Agregátor RSS
Charities remain locked out of CAF Bank online accounts
A week after suspending online banking, CAF Bank still has no timetable for restoring access to its 14,000 UK charity customers. The bank updated customers on Thursday about the outage, which has disrupted payments to staff and suppliers. Little had changed. In a message seen by The Register, CAF Bank said it was not yet able to restore the service safely. As it had earlier in the week, the bank said it detected attempted fraud on some accounts and acted quickly to stop it. Its investigation uncovered a previously unknown vulnerability in the connection between its systems and third-party software. CAF Bank said its technical team was working around the clock with suppliers and external experts on a fix. The Register understands that no timetable has been set for restoring online banking. Earlier this week, CAF Bank CEO Alison Taylor apologized for the disruption. "The core bank is not affected. We are acutely aware of the impact this has on our customers and want this to be fixed as soon as possible, but we cannot restore access to the online service until we are assured the issue is safely resolved," she said. Since The Register first reported the story earlier this week, the BBC has spoken to charities struggling to make essential payments, including payroll. Kevan Hodges, chief executive of Down's syndrome charity 21 Together, told the BBC the outage was "appalling." "People are concerned that wages won't get paid because of this, and that's just stressful when they have bills to pay. My team have wasted days trying to get through to [CAF Bank], but all in vain," he said. Bali Rodgers, chief executive of Safer Communities Alliance, told the BBC the grassroots organizations it represents were slowly losing trust in the bank. CAF Bank also came under fire last year after the introduction of a new banking platform left customers unable to log in or make transactions. The bank later apologized but has not disclosed how much it spent on the system. CAF Bank held £1.45 billion ($1.93 billion) in customer deposits at the end of its 2024/25 financial year. ®
Kategorie: Viry a Červi
Američané mají nové autíčko na dálkové ovládání. Autonomous Volcano rozprskne 960 protitankových min (video)
Minová pole jsou i ve 21. století klíčovým prvkem vojenské strategie a situace na Ukrajině to jen potvrzuje. Oproti předchozím konfliktům však do hry nově vstoupily drony, které mohou zničit minovací vůz i s posádkou.
Rozprskne miny a vytoří kilometrovou zónu smrti
Americká armáda proto úspěšně ...
Kategorie: IT News
Na Slovensku hrozí kroucení kolejí a klesá Dunaj. Stanice ve Štúrovu už dokonce měří záporné hodnoty
Zatímco v Česku dnes vrcholí další horká vlna, během které by teploty mohly opět atakovat čtyřicítku, na Slovensku raději už před týdnem preventivně zpomalili vlaky.
Tamní obdoba Správy železnic – Železnice Slovenskej republiky (ŽSR) – minulý víkend ve vybraných okresech snížila traťovou rychlost ...
Kategorie: IT News
Důchodci mohou od srpna ukončit penzijko bez sankce. Nabývá účinnost zákona
Od 1. srpna 2026 začínají platit nová pravidla pro důchodce, kteří po zrušení státních příspěvků zůstali „uzamčeni“ v penzijním spoření. Pokud se vás změna týká, můžete penzijko ukončit bez sankce, i když jste ještě nesplnili minimální dobu spoření. A pokud jste ho už dříve předčasně ukončili a přišli kvůli tomu o státní příspěvky nebo dokonce o vlastní vklady, můžete požádat o jejich vrácení.
Kategorie: IT News
Why Python Is the Right Language for Linux Security Automation
Linux administrators automate almost everything. Backups run on a schedule, logs rotate on their own, updates ship through pipelines, and health checks happen without anyone opening a terminal.
Kategorie: Hacking & Security
Three Recent Chrome Releases Fix 1,442 Flaws, More Than Prior 23 Updates Combined
Google on Thursday announced that it fixed a whopping 1,072 security bugs in Chrome versions 149 and 150, surpassing the total number of flaws the company fixed across the prior 23 milestones combined.
Both versions were released last month. In its latest patch for Chrome 151, released Wednesday, the tech giant resolved 370 flaws, out of which 349 were reported by Google itself. Seven of the
Kategorie: Hacking & Security
Three Recent Chrome Releases Fix 1,442 Flaws, More Than Prior 23 Updates Combined
Google on Thursday announced that it fixed a whopping 1,072 security bugs in Chrome versions 149 and 150, surpassing the total number of flaws the company fixed across the prior 23 milestones combined.
Both versions were released last month. In its latest patch for Chrome 151, released Wednesday, the tech giant resolved 370 flaws, out of which 349 were reported by Google itself. Seven of the Ravie Lakshmananhttp://www.blogger.com/profile/[email protected]
Kategorie: Hacking & Security
Anthropic při testování pustil své modely na skutečný internet. Claude napadl tři existující firmy
Poté, co OpenAI přiznalo, že jeho AI při testech hackla známý web, přichází s podobnou zkušeností také Anthropic. Popisuje hned tři takové případy z posledních měsíců.
Tři incidenty ve 141 tisících evaluačních běhů je sice směšně malý poměr, ale důsledky se nedají jen tak přejít. Modely Claude se ...
Kategorie: IT News
From Beginner to Pro: How Your Linux Setup Should Evolve as a Developer
Your operating system forms the base layer of your production pipeline. Moving from a basic workstation layout to an enterprise environment takes deliberate work around security hardening, telemetry, and automated provisioning.
Kategorie: Hacking & Security
Shadowfetch Linux, nová distribuce s důrazem na lokální umělou inteligenci
Představena byla nová linuxová distribuce Shadowfetch Linux. Na rozdíl od mnoha nováčků, které nabízejí převážně jiné téma a výběr softwaru, tato distribuce založená na Debianu Testing s desktopovým prostředím KDE Plasma 6.6, klade lokálně běžící umělou inteligenci do centra svého desktopového zážitku.
Kategorie: GNU/Linux & BSD
Researchers Report 84 Flaws in 4G and 5G Cores, Including a Session Hijacking Flaw
An academic study has disclosed a "widespread class" of security vulnerabilities impacting 4G and 5G core networks that, if successfully exploited, could trigger denial-of-service (DoS) attacks and even session hijacking, allowing an attacker to seize control of a user's network session.
The findings have been released by a group of researchers from Singapore's Nanyang Technological University
Kategorie: Hacking & Security
Researchers Report 84 Flaws in 4G and 5G Cores, Including a Session Hijacking Flaw
An academic study has disclosed a "widespread class" of security vulnerabilities impacting 4G and 5G core networks that, if successfully exploited, could trigger denial-of-service (DoS) attacks and even session hijacking, allowing an attacker to seize control of a user's network session.
The findings have been released by a group of researchers from Singapore's Nanyang Technological University Ravie Lakshmananhttp://www.blogger.com/profile/[email protected]
Kategorie: Hacking & Security
Stačí stížnost od Justina Biebera a Apple hned mění iOS. Nejotravnější tlačítko na klávesnici půjde skrýt
Kategorie: IT News
6 Reasons Why Device Code Phishing is the Fastest-Growing Threat of 2026
Device code phishing - the abuse of the OAuth 2.0 device authorization grant to steal access tokens - has evolved from a niche red-team technique to an industrial-scale threat in under six months.
Designed for input-constrained devices like smart TVs, printers, and so on, the device authorization login flow has been adopted by a wide range of apps and use-cases that it wasn't originally
Kategorie: Hacking & Security
6 Reasons Why Device Code Phishing is the Fastest-Growing Threat of 2026
Device code phishing - the abuse of the OAuth 2.0 device authorization grant to steal access tokens - has evolved from a niche red-team technique to an industrial-scale threat in under six months.
Designed for input-constrained devices like smart TVs, printers, and so on, the device authorization login flow has been adopted by a wide range of apps and use-cases that it wasn't originally [email protected]
Kategorie: Hacking & Security
Chinese Hacker Commands DeepSeek via Telegram to Launch Autonomous Attacks
Palo Alto Networks' Unit 42 says a Chinese-speaking threat actor used DeepSeek through the open-source Hermes Agent framework to launch attacks autonomously.
After an initial Telegram instruction, the agent found internet-facing systems and selected public exploits. The researchers recovered no further operator input in the session.
The operator, tracked through the aliases knaithe and KnYuan,
Kategorie: Hacking & Security
Chinese Hacker Commands DeepSeek via Telegram to Launch Autonomous Attacks
Palo Alto Networks' Unit 42 says a Chinese-speaking threat actor used DeepSeek through the open-source Hermes Agent framework to launch attacks autonomously.
After an initial Telegram instruction, the agent found internet-facing systems and selected public exploits. The researchers recovered no further operator input in the session.
The operator, tracked through the aliases knaithe and KnYuan,Swati Khandelwalhttp://www.blogger.com/profile/[email protected]
Kategorie: Hacking & Security
12 top productivity tips for Microsoft Edge
We live and work in browsers. It’s where we spend most of our time — and it’s where we waste most of our time as well. Web browsing is slow, inefficient, and full of time-sapping annoyances.
But it needn’t be that way. You can turn your browser into a lean, mean productivity machine. To do it, just follow these tips for Microsoft Edge in Windows 10 or 11. You’ll learn how to switch between home and work profiles, put idle tabs to sleep to speed up your PC, tap into the power of Microsoft’s Copilot AI assistant, and more.
(Note that these tips are written for the most recently updated version of Edge in Windows 11 25H2 and Windows 10 22H2. Things may be slightly different if you use a different Windows version, and not all of these features are available for Edge on macOS or other platforms.)
So let’s get started — time’s a-wasting, and so is your productivity.
1. Switch between work and personal profilesWith remote and hybrid work models now common, many people use the same device for work and personal use. When it comes to using a web browser, that can quickly become problematic.
Mixing work and personal favorites makes it far more difficult to quickly get to important work websites or personal websites. When you’re working, you don’t want to wade through hundreds of links to family photos, vacation destinations, and YouTube videos of cats befriending parrots when you’re just looking for the OSHA website about mine safety regulations. And when you’re off working hours and want to watch a video of a Persian cat nuzzling a cockatiel, a website detailing the GDPs of every country in Europe and Asia is not your primary destination.
Different profiles let you completely segregate your browser use. That doesn’t just mean different favorites. It also means different Collections, different extensions, different passwords, and more.
Each Edge profile is tied to a different Microsoft account. So to use different profiles, you’ll need to create different Microsoft accounts. To create a new Microsoft account in Windows 10 or 11:
- Go to https://account.microsoft.com. If you’re signed in to your account, click your profile icon or initials in the upper-right corner and select Sign out. Close Edge, restart it, and go back to https://account.microsoft.com/.
- Scroll down to the button that says Create an account, click it, and follow the prompts to create a new account.
- On the page that appears, click the Sign in button in the middle of the page. On the screen that appears, select the Create one! link, then follow the prompts to create a new account.
You’ve now got two different Microsoft accounts you can use for Edge. When you log into one of those accounts in Windows, that will be the default account that Edge will use when you browse the web.
To switch between the two accounts, you’ll need to add that second account to Edge. To do it:
- Click the user profile icon at the top right of Edge. On the small pane that appears, select Set up a new profile, then select either Personal or Work or School.
- You’ll be sent to a web page in a new instance of Edge. Click the Sign in button at the far right, then select Sign in to sync data.
- On the screens that appear, sign in and confirm that you want to proceed.
Once you’ve done that, you don’t have to log out of your current account and then log into the second account to use it in Edge. Instead, when you want to use the second account, click the user profile icon at the top right of the Edge window. A small pane appears with your current profile at the top. To switch to your other profile, select it in the “Other profiles” section.
To minimize distractions, set up work and personal profiles in Edge.
Preston Gralla / Foundry
You’ll now be sent straight to that profile. When you do that, Edge will open in a new window. So you’ll have both your profiles running simultaneously, each with its own tabs, in two separate windows. (Note that you can set up multiple additional profiles.)
You can also tell Edge which profile to use when you visit certain websites. To do it:
- Click the user profile icon in Edge and select Profile settings. (Alternatively, you can click the three-dot icon next to the user profile icon and select Settings > Profiles.)
- In the “Profile settings” area, click Profile preferences.
- At the bottom of the “Automatic profile switching” section on the page that appears, click Add site next to “Custom site switch.”
- On the “Add site” popup, enter a website URL and select the profile you want to switch to for that site.
Should you decide you want to remove a profile, go to Settings > Profiles and scroll to the “More profiles” section. Click the trash can button next to any profile you want to delete. You can always add it again later using the steps above.
2. Get to your most-used sites quicklyBookmarking and organizing favorites is a great way to manage a large collection of websites, but it’s not that useful if you simply want to get to a frequently used site quickly. Edge has some tricks up its sleeve if you want to get your most-used sites pronto.
Add a site to the new tab pageWhen you open a new tab in Edge, a page appears that shows you news and other items you might be interested in. It’s easy to pin a site to this page so it’s accessible whenever you open a new tab.
Look toward the top of the page, just underneath the search box. If you don’t see icons for pinned pages (such as for Yahoo, Amazon, your inbox, and so on), click the settings icon on the upper right of the page (it looks like a gear) and turn “Quick links” on.
A row of site icons appears, along with a + icon. Click the + icon and type or paste in the name and URL of the site you want to pin, then click Add. The site will now appear along with the other pinned pages.
Pinning a site keeps it handy on the new tab page.
Preston Gralla / Foundry
You can rename or remove any site pinned to the new tab page by clicking the three-dot icon next to the site icon and selecting Rename or Remove from the menu that appears.
The new tab page is tied to your current profile, so you can set up different pinned sites on the new tab page for each of your profiles.
Pin tabs to the top of EdgeFor even faster access to frequently used sites, you can pin them as browser tabs so they appear at the far left of all your other tabs in Edge. When you’re on the site you want to pin as a tab in Edge, right-click its tab and select Pin tab from the menu that appears. The pinned tab will now appear to the left of all your open tabs.
The icon for the pinned tab looks smaller than all of your other tabs, and it will persist even after you shut down and restart Edge. If you have multiple pinned tabs, all of them will appear to the left of any non-pinned tabs.
Like pinned sites on new tab page, your pinned tabs are unique to each Edge profile; they won’t carry over from profile to profile.
Pin sites you often visit to the Windows taskbarFor Windows users, the fastest way to access a frequently used site is to pin it to the Windows taskbar. That means it’s always visible (even when Edge isn’t running), and you can launch it with a single click.
When you’re on the site you want to pin, select the three-dot icon at the top right of the browser window and select More tools > Pin to taskbar. A small screen appears with a text box in it with the name of the site. Use the name provided or type a new name into the text box and click Pin.
3. Create tab groups for more efficient browsingIf you’re like lots of people, you frequently browse with many tabs open, and find yourself wasting time switching to the tab you want because of all of the clutter.
There’s a simple fix: group tabs into categories so you can quickly switch to the tab group that has the tab you want. For example, you might group them into “News,” “Museums,” “Finance,” and so on. Or you could create a tab group for research related to a specific project.
To do it, right-click a tab, select Add tab to new group, and then name the tab group. You can then drag other tabs into the group. You can also assign each tab group a unique color so they’re easy to differentiate at a glance.
Creating tab groups makes it easier to find the tab you want quickly.
Preston Gralla / Foundry
If you’ve already created a group, when you right-click a tab, you’ll see “Add tab to group” rather than “Add tab to new group.” When you click the arrow next to it, you’ll see a list of all your existing groups, so you can easily add it to any of them. You’ll also see “New group,” which will let you create and customize a new group.
Once you’ve created a tab group, you can rename it, change its assigned color, add new tabs to it, ungroup the tabs from it, delete the group and all the tabs in it, and more. Just right-click the name of any group and select an option from the menu that appears.
4. Enlist a Copilot as you browseMicrosoft’s genAI chatbot, Copilot, has become increasingly integrated with Edge, so much so that Microsoft now calls Edge an “AI browser.” At the moment, that’s more hype than fact, but it is true that Edge gets new Copilot features added on a regular basis.
Edge provides a couple of ways to interact with Copilot, one of which is to open the Copilot sidebar to the right of the main browser window. (We’ll go over the other method later in the story.) Click the Copilot icon at the top right of Edge, and the Copilot pane appears. Here’s where you type in prompts for Copilot.
There’s a tremendous amount you can do with Copilot, most of which is beyond the scope of this article. To learn more about what it can do and how to use it, see our story “9 ways to use Copilot right.”
However, here’s one use designed specifically for web browsing: summarizing the contents of the page you’re currently visiting. Depending on the structure and content of the page, Copilot can give a high-level overview of the entire page, provide capsule descriptions of individual articles or sections, and more. You can also ask Copilot to extract specific information from a page, such as all the AI-related information on it, and organize the information into a bulleted digest.
To do all that, open a web page and open the Copilot sidebar. You’ll see a few suggested prompts, one of which should be related to summarizing the page, such as Summarize the main points on this page or Create a summary of this page. Click the prompt, or if you don’t see it, type it into the text box at the bottom of the Copilot pane.
Use Copilot to summarize the content on a web page.
Preston Gralla / Foundry
You can also ask it to summarize the last page you’ve visited. Click the down arrows towards the bottom of the Copilot pane, and you’ll see a listing for the previous page you’ve visited, such as Computerworld.com. Click the text summarize my recent activity on [page] and it will do that for you. Again, if you don’t see that text, type it into the Copilot text box.
The summarization feature, though, still has rough edges, or at least it did when I was writing this article. If you leave the web page you’re currently on and go to a new one, the summary of the old page remains, and there isn’t an immediate way to summarize the new one. To get a summary of the new page, you’ll have to scroll to the bottom of the Copilot pane, click the arrow (it will be facing either up or down, depending on whether you’ve previously clicked it) and click “Create a summary of this page.”
In that section, you can also click listings of your other open tabs and get summaries of any of them.
5. Remove clutter when you launch new tabsWhen you create a new tab, the initial page is filled with pinned sites, suggested news stories, widgets, and more. If you find that page distracting, you can change it to a much cleaner, more stripped-down page.
If you haven’t pinned specific sites to the row of icons below the search box (see tip #2 above), you can make Edge’s default icons go away: Click the gear icon on the upper right of the page, and a “Page settings” panel pops up. In the “Quick links & search” section, click the dropdown next to “Quick links” and select Off. That gets rid of the icons for web sites just beneath the search box.
If you have pinned your own preferred sites there, you’ll want to leave quick links enabled, but you can turn the “Show sponsored links” toggle to Off to get rid of ads.
To get rid of the news articles that overwhelm the page, go to the “Show content” area of the panel and move the “Show feed” toggle to Off. Or, if you want to really strip down the page, move the “Show content” toggle to Off. That kills pretty much everything on the page except the weather. If you don’t want to see that either, scroll down a bit more and move the “Weather” toggle to Off.
Going with the stripped-down new tab look in Edge.
Preston Gralla / Foundry
You can also strip out the background graphic for the new tab page by turning off the “Background” toggle. I don’t recommend it, though, because when you do that, you’ll get a gray page with a big Microsoft logo dead center when you launch a new tab.
6. Launch Copilot-centered new tabsIf you’re a frequent Copilot user, you might want to take a different approach to the new tab page.
The Copilot you get in a side pane when you click the Copilot icon at the top right of Edge is a somewhat stripped-down version of Microsoft’s full-blown Copilot app. If you’re looking to use the full-fledged version, there’s a simple way to do it: Tell Edge to open Copilot every time you open a new tab.
To do it, click the three-dot icon to the left of the Copilot icon at the top right of Edge and navigate to Settings > Start, home, and new tab page. In the “New tab page” section, turn on the Copilot new tab page toggle. From then on, every time you open a new tab, you’ll launch a full Copilot screen that’s similar to the standalone Copilot app.
The Copilot new tab page puts Copilot chat front and center.
Preston Gralla / Foundry
You’ll see the usual Copilot prompt box front and center, and beneath that, several prompts Microsoft thinks you might want to use. (Note to Microsoft: I’ve never used one of those suggestions even once. I’d guess few other people have either.)
What’s really new here are the vertical icons running down the left side of the page. Here’s a brief rundown of what each one does:
- Open sidebar: Widens the navigation bar and shows a list of your recent chats so you can revisit any of them.
- New chat: Start a new chat with Copilot.
- Library: Build a library of Copilot-created content such as images, reports, podcasts, documents, and more.
- Tasks: Create a Copilot task that automates something you want done, such as sending you a weekly email about a company’s stock price.
- Health: Open Copilot Health, a version of Copilot designed specifically for getting health information.
- Shopping: Use Copilot as a shopping assistant.
- Imagine: Create or edit an image using Copilot.
- Experiments: Discover and use new Copilot features that Microsoft is testing but that may or may not be officially launched at some point.
Clicking the Copilot icon at the top of the list of vertical icons returns you to the main Copilot interface you get when you launch a new tab.
As you can see, many of these new Copilot functions are aimed at consumers and unlikely to be useful in a business setting. Still, if you frequently turn to Copilot for help, you might find the Copilot new tab page a good alternative to the standard new tab page.
And note that setting up the Copilot new tab page doesn’t prevent you from browsing or searching the web normally. Just enter the search term or website you want to visit in the address bar at the top of the screen.
7. Put tabs to sleep to conserve system resources and boost battery lifeIf you’re like most people, you keep multiple tabs open in Edge so you can easily switch among the sites, web apps, and information important to you. It’s a great time-saver.
But it can also be a big memory and processor hog, which can slow down both your browsing and your other computing tasks. It needn’t be that way, though. You can put inactive tabs to “sleep” until you need them, freeing up resources, which will make your PC speedier and make its battery last longer, even when you have multiple tabs open. Microsoft claims that putting inactive tabs to sleep reduces memory use by an average of 32% and CPU use by an average of 37%.
Here’s how to do it:
- In Edge, click the three-dot icon on the upper right of the screen and select Settings > System and Performance > Performance.
- In the “Memory” section, move the slider to On next to Automatically put tabs to sleep.
- To change the length of time it takes to put an inactive tab to sleep, below “Automatically put tabs to sleep” click the drop-down arrow and select a time. Your choice is anywhere from 30 seconds to 12 hours.
Putting tabs to sleep can significantly reduce CPU and memory use.
Preston Gralla / Foundry
To reawaken any tab that’s been put to sleep, simply click on it, and it will resume normal activity.
There’s a chance that some sites might not work properly after they’ve been put to sleep. If that happens to you, you can tell Edge never to put that site to sleep again. To do it, scroll up to the “General” area on the “System and performance / Performance” page of Settings. Click the Add site button next to the “Always keep these sites active” item and paste in the URL of any site you don’t want to sleep.
8. Reduce power use with ‘energy saver’Browsers can be power hogs, especially if you have multiple tabs open and are playing videos or music in them. That can be a particular problem if you’re using a laptop that isn’t plugged into a power source.
In Edge, the “energy saver” setting reduces the amount of system resources the browser uses, which extends your PC’s battery life. If you enable energy saver, it becomes active when your laptop is unplugged. Microsoft claims energy saver can give you on average an extra 25 minutes of battery life. To use it:
- In Edge, click the three-dot icon on the upper right of the screen and select Settings > System and Performance > Performance.
- In the “Power” section, make sure the toggle next to “Enable energy saver” is turned on. When you do that, you see two options: “Balanced” and “Maximum savings.”
- Select Balanced if you want your laptop to go into a lower-power mode to save battery life when your laptop is unplugged or has a low battery. Select Maximum savings if you know you’re not going to be able to plug your laptop in for some time. Note that in this mode, your video quality may be affected.
There’s also a separate option to use energy saver even if your laptop is plugged in. Use this option if you want to consume less energy when you use your computer. Note that if you use it, you may experience slowdowns when browsing the web.
You can get an extra 25 minutes of battery life with the energy saver setting, Microsoft claims.
Preston Gralla / Foundry
9. View and mark up PDFsWith Edge, there’s no need to launch a separate application when you want to read or mark up a PDF; its built-in PDF app is quite good. With it, you can draw on and highlight sections of the PDF and erase the marks you made as well. So save yourself time and use Edge rather than third-party software.
You don’t need to do anything to read a PDF online. Simply click it, and by default it will launch in Edge’s reader. You’ll find the markup tools, including for drawing, highlighting, and erasing, in a toolbar towards the top of the screen. To open a PDF from your hard disk, when you’re in Edge, press Ctrl-O, then navigate to the PDF and click it.
Edge has a surprisingly useful PDF viewer with markup tools.
Preston Gralla / Foundry
If you prefer to use your own PDF reader, even for PDFs found online, you might be annoyed that every time you click a PDF, it opens in Edge’s PDF reader. You can change that, though, by changing your default PDF reader.
In Windows Settings, select Apps > Default Apps and in the search box at the top of the screen just below “Set a default for a file type or link type,” type in .pdf. After you do that, the listing “Microsoft Edge Microsoft Edge PDF document” appears. Click it, and a screen appears showing you all the applications on your PC that can read PDFs. Select the one you want to use instead of Edge.
10. Turn on Edge’s AI-powered ‘scareware’ blockerThe internet is filled with scammers using sophisticated attacks to steal your data or money. A common one is so-called “scareware,” in which when you visit a website, your PC is suddenly locked into full-screen mode filled with fake malware warnings that claim your computer has been infected and urge you to call a phony tech-support line or allow remote access to your device to supposedly fix the problem.
Once you do that, the scammers steal your data, get you to pay for phony solutions, or embed malware on your system.
To fight that, Edge includes an AI-powered scareware blocker that builds and constantly updates a machine-learning model that detects suspicious behavior and stops the scamware in its tracks.
Typically, the scamware detector is turned on, but there’s a possibility it’s been turned off at some point or was never turned on in the first place. For example, on PCs with only 2GB of RAM or fewer than 5 cores, it’s not turned on by default. Microsoft recommends enabling it on those machines. To do it, in Edge go to Settings >Privacy, search, and services > Security, and in the “Scareware blocker” setting, turn the slider from off to on.
When you do that, make sure that “Block sites detected as scams” and “Share detected scam sites with Microsoft Defender SmartScreen” are turned on as well.
Turn on Edge’s scareware blocker to protect yourself from scams and data theft.
Preston Gralla / Foundry
11. Use Edge’s one-click form fillerHow many hours a week do you spend mindlessly filling out web forms — your office or home address, shipping address, email address, and phone number? Wouldn’t it be nice to get that time back?
With autofill, built into Edge, you can. To use it, in Edge go to Settings > Passwords and autofill > Addresses and more. Turn on the toggle next to “Save and autofill addresses.” You can also choose to have Copilot analyze web forms and decide which bits of your information belong in which part of the form.
Microsoft autofill saves information that can be used to fill out forms online.
Preston Gralla / Foundry
From now on, whenever you visit a web form, just click in a text box, and your information will appear in a popup. Select it and the form will fill in. You can go back to Passwords and autofill to change any information you want.
12. Save time with keyboard shortcutsThere’s a good chance you use keyboard shortcuts for some of your office applications, like Word and Excel — and you likely use some for Windows itself.
But when it comes to browsers, many people forgo the keyboard except when absolutely necessary. That’s too bad, because keyboard shortcuts are a big timesaver. So to improve your productivity, check out these keyboard shortcuts for Edge in Windows. (Mac users can generally substitute the Cmd key for Ctrl and the Opt key for Alt.)
For even more shortcuts, see Microsoft’s complete list of keyboard shortcuts for Edge.
Useful keyboard shortcuts in Microsoft Edge Key combinationTaskCtrl-Shift-BShow or hide the favorites barCtrl-DAdd the current site to favoritesAlt-D or Ctrl-LSelect the URL in the Address barCtrl-E or Ctrl-KOpen a search in the Address barCtrl-FFind on the current pageCtrl-RReload the current pageCtrl-HOpen your HistoryCtrl-MMute or unmute volume on the current tabCtrl-NOpen a new windowCtrl-Shift-NOpen a new InPrivate windowAlt-F4 or Ctrl-Shift-WClose the current windowCtrl-TOpen a new tab and switch to itCtrl-WClose the current tabCtrl-TabSwitch to the next tabCtrl-Shift-TabSwitch to the previous tabCtrl-+ (plus symbol)Zoom inCtrl– (hyphen)Zoom outCtrl-PPrint the current pageCtrl-Shift-.Open the Copilot paneThis article was originally published in March 2021 and most recently updated in July 2026.
Kategorie: Hacking & Security
Lidlovská nabíječka si poradí s osmi bateriemi najednou. Teď stojí jen 200 Kč
Lidlovská nabíječka Tronic TAL 1000 B3 zlevnila o 60 % na 200 Kč. • Nabije osm baterií najednou, má displej i funkci refresh. • Poradí si s akumulátory AA, AAA, C, D a 9V.
Kategorie: IT News
Network Anomaly Detection in KATA
Introduction
Once the attacker has breached the corporate network, subsequent stages of the attack often involve leveraging standard domain infrastructure protocols: using Kerberos, running DNS queries, accessing internal services, opening network shares, and other common networking actions. Because this activity is virtually indistinguishable from legitimate network traffic, it is extremely difficult to detect it with traditional network attack detection tools.
Kerberoasting and DNS tunneling have long ceased to be exotic techniques. They are becoming standard methods in modern attacks because they allow attackers to execute critical compromise stages while remaining undetected by traditional security tools. A clear example of this trend is seen in latest campaigns, employing both Kerberoasting and DNS tunneling.
Traditional network security tools perform well when the attack features a distinct and identifiable indicator: a characteristic query string, a known malicious traffic pattern, or the source code of an already discovered exploit. While this approach to threat detection remains effective, it cannot always be applied to discovering network attacks that blend seamlessly with legitimate traffic inside a corporate network.
Instead of searching for explicit indicators of attack, Network Anomaly Detection (NAD) analyzes all traffic for suspicious artifacts that deviate from the host’s typical network activity. Within Kaspersky’s solution portfolio, this technology is implemented specifically in the Kaspersky Anti Targeted Attack (KATA) platform.
The system analyzes network traffic data (DNS, DCE/RPC, Kerberos and other packets) and extracts key parameters used to identify anomalous behavior. This approach enables searching for attacks on domain controllers, signs of traffic tunneling and exfiltration, C2 communications, and other scenarios that may point to compromise of network infrastructure.
However, Network Anomaly Detection is not built on a single, universal set of indicators. Each attack scenario employs tailored detection models that account for the specifics of the corresponding network protocol, typical host behavior, and characteristic deviations from that baseline. This article examines two practical examples – detecting Kerberoasting and DNS tunneling – to demonstrate how these principles are implemented in KATA’s NAD rules and why this approach proves more effective than traditional signature-based analysis.
Kerberoasting attack detection by KATA Why standard tools have a hard time detecting KerberoastingThe Kerberoasting attack leverages the standard operational logic of the Kerberos protocol. The attacker identifies service accounts configured with a Service Principal Name (SPN), requests a Ticket-Granting Service (TGS) ticket for them, and attempts to crack the password offline using a dictionary attack against the retrieved ticket. If the password is weak or hasn’t been changed in a long time, the adversary can bruteforce it to get it in cleartext. Subsequently, these compromised credentials can be leveraged for both vertical and horizontal movement across the network.
The essence of a Kerberoasting attack is that an adversary possessing a compromised low-privileged account and a valid Ticket-Granting Ticket (TGT) for that account can request TGS tickets with weakened encryption for service accounts with SPNs. Crucially, it doesn’t matter whether the compromised account actually holds access permissions for those services. Having obtained these tickets, the attacker can then take them offline and bruteforce the service account’s password by trying to decrypt the corresponding ticket locally, without generating any network activity. As the encryption key is based on the password hash, the adversary can guess the password upon finding the correct key.
The attacker’s objective is to find a service account that has a simple password. Most likely, this will be an account created manually by the administrators of the infrastructure or a service. This is precisely why attackers are not interested in system service accounts with SPNs (such as CIFS/fileserver.company.local); these are generated automatically and feature highly complex passwords that are impossible to bruteforce.
We should note that the TGS ticket requests made by attackers are identical to standard, legitimate requests. Every domain naturally exhibits a high volume of Kerberos traffic. Therein lies the primary challenge of detecting Kerberoasting: legitimate service ticket requests (TGS-REQ) are indistinguishable from those issued by attackers. Consequently, the primary detection method relies on correlating indirect indicators rather than signature matching. Key indicators include an anomalous request source (atypical host or user account), a surge in requested SPNs within a short time window, attempts to obtain service tickets for sensitive or privileged service accounts, and off-hour timing or unusual request volume when benchmarked against the historical profile of both the user and the host.
Most of these indicators can be detected using NAD technology, which helps analysts cut through high volumes of Kerberos traffic to establish a concrete hypothesis: who initiated the Kerberoasting attack, which service accounts are at risk, and why this activity deviates from the baseline.
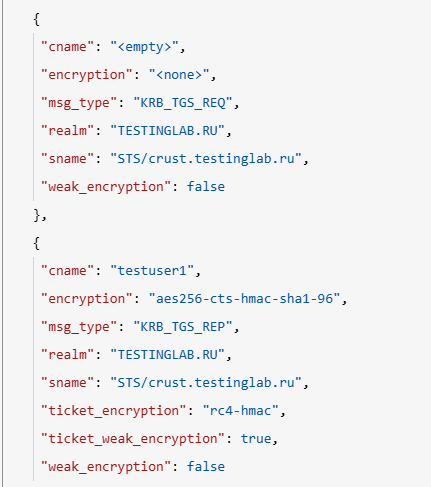
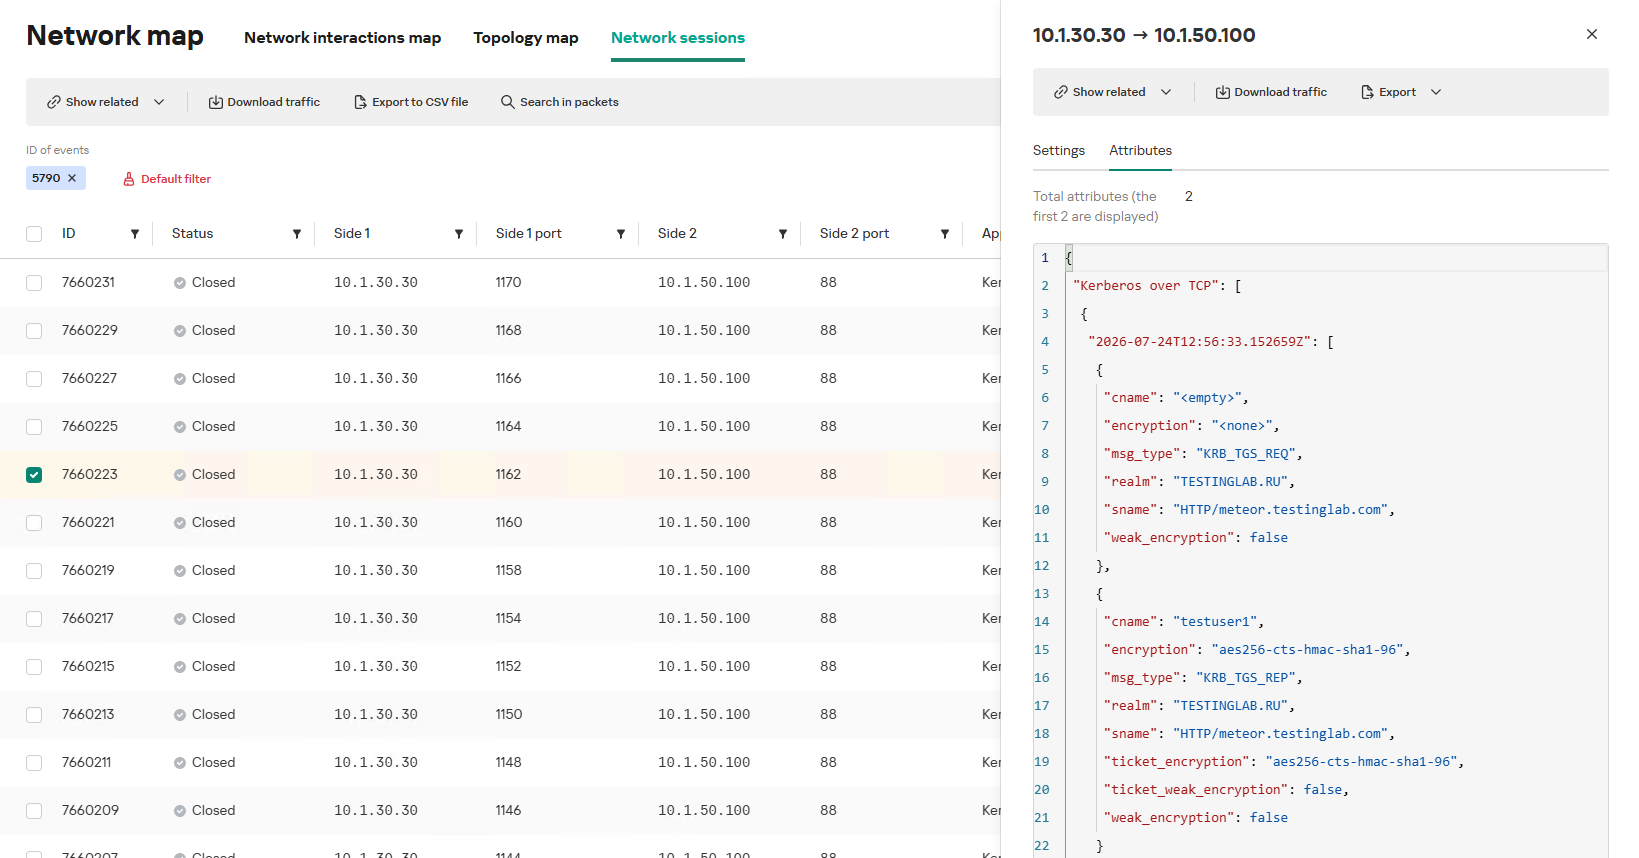
In the context of this attack, the network anomaly stems from a single host – likely using a single user account (cname) – receiving TGS tickets ("msg_type": "KRB_TGS_REP") for numerous unique services with SPNs (sname) within a short timeframe. These service accounts are non-system accounts.
Example of a TGS-REQ – TGS-REP event pair from network session attributes
To detect this anomaly, the NAD rule titled “Signs of a Kerberoasting attack” implements the following logic:
- From Kerberos network sessions during the search depth period, select only those with a successful Kerberos TGS-REP response, subject to the following conditions:
- The IP address that initiated the session must not be excluded in the excl_sip variable.
- The requesting client name (cname) must not be included in the excluded users list (excl_users variable).
- The SPN (sname) must not be excluded within the rule. System SPNs are omitted from detection logic because they exist across most corporate environments and hold no interest for adversaries in this attack vector; including them in the total count of unique SPNs could lead to predefined threshold being exceeded, triggering false positives.
- Extract the cname (the name of the client requesting the TGS-REQ) and sname (SPN itself) from these qualifying sessions.
- Group the sessions by the source IP address and client account name (cname), while aggregating sessions with unique SPNs.
- Generate an alert if a single IP address using a single client account receives TGS-REP responses for N unique SPN names within the specified search depth window, where N equals or exceeds the threshold variable count_spns.
- Within the event regeneration window, group under the initial alert all subsequent alerts associated with the same client IP address. This avoids creating duplicate event records by incrementing the aggregation counter (Total appearances).
We should note that this type of logic cannot be implemented using IDS signatures. Consider creating a Suricata rule designed to detect Kerberos TGS-REP packets. To minimize false positives, we’ll exclude system SPNs (which carry highly complex passwords) and apply a threshold for the number of responses a single client can receive. However, such a rule cannot evaluate the uniqueness of the requested SPNs; it can only track packet counts. As a result, this signature would produce a high volume of false positives because any domain naturally generates large amounts of identical legitimate TGS-REP messages.
Furthermore, adding exclusions and tuning thresholds to fit your specific infrastructure environments is significantly more practical when managed through user variables in the interface rather than directly modifying the underlying structure of the IDS rule itself.
Creating a Network Anomaly Detection ruleNetwork Anomaly Detection (NAD) rules are written as SQL queries executed against KATA’s ClickHouse database. Below, we demonstrate how to add and deploy a rule.
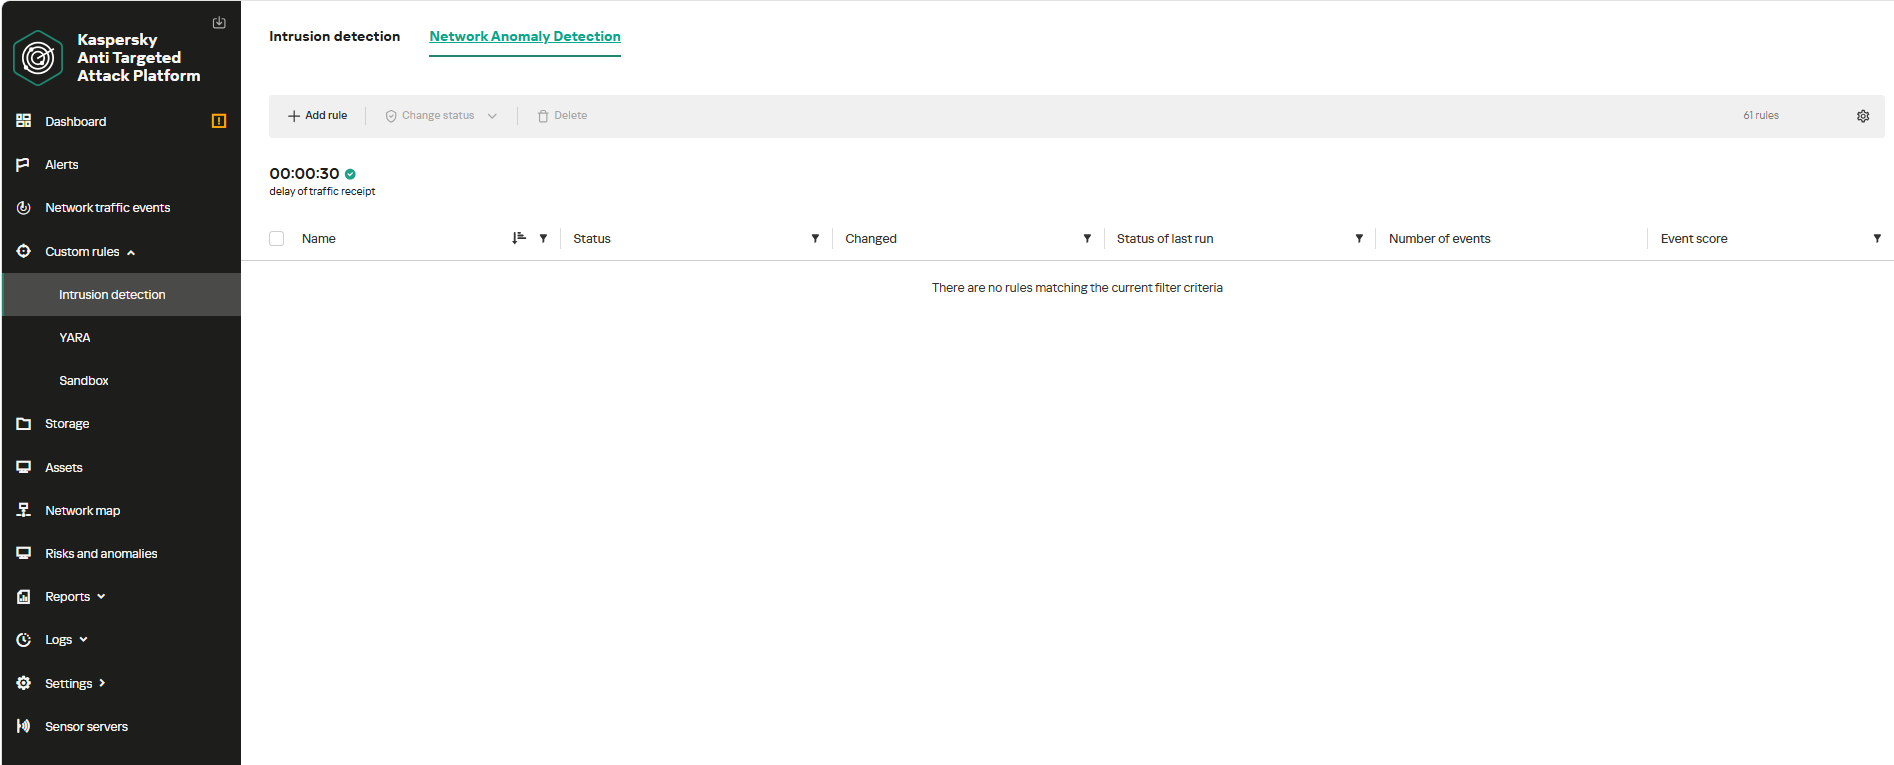
To begin working with NAD rules, navigate to the “Custom rules” section of the interface and select “Intrusion detection”. Under the “Network Anomaly Detection” tab, you can create a new rule.
The Network Anomaly Detection page UI
When adding a new rule, an analyst can select an appropriate rule template from the prebuilt set supplied with product updates. They can also manually modify the rule added from the template (converting it to a custom rule while keeping the original template intact) or author a rule from scratch using the provided guide.
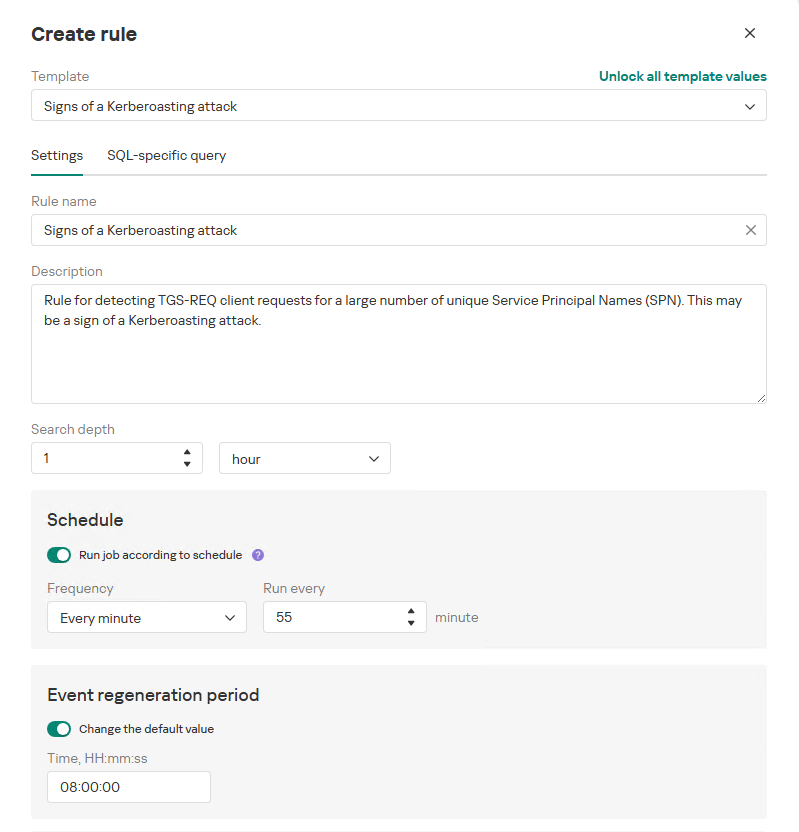
Upon selecting a template, the analyst can review the rule description and either adjust or leave the default values for the following settings:
- Search depth (the lookback window over which the SQL query will run)
- Schedule (the execution frequency for running the query against the specified search depth)
- Event regeneration period (the timeframe during which identical alerts will be aggregated into a single record rather than displayed as distinct events)
UI for creating a new NAD rule
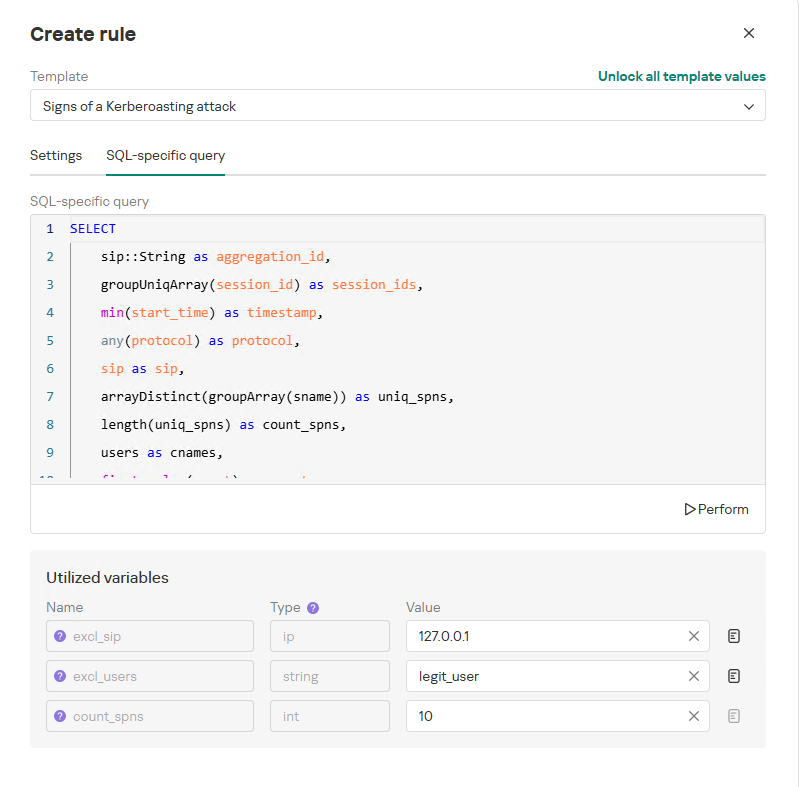
To ensure the rule functions correctly, we recommend navigating to the “SQL-specific query” tab before deployment to review the variables used within the rule – a description for each variable is available by hovering over the question mark icon.
The variables are lists of IP addresses, dates, strings or numeric values that define the network infrastructure – such as domain controllers, DNS servers, time ranges, critical segments, and other entities. This allows you to tailor each rule to different network environments and incorporate specific infrastructure characteristics without modifying the underlying logic.
In our example, using variables allows you to adjust the “Signs of a Kerberoasting attack” rule as follows without altering the underlying SQL query:
- Exclude the source IP address of the TGS-REQ requests from the scope of detection logic (you can specify a single address, a subnet mask, or a dictionary containing addresses and subnets) as well as the requesting client account (accepts a single value or a dictionary with multiple values).
- Adjust the threshold value required to trigger an alert based on the number of unique SPNs in the TGS-REQ messages.
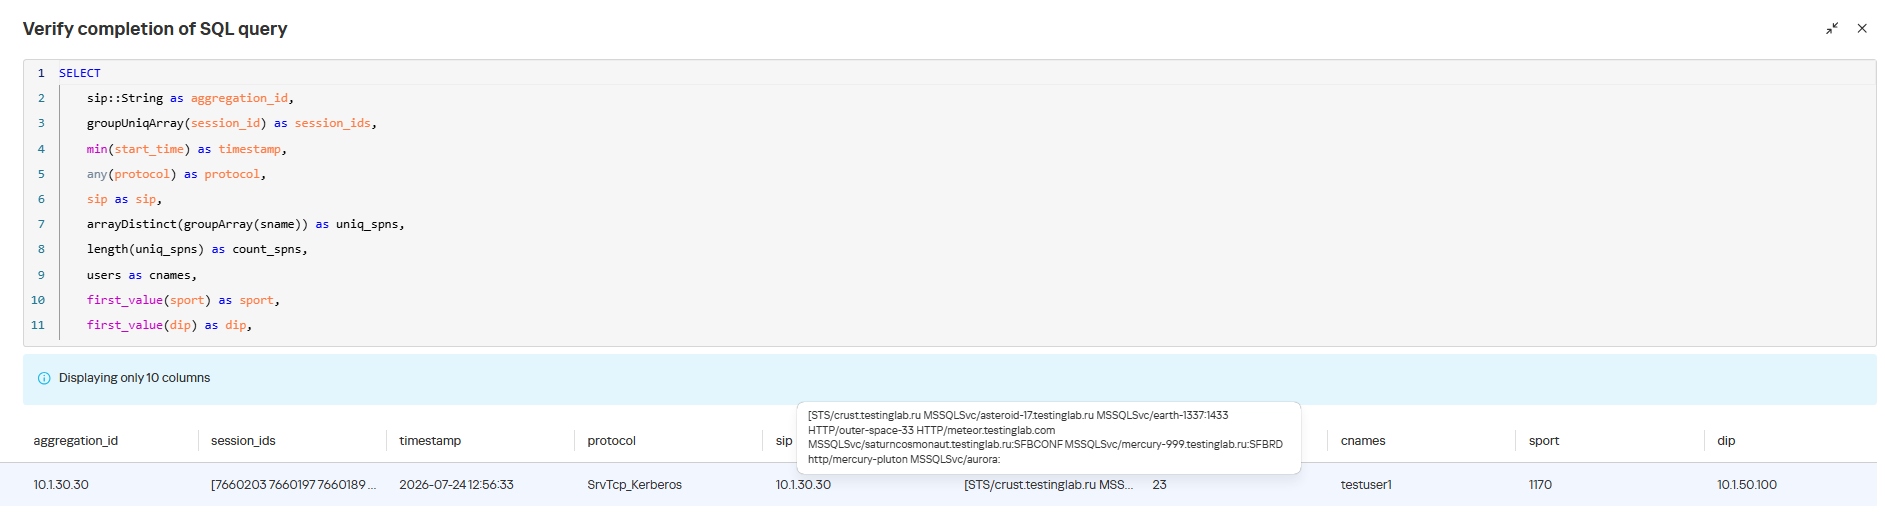
Query contents and variables used in the new rule
On this same page, you can test if the rule is functional prior to saving it.
Rule execution test results
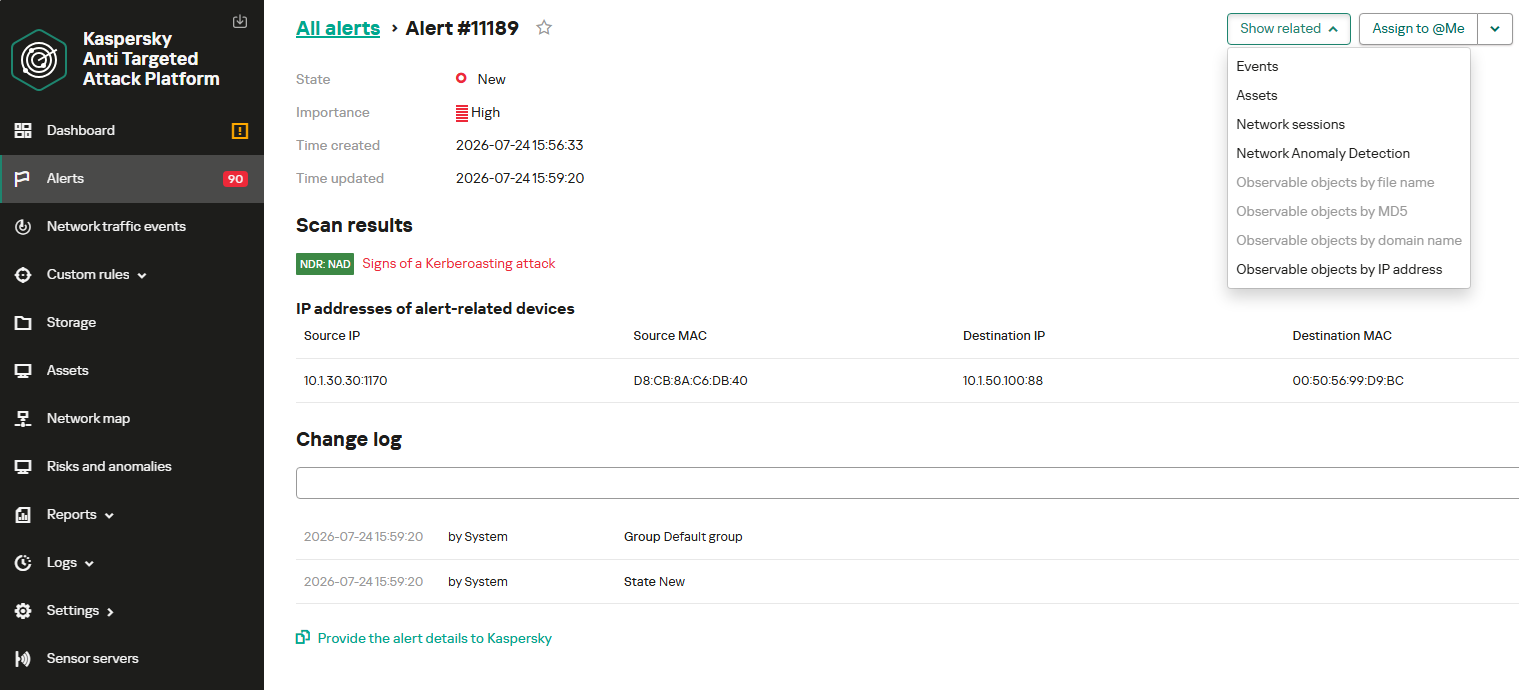
When this rule triggers, an NDR:NAD alert is generated. In the alert card, the analyst can review basic information: IP addresses, ports, and participating network endpoints.
Alert card for the NAD rule
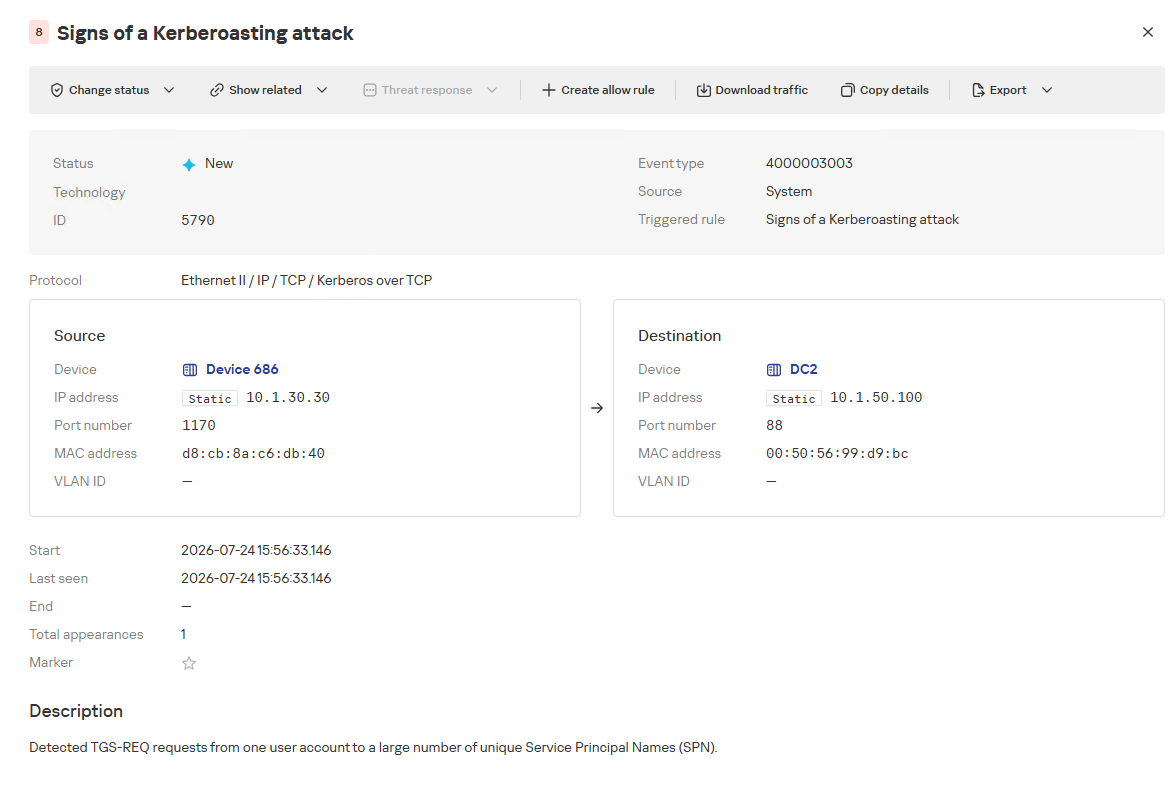
From there, the analyst can navigate to the associated event, which provides a detailed breakdown of the anomaly alongside links to the affected hosts.
NAD rule triggering event
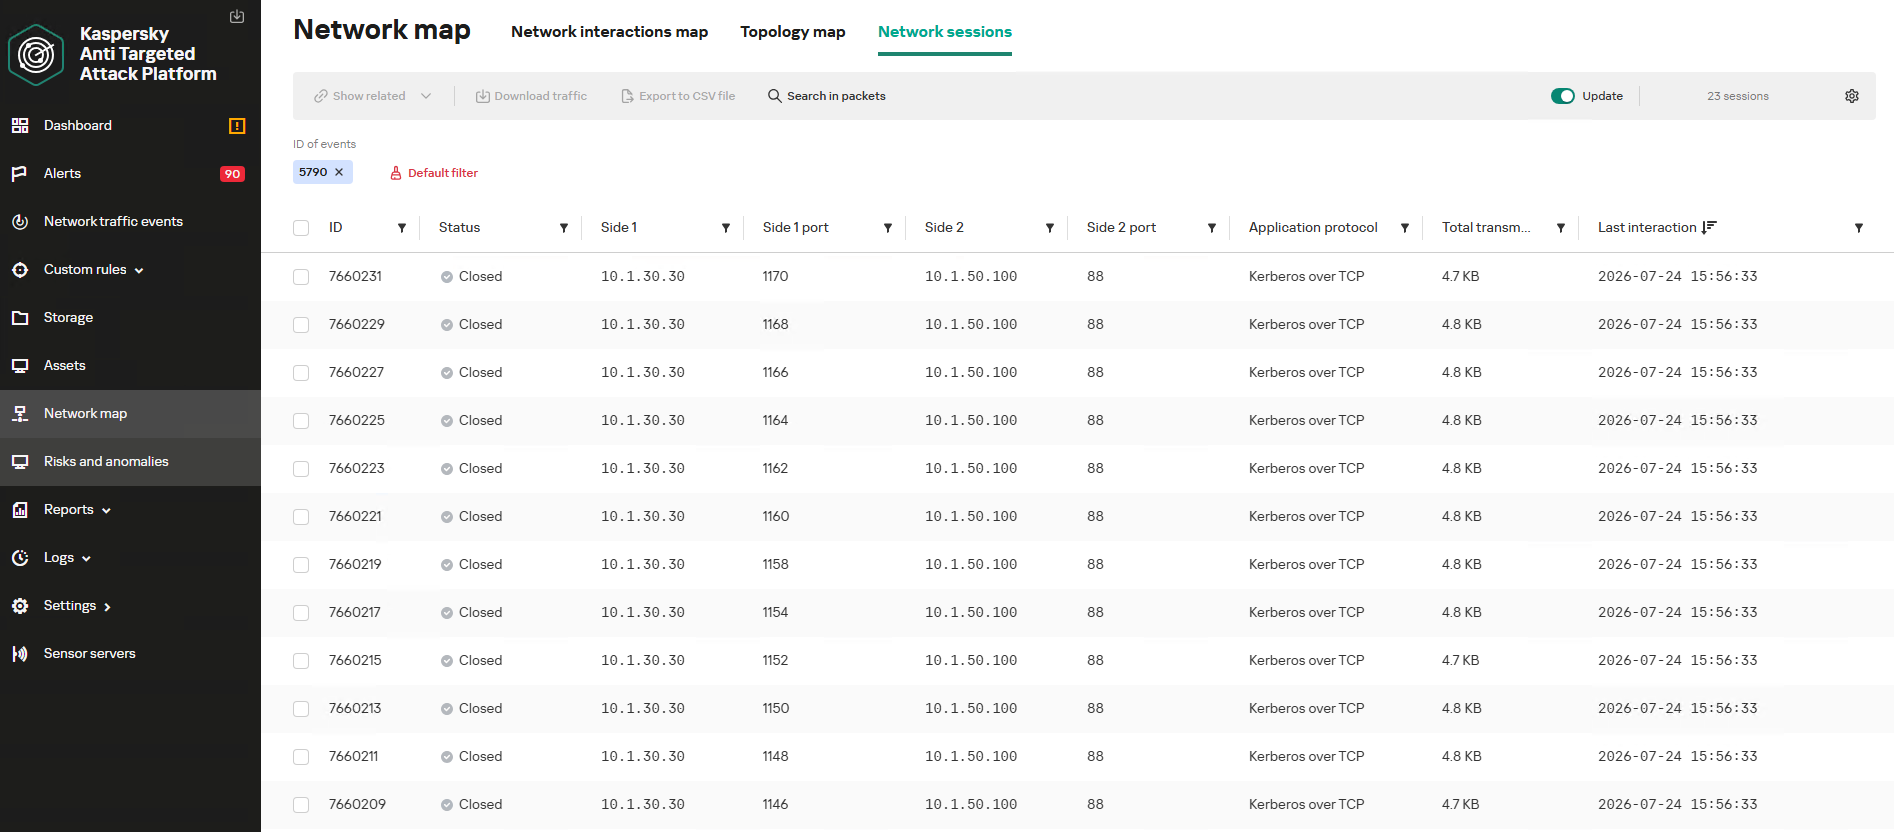
If needed, the analyst can view and export the network sessions associated with the alert. These sessions can be accessed directly from the alert or within the event card via the “Show related” drop-down list.
Network sessions that triggered the rule
Within an individual session, the analyst can inspect standard details including interacting parties, data volume sent and received, and other fields and metrics. On the “Attributes” tab, the analyst can review the specific events recorded within that session.
Network session attributes
Detecting DNS tunneling in KATA How DNS tunnels workDNS tunneling is a technique used to transmit data or control malware through firewalls by encoding information within DNS protocol requests and responses. Instead of performing standard name resolution, an infected host transmits data encoded within subdomain strings and receives response data via DNS records. This covert channel can be leveraged for C2 communication, bypassing network restrictions, or data exfiltration.
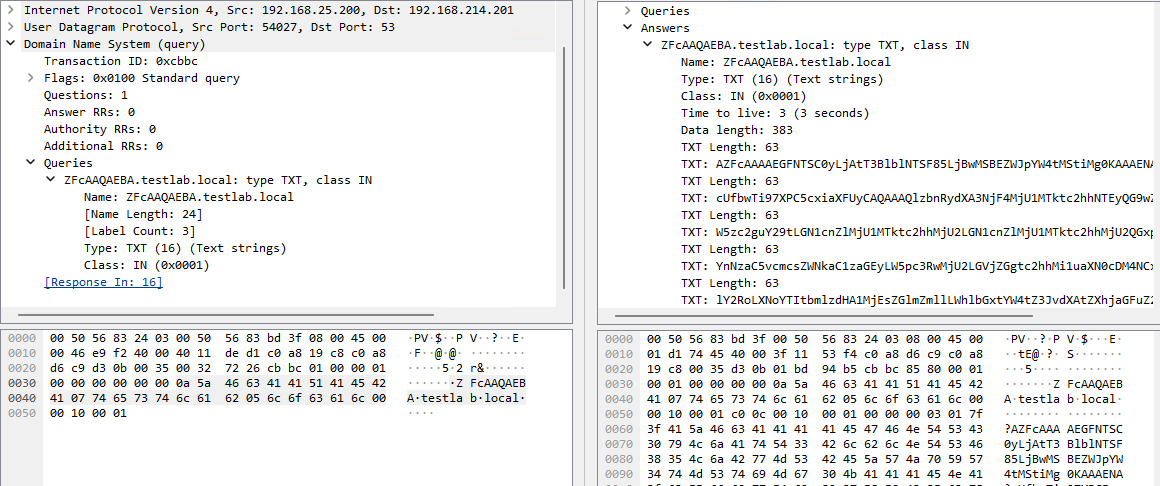
One method of implementing DNS tunneling involves utilizing TXT records. In this scenario, the client issues DNS TXT record queries for domain names where the right-hand portion of the domain name (the higher-level domains) remains static, while the left-hand portion (the lowest-level subdomain) carries encoded or encrypted data sent from the client to the server. Under this structure, a sample domain name might look like ZFcABQAIBA[.]testlab[.]local, where testlab[.]local serves as the static right-hand portion and ZFcABQAIBA represents the variable left-hand string containing the data transmitted by the client.
In response to these queries, the server delivers commands or messages inside the data field of the TXT response. Because the right-hand portion of the domain name remains static, all client queries are consistently routed to the same C2 server, even if the intermediate DNS resolvers targeted by the client change.
DNS query (left) and corresponding response (right) during DNS tunneling via TXT records
It is rather challenging to identify this malicious activity within DNS traffic without generating false positives. DNS traffic is permitted across almost all corporate networks, long domain names occur routinely in both internal and external environments, and TXT records are frequently leveraged for legitimate operational purposes.
Suspicion is established through a combination of indicators: a high volume of long, seemingly random subdomains associated with a single top-level domain, high request frequency, an unusually large number of unique names, non-standard record types, and significant data transfer volumes within a single DNS session.
By analyzing DNS traffic for threat detection, we identified three primary fields of interest:
- Requested DNS name
- DNS record type
- TXT data field within the response
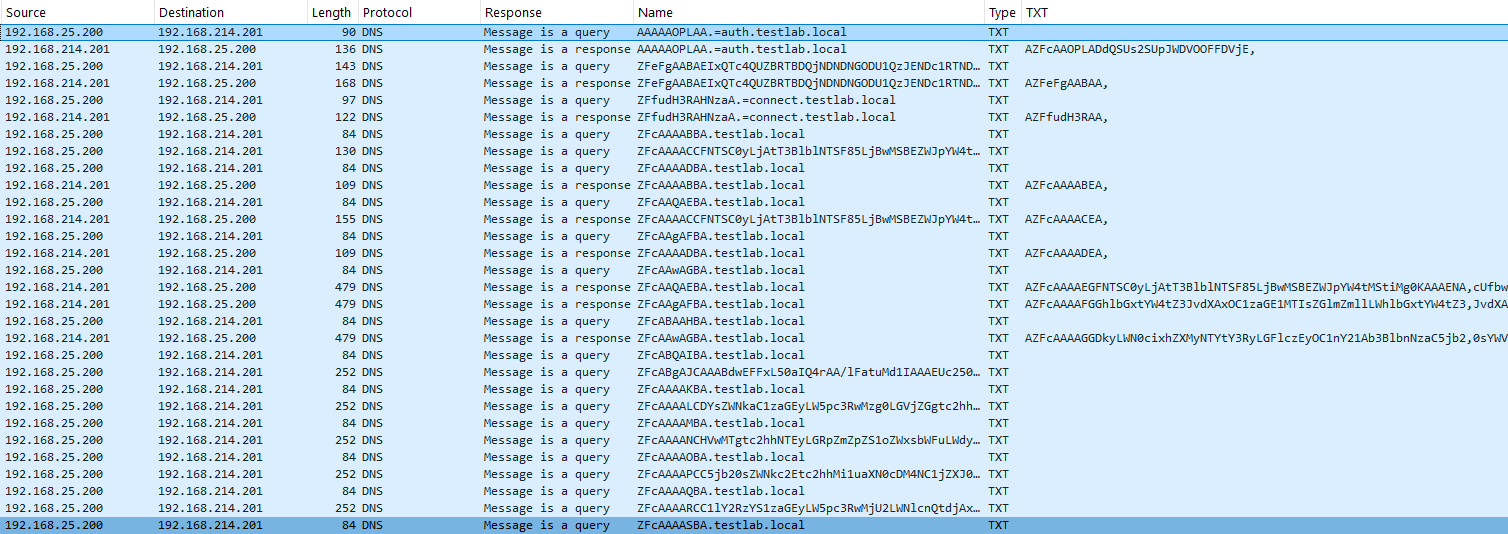
As shown in the image above, all of these fields are present in the DNS response. In a real-world scenario, a tunnel of this nature will transmit a volume of data that is abnormally large compared to standard DNS traffic.
Data exchange within a DNS tunnel
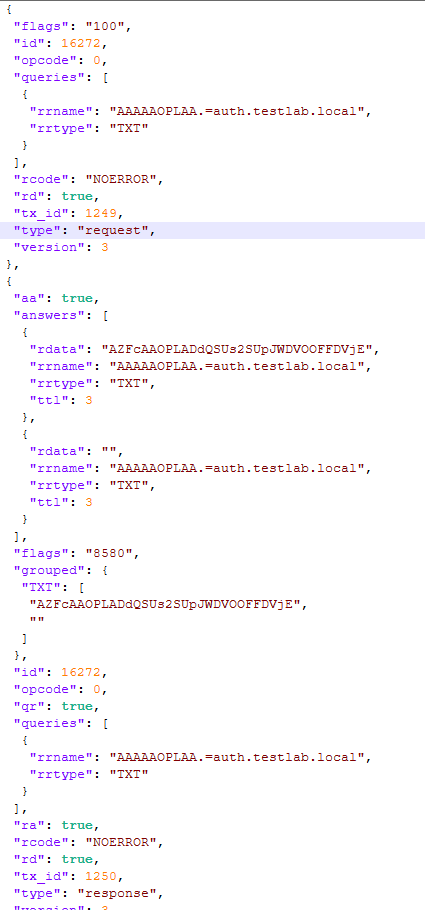
Thus, in the context of DNS tunneling, a network anomaly occurs when 1) a single query source host sends data embedded in the variable left-hand portion of domain names (rrname) while 2) maintaining a static right-hand portion (rrname) and 3) receives DNS server responses containing TXT records (rtype) with varying data (rdata), while 4) the total volume of data transmitted in the left-hand portion of the requested domain name together with the TXT data response (rdata + rrname) exceeds a predefined threshold.
Request and response events from DNS session attributes
When detecting DNS tunneling, the following nuances must be considered:
- A single tunnel will not be constrained to a single DNS session; data may be transmitted across multiple sessions with the DNS server, or each individual request may occur within a separate session.
- A client DNS query can contain more than one requested domain name.
- A DNS response can contain multiple TXT records, as well as a large volume of various non-TXT record types.
- Traffic between DNS servers must be excluded, as it duplicates client requests and can trigger false positives.
- Although the factors outlined above (an abnormally large or frequently changing left-hand subdomain alongside a static right-hand domain, or an unusually long string in a TXT record) serve as key indicators of DNS tunneling, they can also occur within legitimate network traffic.
These challenges create a high likelihood of false positives when detecting DNS tunneling, particularly when using IDS-based tools. Writing an accurate IDS rule for this type of activity is practically impossible. With rare exceptions, DNS tunneling tools possess static markers that can be leveraged for signature-based detection. However, in the absence of such markers, signature methods fail to deliver high detection accuracy without generating an overwhelming number of false positives. In these cases, a comprehensive approach combining multiple correlated indicators is essential to improve overall detection quality.
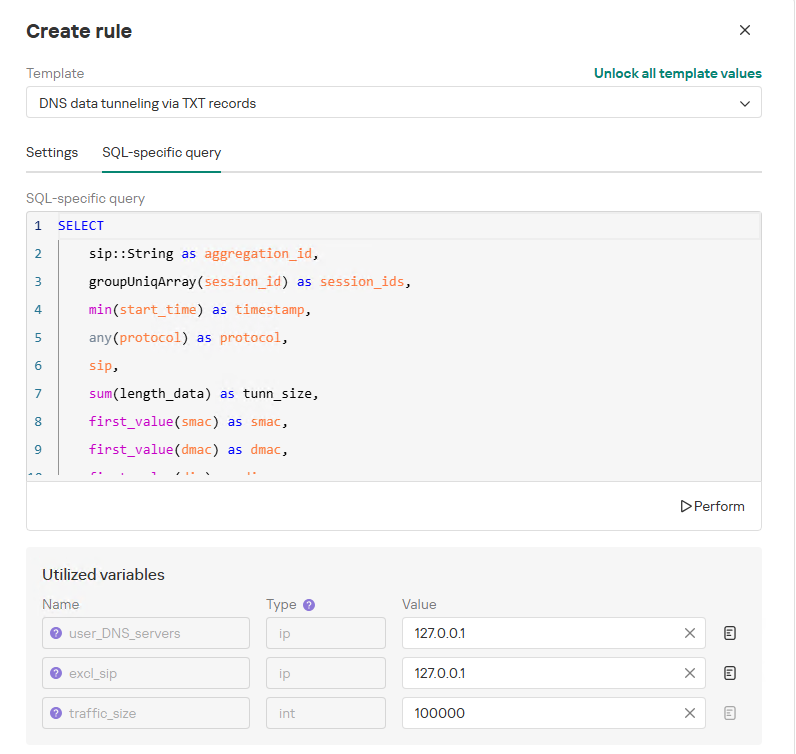
DNS tunneling detection logicTo add a rule for detecting this anomaly, you can use the prebuilt “DNS data tunneling via TXT records” template in the new rule creation interface. The “SQL-specific query” tab will display the list of variables used:
- user_DNS_servers: a list of internal DNS server addresses within the infrastructure, required for the rule to function correctly and minimize potential false positives
- excl_sip: IP addresses to be excluded from the scope of the rule (you can specify a single address, a subnet mask, or a list containing both addresses and subnets)
- traffic_size: the threshold value for the total volume of data (in bytes) transmitted through the tunnel
Variables used in the “DNS data tunneling via TXT records” rule
The detection logic for this network anomaly is structured as follows:
- From network sessions using the DNS protocol within the timeframe defined by the rule’s search depth, select only those sessions containing at least one TXT response.
Additionally:- The IP address that initiated the session must not be excluded in the excl_sip variable.
- The source IP address that initiated the session must not belong to the internal DNS servers listed in the user_DNS_servers variable.
- The DNS names requested by the client must not be excluded within the rule.
- Split qualifying DNS sessions into individual log lines, each corresponding to an individual request or response. Retain only DNS responses containing TXT data.
- Extract DNS names and their associated TXT data from these DNS responses. Retain only unique values.
- Group all resulting records by the session’s source IP address, aggregating all unique DNS names and TXT data blocks.
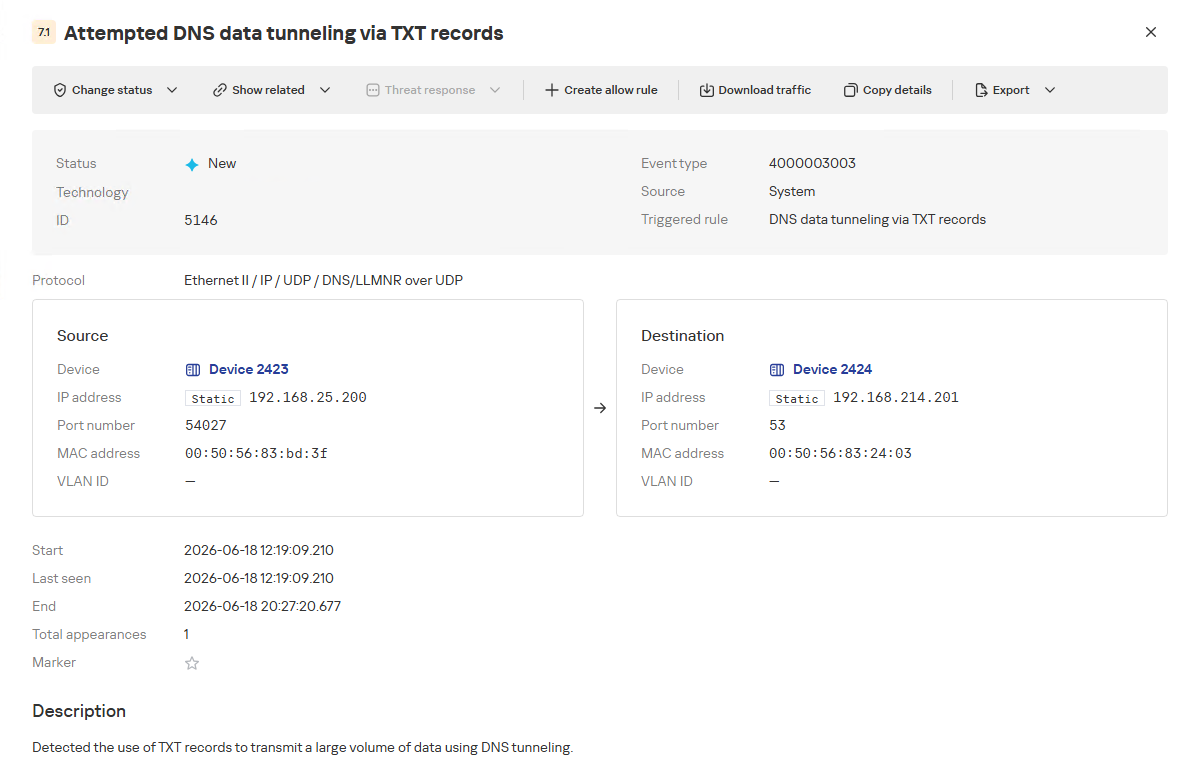
- Generate an alert if the combined size (in bytes) of the unique DNS names and TXT response data for a single IP address within the search depth window exceeds the specified threshold (the traffic_size parameter).
- Within the event regeneration window, group under the initial alert all subsequent alerts associated with the same client IP address. This avoids creating duplicate event records by incrementing the aggregation counter (Total appearances).
“DNS data tunneling via TXT records” rule triggering event
The primary value of NAD technology in this scenario lies in noise reduction – by minimizing false positives – and faster investigation times. A DNS tunnel rarely presents itself as a single, blatantly malicious request. Instead, it leaves behind a behavioral footprint: repetition, length, domain structure, unusual record types, numerous subdomains branching off an unchanging root domain, and anomalous host behavior. KATA consolidates these indicators into a single alert, presenting the analyst with an actionable attack hypothesis rather than a set of fragmented DNS events.
Prebuilt rules for detecting network anomalies in KATAKATA users should note that Network Anomaly Detection (NAD) rules are not enabled by default. Rules must be added manually using the procedure described in the preceding sections. This design ensures that analysts can fine-tune rules to fit specific network infrastructures using variables.
Analysts have three ways of creating new rules:
- Adding a rule from a prebuilt template and adjusting custom variables. In this case, the rule is classified as a system rule.
- Adding a rule from a prebuilt template and modifying its underlying SQL query (which requires enabling the “Unlock all template values” option) to create a custom rule based on the template. When modified this way, the rule transitions from a system rule to a custom rule.
- Authoring a custom rule from scratch, which requires a basic understanding of ClickHouse SQL queries and familiarity with the product documentation.
As of this publication, the product ships with 59 prebuilt NAD rule templates (with additional templates delivered via product updates). KATA supports running up to 200 active rules simultaneously.
Prebuilt rules are divided into six categories:
- Large Data Transfers: tracking abnormally large network sessions across various protocols during regular hours, at night, or over weekends.
- Suspicious Connections: detecting suspicious connections that may indicate hazardous activity, shadow IT, evasion of attack detection mechanisms, and other threats.
- Domain Attacks: detecting classic attacks targeting domain network infrastructures using offensive tooling.
- Reconnaissance Activity: identifying suspicious activity within domain protocol sessions (Kerberos, DCE/RPC, LDAP, DNS) resembling domain reconnaissance.
- Connections to Suspicious Resources: detects actions that violate security policies, potential data exfiltration beyond the perimeter, and unauthorized internet access originating from secured network segments.
- C2 Communication: identifies network sessions characteristic of a potential C2 communication channel or tunnel.
The table below lists the rule templates for detecting network anomalies in KATA:
Rule category Rule name Protocols used Large Data Transfers Data tunneling in DNS traffic DNS ICMP, TCP, UDP, RDP, SSH or LDAP sessions with a large volume of traffic (6 rules) ICMP, TCP, UDP, RDP, SSH, or LDAP (depends on selected rule) ICMP, TCP, UDP, RDP, SSH or LDAP sessions with a large volume of traffic at nighttime (6 rules) ICMP, TCP, UDP, RDP, SSH, or LDAP (depends on selected rule) ICMP, TCP, UDP, RDP, SSH or LDAP sessions with a large volume of traffic on non-working days (6 rules) ICMP, TCP, UDP, RDP, SSH, or LDAP (depends on selected rule) Suspicious Connections Queries to unknown DNS servers DNS Use of unauthorized routes TCP, UDP Use of suspicious ports for connections to external addresses TCP, UDP Use of non-typical protocols for connections TCP, UDP, HTTP, HTTPS, DNS, SMTP Inconsistencies with firewall configuration TCP, UDP Use of unauthorized ports for RDP or SSH sessions (2 rules) RDP or SSH (depends on selected rule) Interactions with external IP addresses over the RDP or SSH protocol (2 rules) RDP or SSH (depends on selected rule) Suspicious RDP sessions with domain controllers RDP Connection to an unknown server via Kaspersky Security Center ports TCP, UDP Domain Attacks Signs of a DCSync attack DCE/RPC Signs of a DCShadow attack DCE/RPC Signs of DHCP spoofing DHCP DNS queries to Canarytoken domains DNS Signs of a Kerberoasting attack Kerberos Signs of an AS-REP Roasting attack Kerberos Signs of a brute-force password attack on SSH SSH Signs of SOAPHound usage LDAP Large-volume Active Directory object data collection via LDAP queries LDAP Reconnaissance Activity Getting information about a task in the Task Scheduler DCE/RPC Getting a list of Kerberos users Kerberos LDAP queries to rights delegation attribute LDAP LDAP queries to attribute for getting administrator passwords LDAP Signs of an internal horizontal port scan TCP, UDP Signs of an internal vertical port scan TCP, UDP DNS zone data replication requests sent from sources other than DNS servers DNS Successfully completed requests for DNS zone data replication sent from sources other than DNS servers DNS LDAP query targeting a critical attribute of insecure credentials LDAP Enumeration of domain accounts via LDAP queries LDAP Exceeding the threshold for requested critical attributes in LDAP queries LDAP LDAP search queries containing a high number of critical attributes LDAP Connections to Suspicious Resources Queries to unauthorized domain names DNS Transmission of large data volumes to cloud storages TCP, UDP, DNS Connections to cloud storages or file transfer services TCP, DNS Connections to public repositories TCP, DNS Connections to resources of programs for traffic tunneling TCP, DNS С2 Communication Possible queries to DGA domains DNS DNS data tunneling via TXT records DNS Numerous blocked connections to external addresses TCP, UDP ConclusionThe examples of Kerberoasting and DNS tunneling clearly demonstrate why modern security defenses cannot rely solely on looking for known signatures and indicators of compromise. Both attack techniques abuse protocols that operate inside corporate networks every day. At the individual event level, they may look like legitimate activity, yet in behavioral context, they stand out as clear indicators of compromise.
NAD directly addresses this gap. Instead of relying purely on signature matches across Kerberos or DNS traffic, it highlights deviations from established baselines: who initiated the activity, how frequently it recurred, which services or domains were targeted, and why that matters for a specific infrastructure.
As a result, analysts gain a clear, actionable starting point for investigation. This capability is especially valuable for spotting the signs of APT group activity, which runs stealthily and is designed to blend in with legitimate operations. The importance of this capability will only grow: as attack techniques evolve, detecting suspicious activity at its earliest stages – before it escalates into critical service compromise or a data breach – becomes increasingly vital.
Kategorie: Hacking & Security, Viry a Červi
- « první
- ‹ předchozí
- …
- 36
- 37
- 38
- 39
- 40
- 41
- 42
- 43
- 44
- …
- následující ›
- poslední »