


Agregátor RSS
Progress warns of critical MOVEit Automation auth bypass flaw
Progress Software warned customers to patch a critical authentication bypass vulnerability in its MOVEit Automation enterprise-grade managed file transfer (MFT) application. [...]
Kategorie: Hacking & Security
Webinar: Why MSPs must rethink security and backup strategies
Security breaches don't just test your defenses—they test your recovery. Join Kaseya in our upcoming webinar to learn how MSPs strengthen resilience with SaaS backups and BCDR to stay operational after attacks. [...]
Kategorie: Hacking & Security
10 quick productivity tips for Microsoft 365 mobile apps
Most of us work with Word, Excel, PowerPoint, and other Microsoft 365 apps primarily on a computer, via the desktop or web apps. While you’re on the go, the mobile versions of these apps are handy for reviewing documents, spreadsheets, presentations, or other Office files, and you can use them to do minor editing.
But the mobile apps also have specific functions designed for your smartphone’s smaller screen and touch interface that can help you do more in-depth work. In this guide, we’ll explain what these mobile-first features are and how to use them.
Note: This guide refers to the individual Word, Excel, Outlook, OneNote, and PowerPoint mobile apps for Android and iOS. There’s also a general Microsoft 365 app (which Microsoft confusingly renamed “Microsoft 365 Copilot”) for both platforms that includes versions of Excel, PowerPoint, and Word built into it. But some of the features covered in this guide are not available in these apps within the M365 Copilot app, so we prefer to use the individual apps.
Also note that some users now have access to some Copilot generative AI features within the individual mobile apps as well as in the broader M365 Copilot app. In this article, we’re focusing on features that are available to all Microsoft Office users; we’ll do a follow-up story on using Copilot in the mobile apps.
Word: Take advantage of Mobile ViewWhen you load a document in the Word app, it’s shown in Mobile View — its text and layout are formatted to make for easier reading on your smartphone display.
width="461" height="1024" sizes="auto, (max-width: 461px) 100vw, 461px">Documents open in the Word mobile app in a clean view that’s easy to read on a small screen.
Howard Wen / Foundry
You can use the familiar pinch-and-spread gestures on the touchscreen, zooming in to enlarge the text or zooming out to shrink it down. When you do, the text automatically adjusts to fill the screen at its new size. And when you hold your phone horizontally, the document is automatically reformatted to fit this wider view.
Tapping the Print Layout button (a piece of paper with right angles at the four corners) on the toolbar below will show how your document would look if printed on paper. Tap Mobile View (a smartphone icon) to return it to this view mode.
Word: Navigate a document by its headingsIf your document is separated into headings, Word’s Headings feature helps you quickly navigate through your document.
On Android: Tap Headings on the toolbar to open a panel that lists the headings in your document. Tap a heading to immediately scroll down to it in your document.
width="461" height="1024" sizes="auto, (max-width: 461px) 100vw, 461px">Tap a heading to zoom straight to it in your document.
Howard Wen / Foundry
On iOS: Tap the three-dot icon at upper right. On the screen that appears, scroll down and tap Headings. You’ll see a panel that lists the headings in your document. Tap a heading to jump to it in the doc.
Word: Have your document read aloudThis feature can be a useful way to review a document as you’re driving or walking. Tap Read Aloud (an icon of a capital A with sound waves coming out) on the toolbar, and a digital voice will immediately start reading your document.
A control bar appears at the bottom of your document with buttons you can tap to pause/play, or to skip to the previous or next headline or section in your document. You can also tap the Audio Settings button (a speaker with a gear) and adjust the digital voice to read faster or slower, or change its gender between female and male.
width="461" height="1024" sizes="auto, (max-width: 461px) 100vw, 461px">If you need to keep your eyes up, you can have Word read your document out loud.
Howard Wen / Foundry
Word, OneNote: Write by speakingYou can dictate words onto a document in the Word app or onto a note in the OneNote app — a much quicker way to capture your thoughts than trying to type on a tiny touchscreen keyboard.
With your document or note loaded in the Word or OneNote app, tap somewhere inside the document or note. A text formatting toolbar appears toward the bottom of the screen. On Android, you’ll see a microphone icon above the right end of the formatting toolbar; on iOS the microphone icon is part of the toolbar, toward the left. Tap the microphone icon and, if necessary, grant Word permission to use your phone’s microphone.
Then start speaking into your phone mic. Your spoken words will be transcribed into the document or note.
width="461" height="1024" sizes="auto, (max-width: 461px) 100vw, 461px">Word’s dictation tool in action.
Howard Wen / Foundry
As soon as you tap the microphone, a dictation toolbar appears below the text formatting toolbar. It has a pulsing blue microphone button that lets you know it’s actively listening to you. To pause dictation, tap the microphone button, and it turns white. Tap it again to resume dictation.
Of course, this tool works best if you speak clearly and slowly. When it comes to punctuation, you can say “period” to trigger the tool to end a sentence with a period, “comma” to insert a comma, or “new line” to start a new paragraph. (Tap the question mark icon on the right side of the dictation tool to see a list of punctuation, editing, and formatting commands you can say.)
But these commands often don’t work reliably, since the technology can’t always distinguish whether you’re giving it a command or if you intend these words to be transcribed. So you may find it easier to just tap on the appropriate punctuation button on the dictation toolbar as you’re speaking.
You can also try enabling auto-punctuation. Tap the gear icon on the dictation toolbar to open the “Dictation settings” panel, then switch on Enable auto-punctuation. If you do, the dictation tool will try to fill in commas, periods, and question marks where they logically belong.
Also on this panel in the Android app, you can change the language that the dictation tool recognizes. If you normally work in English but want it to transcribe words you speak in French or Spanish, for instance, changing this setting will make it correctly transcribe your words in that language. The dictation tool currently supports about a dozen languages, with about 35 more in preview.
The dictation tool may not always transcribe your words perfectly. Be sure to review transcribed text and fix any errors.
Note: You may ask why you should use the dictation tool in Word or OneNote rather than a dictation app that may already be on your smartphone. For example, Google’s Gboard keyboard app has a dictation tool that works similarly. Our advice: try both and decide which responds best to the way you speak.
Excel: Interact with tables as cardsIf you have a spreadsheet with one or more tables on it, the Excel mobile app has a feature that can present them for better viewing on your smartphone. Cards View reformats the rows of a table as cards that you can scroll through. This also helps to make these rows easier to edit using your phone touchscreen.
Open a spreadsheet that has a table on it in the Excel app, then tap any cell inside the table. Then on the toolbar that appears below, tap the second icon from the left, the Cards View icon.
The table’s rows will be formatted as a series of cards, each of which displays a summary of the row’s contents. You can scroll down and up this list of cards.
width="461" height="1024" sizes="auto, (max-width: 461px) 100vw, 461px">The data in each row is displayed on a separate card.
Howard Wen / Foundry
When you tap a card, it expands. You can view all the data in that table row and edit any value by tapping it. Tap PREVIOUS or NEXT at the bottom of the screen to move through the row cards.
To delete a row or add a new row, tap the three-dot icon on the card and select Delete, Insert Above, or Insert Below from the menu that opens.
Outlook: Quickly view upcoming eventsWhen you launch the Outlook app, tap Calendar on the toolbar along the bottom. This switches to the calendar. If there’s a date with one or more events on it, tapping it will open a schedule for that day, organized by hour.
Tap the calendar icon at the upper right (to the left of the magnifying glass icon). On the panel that opens, select Agenda. This will list the calendar dates line-by-line; you can scroll up and down to see dates in the past and future that have events scheduled. To return to a regular calendar view, tap the calendar icon at the upper right and choose Day, 3 Day, or Month.
width="461" height="1024" sizes="auto, (max-width: 461px) 100vw, 461px">Outlook’s Agenda view gives you a quick, scrollable overview of all your upcoming events.
Howard Wen / Foundry
Outlook: Create or update an eventTap a date on the calendar, then tap the + icon on the lower right. On the next screen, fill out the New Event form with the event title, names of people you want to invite, start and end times, location, and so on.
width="461" height="1024" sizes="auto, (max-width: 461px) 100vw, 461px">Creating a new event in the Outlook app.
Howard Wen / Foundry
After you’ve filled out the details you want, tap the checkmark at the upper right. The new event will appear on your calendar, and your invitees will be notified via an Outlook email.
To edit or delete an event that you’ve created, tap the event on the calendar to open it. On the screen that appears, tap the pencil icon at the upper right. Make whatever changes you like, then tap the checkmark at the upper right. To delete it, tap the Delete Event button at the bottom of the screen, then tap Delete Event again to confirm. Your invitees will be notified of the changes or cancellation.
Outlook: Get notified of upcoming eventsOn Android: Tap the calendar icon in the upper-left corner. On the side panel that opens, tap the gear icon to open Settings. Then under “Quick Settings,” tap Notifications. On the Notifications screen, tap the Calendar tab toward the upper right.
width="461" height="1024" sizes="auto, (max-width: 461px) 100vw, 461px">You can have Outlook remind you of upcoming events.
Howard Wen / Foundry
On iOS: Tap your profile picture or initial in the upper-left corner. At the very bottom of the side panel that opens, tap the gear icon to open Settings. Under “Quick Settings,” tap Notifications & Sounds. On the Notifications screen, tap the Calendar tab toward the upper right. Make sure the Allow Notifications toggle is turned on.
In either OS, you can tap Events on the Calendar page to set how far in advance you want to be notified of scheduled events, anywhere from 5 minutes before to 1 week before. Next, tap All day or All day events to set the default notification time for events that are set for a certain day but without a specific start or end time. You can choose to be notified of an all-day event on the morning of that date, the day before, or the week before.
OneNote: Quickly sketch ideas using your phone touchscreenOne function in the OneNote app makes it unique from its desktop and web app counterparts: It’s convenient to use it to make quick doodles and sketches, using your phone’s touchscreen to draw.
On Android: Launch the OneNote app and tap the pen tip icon on the toolbar along the bottom. A new blank note will open with a drawing toolbar along the top. You can immediately start drawing on the note with your finger.
To change the drawing color, tap the leftmost pen tip icon on the toolbar. A panel will open to let you select a new color. You can also adjust the thickness of the drawing line by moving the slider along the bottom of this panel. There’s also a second pen and a highlighter – either can also be adjusted by tapping on them to open the same panel that lets you change its color and line thickness.
width="461" height="1024" sizes="auto, (max-width: 461px) 100vw, 461px">The Android OneNote app includes a robust set of drawing tools.
Howard Wen / Foundry
The remaining tools are an eraser (select this and tap on something you drew to remove it), shapes tool (to draw shapes, lines, or graphs), and a lasso (to select drawn objects so that you can resize them, move them to another spot on the note, or cut or copy them to your phone’s clipboard).
To undo a drawing action, tap the arrow at the upper right that’s curved counterclockwise. To restore it (after you’ve undone it), tap the arrow that’s curved clockwise.
On iOS: Launch the OneNote app, start a new note, and tap the pen tip icon at the upper right. You can immediately start drawing on the note with your finger.
A drawing toolbar appears along the top that looks similar to the Android toolbar but is less fully featured. There’s one pen, the highlighter, the eraser, the lasso, and the undo arrow. The color and thickness of the pen and highlighter are not adjustable. (The drawing tool in the OneNote for iPadOS app does offer the full feature set.)
PowerPoint: Rehearse your presentation before the big meetingIf you’ll be showing a presentation at an upcoming meeting, the PowerPoint app can help you practice your speech. Its Rehearse with Coach tool will give advice and rate the clarity and pace of your speaking. It doesn’t alter the presentation file itself.
With your presentation file open in the PowerPoint app, tap the three-dot icon at the upper-right corner. On the menu that appears, scroll down and select Rehearse with Coach. If asked, grant the app permission to use your microphone.
Speaking into your phone’s mic, start reading your prepared speech aloud or improvising from your notes. As you talk, Rehearse with Coach will give you on-screen words of advice and encouragement, and rate the clarity of your voice. A timer helps you track how long you’ve been talking.
width="461" height="1024" sizes="auto, (max-width: 461px) 100vw, 461px">PowerPoint’s Rehearse with Coach feature listens to your presentation, providing advice and encouragement.
Howard Wen / Foundry
To advance to the next slide, tap the right arrow on the slide or swipe to the left. (Tap the left arrow or swipe right to return to the previous slide.)
When you’re finished with your practice, tap the stop button at the lower right. A report that rates your performance and offers advice will be generated.
Kategorie: Hacking & Security
2026: The Year of AI-Assisted Attacks
On December 4, 2025, a 17-year-old was arrested in Osaka under Japan’s Unauthorized Access Prohibition Act. The young man had run malicious code to extract the personal data of over 7 million users of Kaikatsu Club, Japan's largest internet cafe chain. When asked, the young man shared his motivation for the hack: he wanted to buy Pokémon cards.
In a sense, this is a fairly conventional story.
Kategorie: Hacking & Security
2026: The Year of AI-Assisted Attacks
On December 4, 2025, a 17-year-old was arrested in Osaka under Japan’s Unauthorized Access Prohibition Act. The young man had run malicious code to extract the personal data of over 7 million users of Kaikatsu Club, Japan's largest internet cafe chain. When asked, the young man shared his motivation for the hack: he wanted to buy Pokémon cards.
In a sense, this is a fairly conventional story. [email protected]
Kategorie: Hacking & Security
Silver Fox Deploys ABCDoor Malware via Tax-Themed Phishing in India and Russia
The China-based cybercrime group known as Silver Fox (aka Monarch, SwimSnake, The Great Thief of Valley, UTG-Q-1000, and Void Arachne) has been linked to a new campaign targeting organizations in Russia and India with a new malware called ABCDoor.
The activity involved using phishing emails that mimic correspondence from the Income Tax Department of India in December 2025, followed by a similar
Kategorie: Hacking & Security
Silver Fox Deploys ABCDoor Malware via Tax-Themed Phishing in India and Russia
The China-based cybercrime group known as Silver Fox (aka Monarch, SwimSnake, The Great Thief of Valley, UTG-Q-1000, and Void Arachne) has been linked to a new campaign targeting organizations in Russia and India with a new malware called ABCDoor.
The activity involved using phishing emails that mimic correspondence from the Income Tax Department of India in December 2025, followed by a similar Ravie Lakshmananhttp://www.blogger.com/profile/[email protected]
Kategorie: Hacking & Security
Sennheiser HDB 630: Když je prioritou kvalitní přednes, Hi-Res přenos a maximálně flexibilní konektivita
Přenosná uzavřená náhlavní sluchátka s ANC a velkou výdrží baterie – přijde vám tato charakteristika povědomá? Velmi podobně popisuje své modely celá řada renomovaných výrobců a přesně takový model je de facto vlajkovou lodí v jejich nabídce.
Kategorie: IT News
CISA says ‘Copy Fail’ flaw now exploited to root Linux systems
CISA has warned that threat actors have started exploiting the "Copy Fail" Linux security vulnerability in the wild, one day after Theori researchers disclosed it and shared a proof-of-concept (PoC) exploit. [...]
Kategorie: Hacking & Security
Tento 4K monitor Philips zlevnil na 4123 Kč. Láká na přesné barvy a USB-C pro připojení notebooku
Kvalitní 4K monitor od Philipsu zlevnil na minimum. • Stojí 4123 Kč, běžně je o patnáct stovek dražší. • Láká na přesné barvy a vstup USB-C s 65W nabíjením.
Kategorie: IT News
Microsoft confirms April Windows updates cause backup failures
Microsoft has confirmed that the April 2026 security updates are causing failures in third-party backup applications using the psmounterex.sys driver. [...]
Kategorie: Hacking & Security
“Legitimate” phishing: how attackers weaponize Amazon SES to bypass email security
Introduction
The primary goal for attackers in a phishing campaign is to bypass email security and trick the potential victim into revealing their data. To achieve this, scammers employ a wide range of tactics, from redirect links to QR codes. Additionally, they heavily rely on legitimate sources for malicious email campaigns. Specifically, we’ve recently observed an uptick in phishing attacks leveraging Amazon SES.
The dangers of Amazon SES abuseAmazon Simple Email Service (Amazon SES) is a cloud-based email platform designed for highly reliable transactional and marketing message delivery. It integrates seamlessly with other products in Amazon’s cloud ecosystem, AWS.
At first glance, it might seem like just another delivery channel for email phishing, but that isn’t the case. The insidious nature of Amazon SES attacks lies in the fact that attackers aren’t using suspicious or dangerous domains; instead, they are leveraging infrastructure that both users and security systems have grown to trust. These emails utilize SPF, DKIM, and DMARC authentication protocols, passing all standard provider checks, and almost always contain .amazonses.com in the Message-ID headers. Consequently, from a technical standpoint, every email sent via Amazon SES – even a phishing one – looks completely legitimate.
Phishing URLs can be masked with redirects: a user sees a link like amazonaws.com in the email and clicks it with confidence, only to be sent to a phishing site rather than a legitimate one. Amazon SES also allows for custom HTML templates, which attackers use to craft more convincing emails. Because this is legitimate infrastructure, the sender’s IP address won’t end up on reputation-based blocklists. Blocking it would restrict all incoming mail sent through Amazon SES. For major services, that kind of measure is ineffective, as it would significantly disrupt user workflows due to a massive number of false positives.
How compromise happensIn most cases, attackers gain access to Amazon SES through leaked IAM (AWS Identity and Access Management) access keys. Developers frequently leave these keys exposed in public GitHub repositories, ENV files, Docker images, configuration backups, or even in publicly accessible S3 buckets. To hunt for these IAM keys, phishers use various tools, such as automated bots based on the open-source utility TruffleHog, which is designed for detecting leaked secrets. After verifying the key’s permissions and email sending limits, attackers are equipped to spread a massive volume of phishing messages.
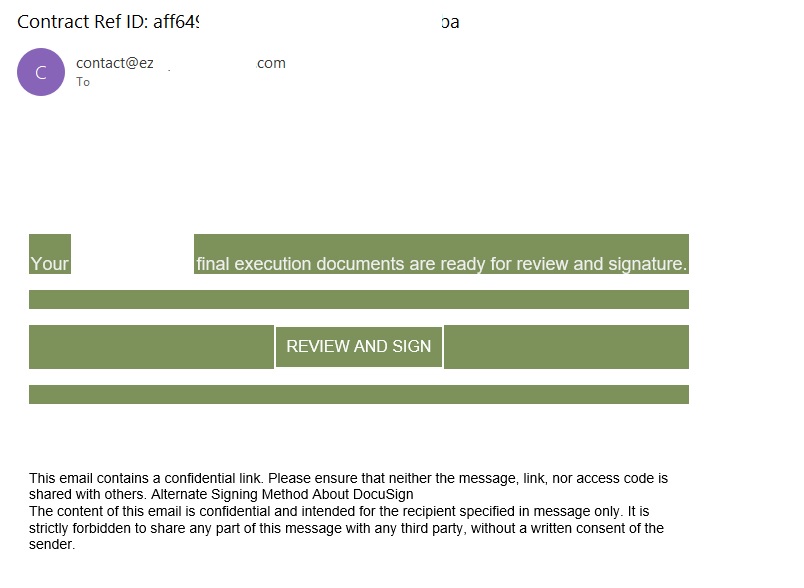
Examples of phishing with Amazon SESIn early 2026, one of the most common themes in phishing emails sent with Amazon SES was fake notifications from electronic signature services.
Phishing email imitating a Docusign notification
The email’s technical headers confirm that it was sent with Amazon SES. At first glance, it all looks legitimate enough.
Phishing email headers
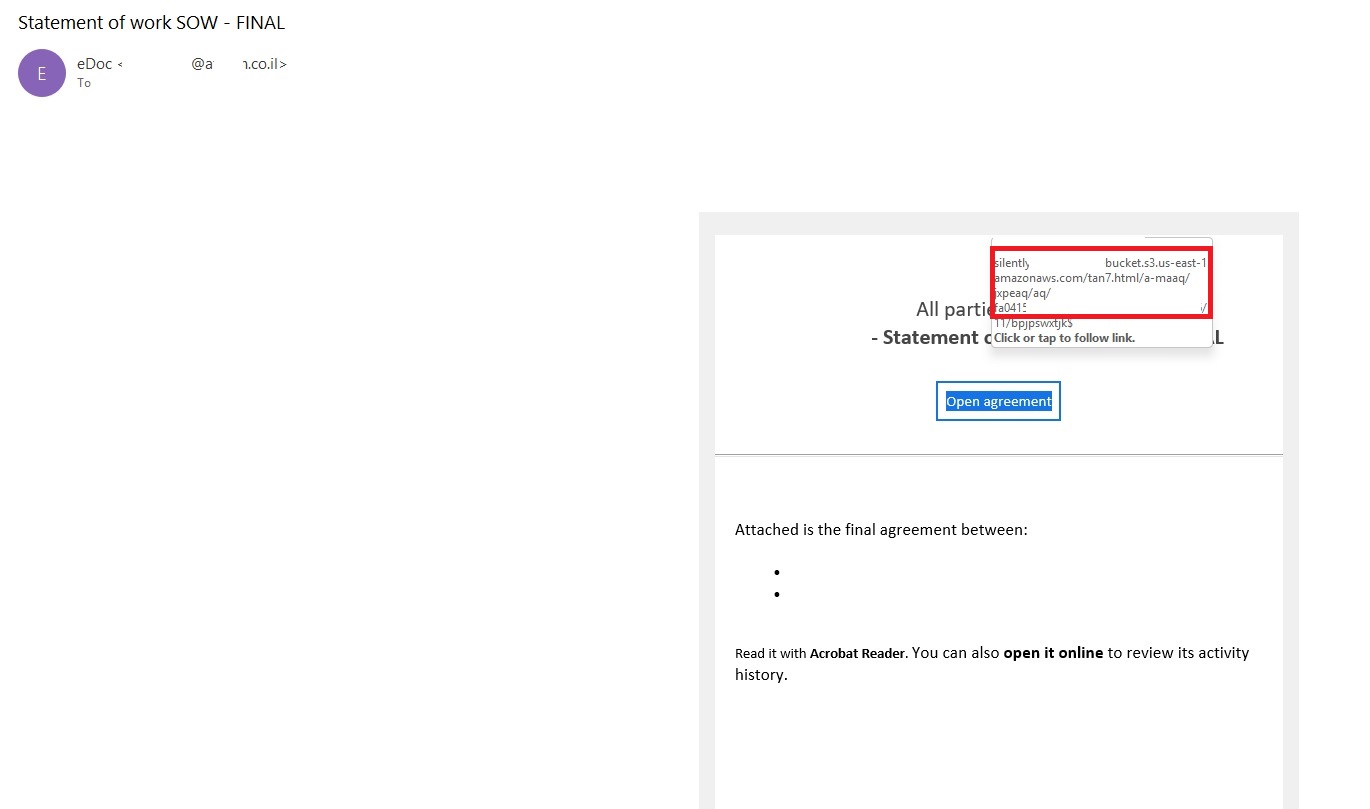
In these emails, the victim is typically asked to click a link to review and sign a specific document.
Phishing email with a “document”
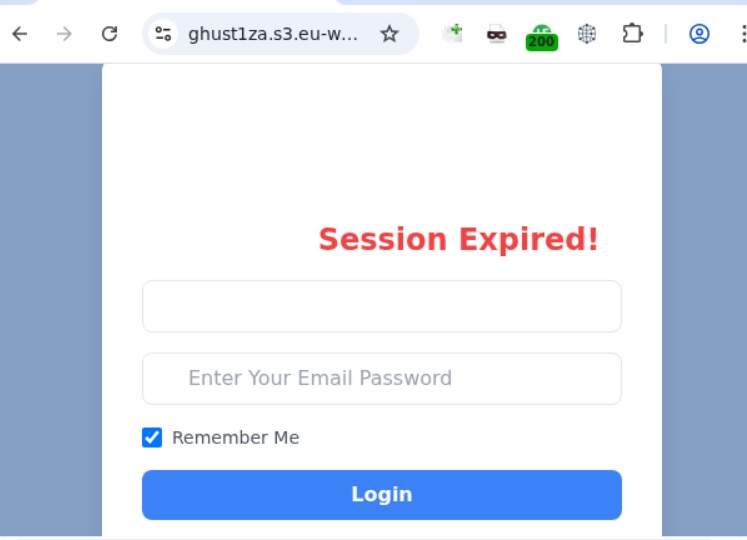
Upon clicking the link, the user is directed to a sign-in form hosted on amazonaws.com. This can easily mislead the victim, convincing them that what they’re doing is safe.
Phishing sign-in form
The resulting form is, of course, a phishing page, and any data entered into it goes directly to the attackers.
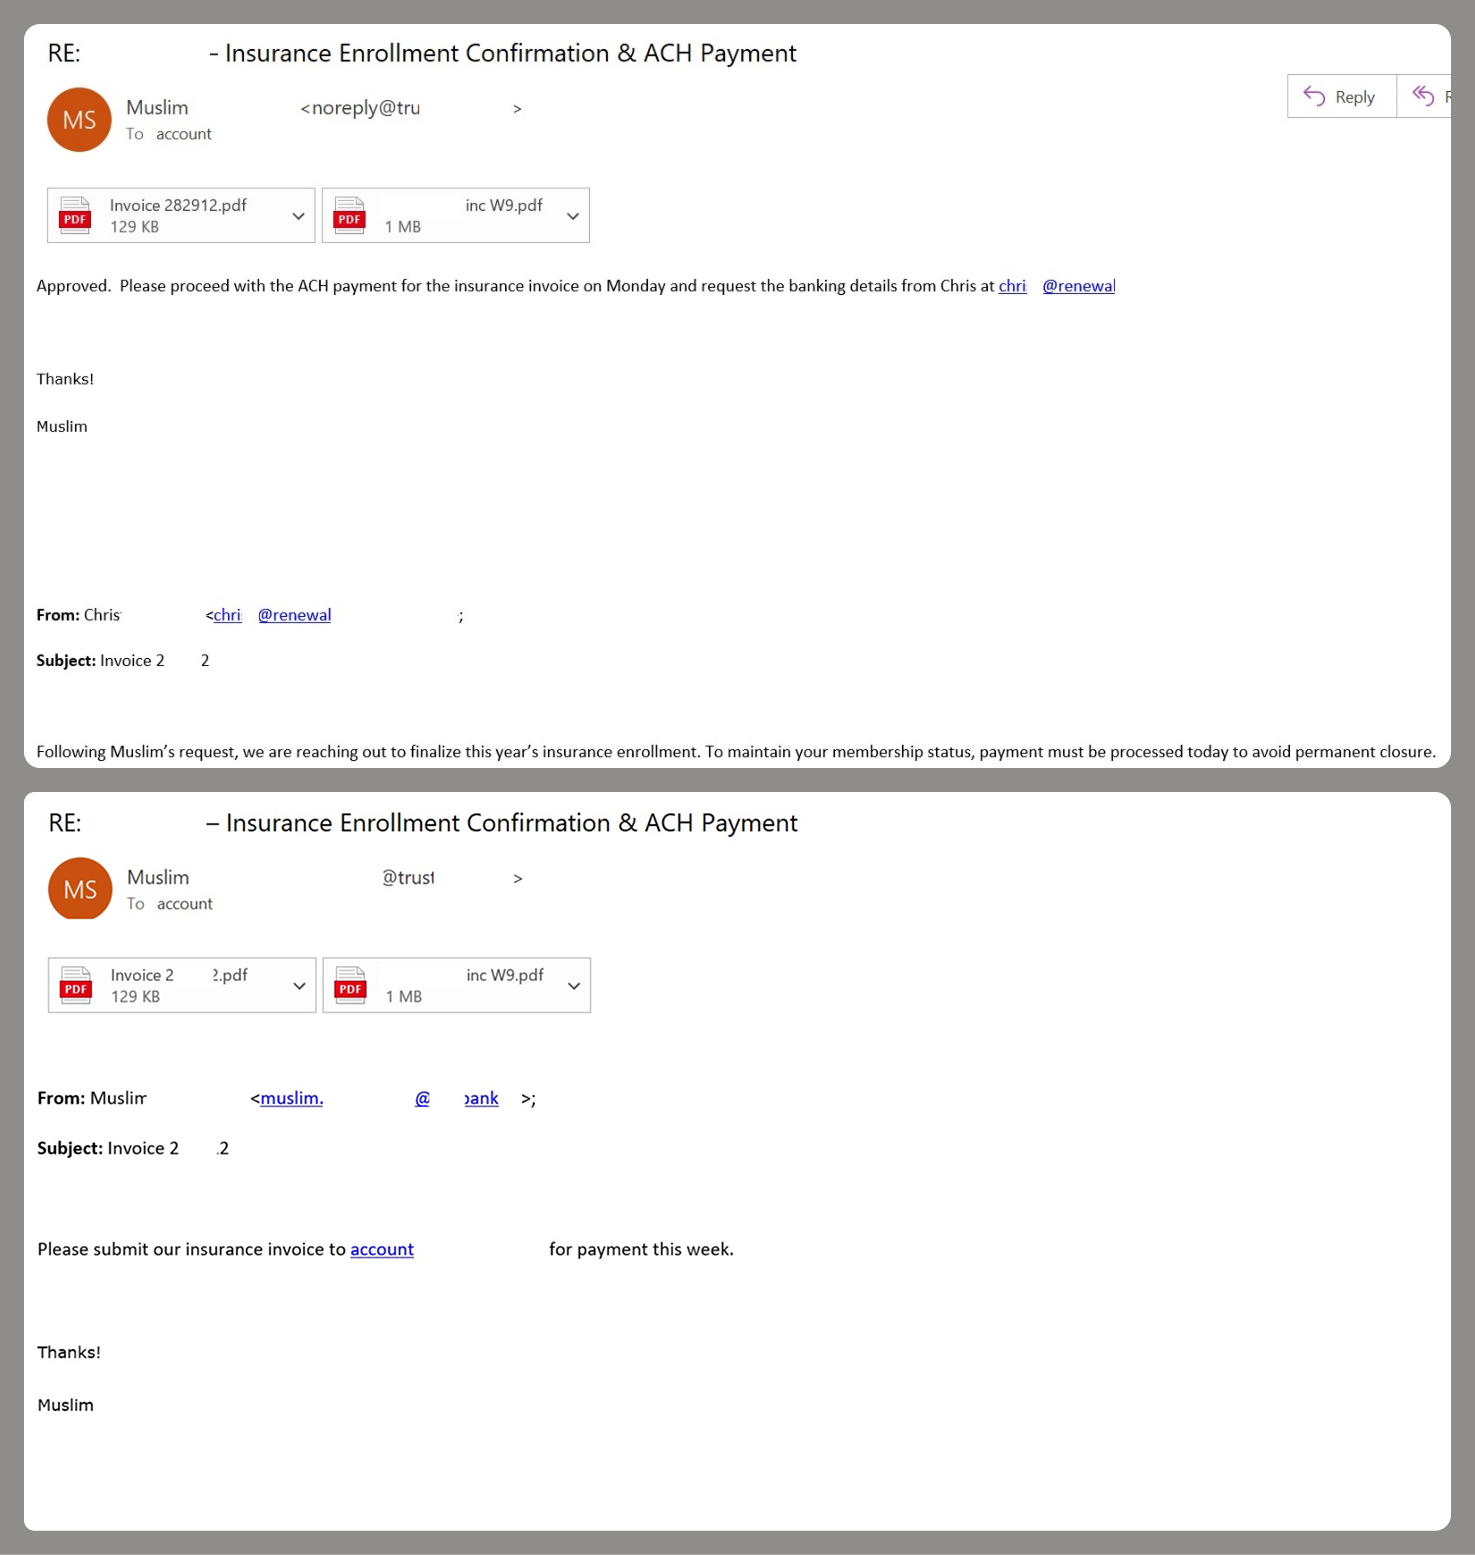
Amazon SES and BECHowever, Amazon SES is used for more than just standard phishing; it’s also a vehicle for a very sophisticated type of BEC campaigns. In one case we investigated, a fraudulent email appeared to contain a series of messages exchanged between an employee of the target organization and a service provider about an outstanding invoice. The email was sent as if from that employee to the company’s finance department, requesting urgent payment.
BEC email featuring a fake conversation between an employee and a vendor
The PDF attachments didn’t contain any malicious phishing URLs or QR codes, only payment details and supporting documentation.
Forged financial documents
Naturally, the email didn’t originate with the employee, but with an attacker impersonating them. The entire thread quoted within the email was actually fabricated, with the messages formatted to appear as a legitimate forwarded thread to a cursory glance. This type of attack aims to lower the user’s guard and trick them into transferring funds to the scammers’ account.
TakeawaysPhishing via Amazon SES is shifting from isolated incidents into a steady trend. By weaponizing this service, attackers avoid the effort of building dubious domains and mail infrastructure from scratch. Instead, they hijack existing access keys to gain the ability to blast out thousands of phishing emails. These messages pass email authentication, originate from IP addresses that are unlikely to be blocklisted, and contain links to phishing forms that look entirely legitimate.
Since these Amazon SES phishing attacks stem from compromised or leaked AWS credentials, prioritizing the security of these accounts is critical. To mitigate these risks, we recommend following these guidelines:
- Implement the principle of least privilege when configuring IAM access keys, granting elevated permissions only to users who require them for specific tasks.
- Transition from IAM access keys to roles when configuring AWS; these are profiles with specific permissions that can be assigned to one or several users.
- Enable multi-factor authentication, an ever-relevant step.
- Configure IP-based access restrictions.
- Set up automated key rotation and run regular security audits.
- Use the AWS Key Management Service to encrypt data with unique cryptographic keys and manage them from a centralized location.
We recommend that users remain vigilant when handling email. Do not determine whether an email is safe based solely on the From field. If you receive unexpected documents via email, a prudent precaution is to verify the request with the sender through a different communication channel. Always carefully inspect where links in the body of an email actually lead. Additionally, robust email security solutions can provide an essential layer of protection for both corporate and personal correspondence.
Kategorie: Hacking & Security, Viry a Červi
Po více než dvou letech se podařilo vyřešit záhadu podivné biologické formy z Aljašky. Mimozemšťan to nebyl
Záhadný útvar z mořských hlubin nemá mimozemský původ • Vědci pomocí genetiky potvrdili živočišný původ tohoto materiálu • Ve skutečnosti jde o opuštěnou schránku obří hlubokomořské sasanky
Kategorie: IT News
Critical cPanel Vulnerability Weaponized to Target Government and MSP Networks
A previously unknown threat actor has been observed targeting government and military entities in Southeast Asia, alongside a smaller cluster of managed service providers (MSPs) and hosting providers in the Philippines, Laos, Canada, South Africa, and the U.S., by exploiting the recently disclosed vulnerability in cPanel.
The activity, detected by Ctrl-Alt-Intel on May 2, 2026, involves the
Kategorie: Hacking & Security
Critical cPanel Vulnerability Weaponized to Target Government and MSP Networks
A previously unknown threat actor has been observed targeting government and military entities in Southeast Asia, alongside a smaller cluster of managed service providers (MSPs) and hosting providers in the Philippines, Laos, Canada, South Africa, and the U.S., by exploiting the recently disclosed vulnerability in cPanel.
The activity, detected by Ctrl-Alt-Intel on May 2, 2026, involves the Ravie Lakshmananhttp://www.blogger.com/profile/[email protected]
Kategorie: Hacking & Security
If the vote you rocked, your personal info can be grokked
Your voter data could be used against you. A foreign intelligence service that wished to identify the family members of deployed military personnel could do so by cross-referencing public voter record data and social media posts. An employer who only wanted to hire employees with a specific political affiliation could do so by analyzing the primary ballot history of job applicants. An identity fraud ring seeking to open credit accounts in the names of other people could identify voters whose mail has been returned (via voter file suspense indicators) to take over those addresses using bogus change-of-address requests. These scenarios are possible thanks to the ability to link publicly available voter data to other data sets, according to Noah M. Kenney, founder of consultancy Digital 520. "I picked two different counties that kind of represented opposite ends of the spectrum," Kenney told The Register in a phone interview. "In Texas, they hide a lot of information and then North Carolina makes a lot of it public in terms of the specific records. And what I was looking at specifically is if you go and merge this data set or link this data set with other data sets, how likely are you to be able to re-identify a person?" More than 25 years ago, research by Latanya Sweeney, currently a professor at Harvard, demonstrated that most of the US population (87 percent) could be identified with just three anonymous data points – a five-digit ZIP code, gender, and date of birth. Those results can be improved when combined with other data sets. And recent research has shown that the process of identifying people from seemingly anonymous data points becomes even easier with AI tools. In a research paper titled "Public Voting Records: A Record, or an Attack Surface?", Kenney describes how he analyzed public records from Travis County, Texas, and Robeson County, North Carolina to show that the adversarial scenarios cited above are practical with public data. The Texas file provides fewer data points than the North Carolina file, but the research suggests redaction doesn't make much of a difference in the re-identification scenarios evaluated. Table 1 — Disclosure regime comparison With the less detailed Texas info, Kenney was able to use a Python script to link the voter records to other public records like the Federal Election Commission's individual-contribution data. "We pulled 500 contribution records for ZIP 78704 (an Austin-core ZIP including South Congress and Travis Heights neighborhoods) from the 2024 cycle via the FEC OpenAPI on May 1, 2026," he explains in his paper. "We de-duplicated to 181 unique contributors by exact match on (last name, first name, ZIP), and inner-joined to the voter file on the same key, no fuzzy matching, no nickname normalization, no suffix handling. Of the 181 contributors, 105 (58.01 percent) matched any voter record and 95 (52.49 percent) matched a uniquely-identifiable voter. Of the 105 matches, 74.3 percent had a non-trivial employer field in FEC." That 52 percent individual match rate for identifying individuals from voter rolls and FEC data, Kenney said, would be more like 90–95 percent using the kinds of tools commercial data brokers employ. The North Carolina voter dataset includes a phone number for the majority of voters. According to the paper, 88.53 percent of voters who have a phone number listed have a number that is unique within the county. As a result, external datasets containing phone numbers can be joined at a similar rate using this field as a key to narrow down and identify likely individuals. Among the report's other findings: Name and ZIP code uniquely identify 95.81 percent of Texas voters and 87.79 percent of North Carolina voters. Among Travis County voters who have voted in 20 or more elections, 98.4 percent have a turnout pattern that is unique to them, making that data point a fingerprint. Texas' redaction of date of birth as a privacy measure is undermined by the publication of the voter registration data, which allows 28 percent of voters to be uniquely identified when combined with ZIP and gender. The Travis County voter file currently exposes 320 deployed military families through the publication of APO/FPO codes for military mailings. There's currently no comprehensive federal privacy law. While many states have privacy rules, there's a lot of variation. "Even within a specific state, most of the counties are individually handling these public records requests, so they all handle them differently across the country," said Kenney. "Some of them, you can't get them. Some of them, you need an ID to get them. Some of them you have to go through a request process for public records or you have to pay for them. The two counties I used are both freely available. You can go and download zip files of them without even putting in an email address or your name from anywhere in the world." Kenney said that he believes that access controls represent a better answer than redacting certain data fields, pointing to his findings that show redaction doesn't necessarily protect against privacy harms. He recommends measures like rate limits on bulk file requests, identity verification, requiring state ID, maintaining audit logs of requests, and prohibiting commercial resale of these records – because they're often used by data brokers. Beyond specific fixes based on his findings – Texas should generalize voter registration dates to a year rather than a day and armed forces mailing codes should be excluded from voter rolls – Kenney argues that people should be allowed to opt out of inclusion in public data sets and that general data privacy protections would be helpful. Last week, House Republicans introduced the Secure Data Act in an effort to create federal privacy rules. But Kenney says that it's significantly weaker than a lot of state regulations and he doesn't expect it will pass. "The industry consensus is that the likelihood of it passing is extremely low, at least in its current form," he said. "This represents the third attempt to pass comprehensive data privacy in recent years, most recent being the American Data Privacy and Protection Act, which failed to pass." ®
Kategorie: Viry a Červi
If the vote you rocked, your personal info can be grokked
Even limited voter rolls can be linked to identify people, research shows
Your voter data could be used against you. A foreign intelligence service that wished to identify the family members of deployed military personnel could do so by cross-referencing public voter record data and social media posts.…
Kategorie: Viry a Červi
Konec fólií, které se poškrábou za pár dní. Novinka z Koreje spojuje odolnost skla i pružnost plastu
Kategorie: IT News
Intel konečně zveřejnil, o kolik bude proces 18A-P lepší než 18A. Není to špatné
Intel 18A nedosáhl cílů, na které mířil. Necháme-li stranou výtěžnost, jsou problémem zejména dosažitelné taktovací frekvence. Ty má citelně vylepšit proces 18A-P, jehož parametry jsou konečně známé…
Kategorie: IT News
Google propojil Fotky a Nano Banana. AI vygeneruje obrázky, na kterých poznáte sebe i své blízké
AI Google Gemini dostává zásadní aktualizaci, která umožní generovat personalizované obrázky s využitím obsahu přímo z Fotek Google. Integrace je součástí širší strategie nazvané „Personal Intelligence“, zaměřené na propojení Gemini s dalšími aplikacemi od Googlu.
Cílem je učinit generované scény ...
Kategorie: IT News
- « první
- ‹ předchozí
- …
- 12
- 13
- 14
- 15
- 16
- 17
- 18
- 19
- 20
- …
- následující ›
- poslední »
