


Agregátor RSS
Recenze hry Saros. Náročná, ale férová akce v záři zlověstného slunce
Po pěti letech nás studio Housemarque bere do pekla, kde se jedna salva projektilů míjí s druhou, smrti unikáme jen o vlásek, a když štěstí nepřeje, jdeme do akce zase od začátku. Saros je věrný odkazu Returnalu a mrazivý příběh na předaleké planetě mě pohltil velmi snadno.
Kategorie: IT News
Microsoft to offer voluntary retirement buyouts to about 7% of the US workforce
Microsoft will offer voluntary retirement buyouts to about 7% of its US workforce, or roughly 8,750 employees, in the first such program in the company’s 51-year history, as the technology industry restructures under the cost pressure of AI investment.
The program, available to US-based employees at the senior director level and below, comes as large technology companies, including Microsoft, increase capital spending on AI infrastructure such as data centers and compute capacity while reviewing workforce structures to align with those investments. The initiative marks the first time Microsoft has implemented a voluntary exit scheme of this kind, CNBC reported, citing an internal memo.
Microsoft employed 228,000 people worldwide as of June 30, 2025, including 125,000 in the US, according to its latest annual filing with the US Securities and Exchange Commission, putting the eligible pool at about 8,750 people.
“Our hope is that this program gives those eligible the choice to take that next step on their own terms, with generous company support,” Amy Coleman, Microsoft’s executive vice president and chief people officer, wrote in the memo.
The program offers financial incentives for eligible employees to leave voluntarily, providing an alternative to layoffs. Microsoft has not said whether roles vacated through the program will be backfilled, the report added, leaving open how responsibilities may be redistributed.
Microsoft did not immediately respond to a request for comment.
A controlled workforce resetThe retirement offer follows two earlier rounds of cuts at the company. Microsoft laid off about 6,000 employees in May 2025 and a further 9,000 in July, both rounds framed around efficiency and AI-driven productivity.
“Microsoft’s move towards voluntary buyouts is best understood not as a softer alternative to layoffs, but as a more controlled instrument of structural change,” said Sanchit Vir Gogia, chief analyst and CEO at Greyhound Research. “This is not about compassion. It is about precision. Large technology firms are entering a phase where workforce design is being actively recalibrated to align with a very different economic model — one defined by sustained, capital-intensive investment in artificial intelligence infrastructure.”
Capital-intensive AI investmentsThe buyout program comes as Microsoft increases spending on artificial intelligence infrastructure and services. The company said earlier this year it expects to spend about $80 billion in fiscal 2025 on capital expenditures, primarily to build AI-enabled data centers and support cloud-based AI workloads.
The scale of this investment has implications for operating costs and workforce allocation, as companies balance capital-intensive infrastructure spending with headcount and other expenses, analysts say.
“Enterprises are reallocating from labour-heavy coordination models towards compute-heavy execution models,” Gogia pointed out, referring to investments in data centers, AI accelerators, and platform infrastructure.
Microsoft has not directly linked the buyout program to specific AI initiatives, but the timing aligns with a broader shift in how resources are being deployed across the business.
Knowledge loss and execution risksGogia said the quieter risk for enterprises is what walks out of the building with the employees who accept the offer.
“The most significant and least understood risk in AI-driven workforce transitions is not job displacement. It is the erosion of institutional knowledge,” he said. “This knowledge is rarely documented in a way that can be easily transferred or automated. It resides in experience, in exception handling, in the unwritten rules that govern how processes actually work under real-world conditions. When experienced employees exit through voluntary programmes, they take with them not just skills, but context.”
He added that this can affect execution, especially as organizations adopt new AI systems at the same time. “Teams are expected to adopt new technologies while compensating for knowledge gaps, which can slow execution and increase reliance on oversight,” he said
Broader tech layoffsThe Microsoft announcement landed on the same day Meta told employees it would eliminate about 8,000 jobs, roughly 10% of its global workforce, and leave another 6,000 open roles unfilled. The Meta cuts take effect May 20 and come as the company prepares to roughly double its 2025 capital spending on AI infrastructure.
Three weeks earlier, Oracle announced up to 30,000 job cuts, roughly 18% of its 162,000-person global workforce, through termination emails on March 31. The company disclosed a $2.1 billion restructuring charge in its SEC filings. Investment bank TD Cowen had warned in January that the reductions would free up $8 billion to $10 billion in cash flow to fund Oracle’s AI data center expansion.
Amazon announced 16,000 job cuts in January, and Salesforce has linked roughly 1,000 reductions to AI automation. Meta, Salesforce, Microsoft, Dell, and Intel have collectively announced more than 24,000 AI-related job cuts, according to an earlier tally, with a running industry timeline spanning dozens of companies.
Full details of the offer are expected to reach eligible employees in the coming weeks.
Kategorie: Hacking & Security
Bridging the AI Agent Authority Gap: Continuous Observability as the Decision Engine
The AI Agent Authority Gap - From Ungoverned to Delegation
As discussed in our previous article, AI agents are exposing a structural gap in enterprise security, but the problem is often framed too narrowly.
The issue is not simply that agents are new actors. It is that agents are delegated actors. They do not emerge with independent authority. They are triggered, invoked, provisioned, or [email protected]
Kategorie: Hacking & Security
26 FakeWallet Apps Found on Apple App Store Targeting Crypto Seed Phrases
Cybersecurity researchers have discovered a set of malicious apps on the Apple App Store that impersonate popular cryptocurrency wallets in an attempt to steal recovery phrases and private keys since at least fall 2025.
"Once launched, these apps redirect users to browser pages designed to look similar to the App Store and distribute trojanized versions of legitimate wallets," Kaspersky Ravie Lakshmananhttp://www.blogger.com/profile/[email protected]
Kategorie: Hacking & Security
Microsoft beefs up Remote Desktop security with ... hard-to-read messages
Ailing scaling blamed by Windows-maker for unreadable missives
Microsoft's update to harden Remote Desktop against phishing attacks has arrived. When users open a Remote Desktop (.rdp) file, they should now see a warning listing all requested connection settings - or they would if it was displaying correctly.…
Kategorie: Viry a Červi
ChatGPT utíká konkurenci. Nový model GPT-5.5 pokořil Claude Opus 4.7 i Gemini 3.1 Pro
GPT-5.5 se výrazně zlepšil v kódování a práci s nástroji. • OpenAI po dlouhé době nabízí srovnání s Anthropicem a Googlem. • Nový model je dvakrát dražší, ale uživatelé ChatuGPT to nepoznají.
Kategorie: IT News
It's a myth that you need Mythos to find bugs: Open source models can do it just as well
BLACK HAT ASIA Open source models can find bugs as effectively as Anthropic's Mythos, according to Ari Herbert-Voss, CEO of AI-powered security startup RunSybil and OpenAI's first security hire. Speaking at the Black Hat Asia conference in Singapore today, Herbert-Voss said Mythos excels at finding both "shallow" bugs - well-described flaws that are and easy to validate - and more complex vulnerabilities. In his talk, he attributed this to "supralinear scaling": where researchers assumed LLM capability would improve linearly, evidence now suggests a model trained on twice the data, compute, and time produces something four times more capable. He hinted supralinear scaling might produce even better multipliers but could not say more due to a non-disclosure agreement. Anthropic has kept access to Mythos tghtly restricted, citing fears of misuse. However Herbert-Voss argues attackers and defenders alike can achieve comparable results with open source models by building "scaffolding" to run several of them in harness. That approach also improves defense in depth, as different models tend to catch different flaws — a useful hedge against any single model's blind spots. Cost is another driver. Mythos is expensive to build and run, and may never be publicly available, making open source alternatives not just viable but necessary for many organizations. Herbert-Voss feels human expertise is still needed to orchestrate open source models so they together deliver Mythos-grade performance, and to assess the bug reports AI generates. He then noted that fuzzing, the testing technique which injects random or near-random data into software to see if doing so produces bugs, also creates so many warnings that it can make extra work for humans. AI bug-hunters already produce the same problem, and he expects it will persist. Herbert-Voss therefore thinks infosec workers will have plenty on their plates for the foreseeable future, and the economic incentive to use AI – someone's got to use services that pay for all those GPUs and datacenters – will act as a forcing function that makes infosec teams adopt AI and as a result improve their proactive and defensive work. ®
Kategorie: Viry a Červi
It's a myth that you need Mythos to find bugs: Open source models can do it just as well
OpenAI's first security hire, Ari Herbert-Voss, thinks more automated bug finding will improve security without costing jobs
Black Hat Asia Open source models can find bugs as effectively as Anthropic's Mythos, according to Ari Herbert-Voss, CEO of AI-powered security startup RunSybil and OpenAI's first security hire.…
Kategorie: Viry a Červi
Microsoft now lets admins uninstall Copilot on enterprise devices
Microsoft says IT administrators can now uninstall the AI-powered Copilot digital assistant from enterprise devices using a new policy setting, which has become broadly available after the April 2026 Patch Tuesday. [...]
Kategorie: Hacking & Security
Understanding Log Management and Analysis Tools for Linux Systems
Every time something happens on a computer''a user logs in, a program crashes, or a hacker tries to guess a password''the system writes it down. These "notes" are called log files. If you're new to the world of servers, it might just look like a mess of text, but linux log analysis is actually your superpower. It's how you find out exactly why a system failed and how to fix it.
Kategorie: Hacking & Security
Google Keep cheat sheet: How to get started
Google Keep lets you create notes and to-do lists that sync across your computer and phone or tablet. It’s handy in a variety of ways: You can record voice memos, and Keep will transcribe them as text notes. You can include images in your notes, and if an image includes text, it shows up in search results. You can create time-triggered reminder notifications based on your notes. You can share your notes with other people and collaborate on them.
Keep is free for individual users and included with a subscription to Google Workspace. You use it through a web browser on your computer, and it’s also available as an app for your Android or iOS device. You’ll get the most mileage from Keep if you use both the desktop browser version and the mobile app in your daily workflow, so that you can take notes and access them wherever you are. Your Keep notes will sync to the cloud through Google Drive.
This guide walks you through how to quickly start using Keep. We’re focusing on the web version here, but most of the same features are also in the Keep mobile app, just laid out differently.
In this article:- Meet the Keep home page
- Create a new note
- Enhance your note
- Finish your note
- Manage your notes
- Use keyboard shortcuts
Start by going to keep.google.com. If you’re not already signed in with your Google account (for Gmail or Google Workspace), you’ll be prompted to do so.
Keep’s home page comprises a main board in the center and a sidebar along the left. The first time you use Keep, this main board will be empty; once you start adding notes, they’ll appear here. The white bar in the center of the main board (with “Take a note…” inside it) is what you use to create notes.
Your first view of the Google Keep home page.
Howard Wen / Foundry
Create a new noteStart typing inside the “Take a note” text box. As you type, the white bar expands down and becomes a new note. You can type in whatever text you want or paste in text that you’ve copied from another source.
Along the top of the note, you can type in a title for the note. To the right of this title line is a pushpin icon. Clicking it prioritizes the note by pinning it toward the top of the main board. (You’ll find more details about how pinned notes work later in this guide.)
Click the pushpin icon to pin the note near the top of your notes board.
Howard Wen / Foundry
If you paste in a web link, a preview of the linked page appears along the bottom of the note as a thumbnail with sample text from the page. Clicking the preview opens the link in a new browser tab. To remove the preview, click the three-dot icon that appears at its right and select Remove.
Link previews appear on notes by default but can be removed.
Howard Wen / Foundry
For each additional link you add, a preview for it is added to the bottom of the note, below the preview for the previously added link. This link preview feature may not work for every link you paste into your note, though. (It can also be turned off under Keep’s settings, described later in this guide.)
If you want to create a list of numbered items in your note, start a line by typing 1. Then type your text and press the Enter key; the next line automatically begins with “2.” You can delete this subsequent number by pressing the Backspace key. Similarly, typing an asterisk (*), typing text, and hitting Enter creates a bulleted list.
If you start a numbered list, Keep automatically numbers subsequent lines.
Howard Wen / Foundry
5 more ways to create Keep notesHere are other ways to create a new note in Keep:
- Start a to-do list by clicking the checkbox icon on the right side of the “Take a note” bar. Then follow the steps in “Turn a note into a to-do list” below.
- Draw a doodle to put into the note by clicking the paintbrush icon on the right side of the “Take a note” bar. Then follow the steps in “Add a drawing” below. Note that this tool is available only when you use Keep in Chrome, Microsoft Edge, or another browser that’s based on Chromium, as well as the mobile app. It does not appear in Firefox.
- Upload an image to put in the new note by clicking the picture icon at the end of the “Take a note” bar. Then follow the steps in “Add or remove images” below. If you’re using the mobile app, you can take a photo with your phone or tablet.
- In the mobile app, record a voice memo. In the Android app, press the + icon and then the microphone icon that appears. On iOS, press the microphone icon at the bottom of the home screen. Start speaking, and Keep will transcribe your spoken words into text in real time.
In the Keep Android app, press the + button and then the microphone icon to record a voice memo.
Howard Wen / Foundry
- Have Google’s AI tool, Gemini, generate a list: In the Keep app for Android, tap the + icon, select Help me create a list, and enter a prompt. This feature is available only if you have a Pixel phone or a Google AI Pro, Google AI Ultra, or Workspace Labs account.
Some Android users can enlist Gemini to generate task lists.
Howard Wen / Foundry
Use the Keep Chrome extension to create notesGoogle offers a Keep extension for Chrome that lets you quickly create notes based on web pages as you browse. After you’ve installed it, pin the Keep icon to Chrome’s address bar so that stays visible: Click the Extensions icon, and on the panel that opens, click the pin icon to the right of Google Keep Chrome Extension.
Now open a web page and click the Keep icon to the right of the address bar. A new blank note will appear at the upper right. When you’re finished filling it out, click Create Note, and this new note will appear on your Keep notes list. The link to the web page will be set at the top of the new note.
The Keep extension for Chrome lets you create a note without having to open the Keep web app.
Howard Wen / Foundry
You can also use text on a web page to create a note: Highlight the text, right-click on it, and select Save selection to Keep.
And you can save an image on a web page to a new note: Right-click the image, select Google Keep Chrome Extension > Save image to Keep. A new blank note will appear at the upper right for you to fill out, as described above, with the image embedded on it.
The Keep extension lets you create a new note from selected text or an image on a web page.
Howard Wen / Foundry
Enhance your noteAt the bottom of a note is a toolbar that lets you take various actions on a note. Starting from the left…
Format text in a noteClick the icon of the underlined “A” to open a toolbar that lets you format text that you’ve selected in your note. There are three size options (heading 1, heading 2, normal) and three styles (bold, italic, underline). If you haven’t selected any text, new text that you start typing in your note will appear in the size and style that you’ve selected on this toolbar.
Change the backgroundThe palette icon lets you change the background color of the note. You can choose from eleven colors and nine background images.
A background color can help a note stand out on your board.
Howard Wen / Foundry
You may find it helpful to change a note’s background color to make it easy to spot on the main board, or to designate notes under a similar category with the same color. Or you could come up with a color-coded system — for example, red notes have the highest priority, while yellow notes get lower priority.
Set a reminder for your noteClick the bell icon to pick a day and time when you want a notification to be sent to your PC, phone, or tablet about this note. Select one of Keep’s suggested three reminder times or Pick date & time to set a custom time for the alert to appear. You can use this function to remind you of an appointment or other important event.
Remember important items or events by creating a note and adding a reminder.
Howard Wen / Foundry
A reminder appears along the bottom of an opened note or a note on the main page of Keep. You can remove a reminder from a note by hovering over it and clicking the X by the reminder. To change the reminder’s date, time, or interval: Click the reminder itself, which will open a panel that lets you change these attributes.
Note: Reminders for your Keep notes are saved and can also be managed in Google Tasks, which you can access through its web app or mobile app for Android or iOS.
Invite collaboratorsThe headshot icon lets you share the note with others so that you can work on it together. These people can be from your list of contacts saved under your Google account (or your corporate directory under a Google Workspace account), or you can invite people by entering their email addresses. They’ll get an email inviting them to collaborate on your note; they will need to sign in with a Google account to do so.
Need help with a note? Invite collaborators.
Howard Wen / Foundry
The people you invite to collaborate can change all aspects of your note, as described throughout this guide, except for deleting the note.
Add or remove imagesTo add images to your note, click the picture icon and select an image file stored on your PC. (In the mobile app, you can take a photo or choose an image stored on your phone or tablet.) It will appear at the top of your note.
Images you add to notes appear at the top.
Howard Wen / Foundry
You can keep adding images; each subsequent image you add to a note appears to the right of the first image you added. When you click an image in a note, a viewer tool shows you the image in a larger size.
To remove an image: Move the mouse pointer over it and click the trash can icon that appears on the lower-right of the image.
Archive a noteClicking the “down arrow in a box” icon removes the note from the main board and stows it in your Keep account’s archive. This is a good place to put notes for safekeeping when you’re no longer using them but don’t want to delete them.
Tag a note with a labelTagging a note with one or more labels enables you to find them quickly later. For example, you can choose to see only the notes that you’ve tagged with the “Work” label on the main board. (Later in this guide we’ll discuss how to filter notes by label.)
To add a label to a note: Click the three-dot icon on the note’s toolbar and select Add label from the pop-up menu. (If your note already has a label, select Change labels from the pop-up menu.) You can type a new label inside the “Enter label name” box and press the Enter key, or select the checkbox for a label that you’ve previously created on the list below. When you’re done adding labels to your note, just click anywhere outside of the “Label note” pop-up panel.
You can select from existing labels or create new ones on the fly.
Howard Wen / Foundry
Label tags appear along the bottom of an opened note or a note on the main page of Keep. You can remove a label from a note by hovering over it and clicking the X by the label.
Add a drawingRemember, this option is available only if you’re using Keep in Chrome or a Chromium-based browser, or the Keep mobile app.
Click the three-dot icon on the note’s toolbar and select Add drawing from the pop-up menu. A simple drawing tool opens; you can use it to quickly sketch a doodle using a mouse, touchpad, or the touchscreen of your phone or tablet.
Add a quick sketch to illustrate a point in your note.
Howard Wen / Foundry
When you’re finished, click the left-pointing arrow in the upper-left corner to return to your note. The drawing you sketched appears at the top of your note, and you can manage it like any other image.
Note: You can edit a drawing that you’ve made or draw over an image that you’ve added to a note. Simply open the note and click on the drawing or image. A drawing you’ve created will open immediately in the drawing tool. To open other images in the drawing tool, click the pen icon at the upper-right corner.
Turn a note into a to-do listClick the three-dot icon on the toolbar and select Show checkboxes from the pop-up menu. Checkboxes will be set at the beginning of each line of text in the main body of your note.
(If you turn this function on for a blank note by clicking the checkbox icon at the right end of the “Take a note” bar, each new line of text that you type will start with a checkbox.)
Give yourself a feeling of accomplishment by turning your note into a to-do list and checking items off as you complete them.
Howard Wen / Foundry
When you have a note with a checklist open, a six-dot icon appears to the left of each checkbox. You can rearrange the order of the items in the list by clicking and holding a six-dot icon, then dragging and dropping the item into another spot in the list. (In the mobile app, press and hold a six-dot icon, then drag and drop the item.)
You can use the same technique to indent items in the checklist: Grab the six-dot icon next to an item, then drag it to the right and release. This allows you to make a checkbox item appear as a subsection below the item above it.
Indent checklist items to make them subsections of your main list.
Howard Wen / Foundry
Clicking an item’s checkbox crosses out its text and sends it to the bottom of the note. If you click the checkbox again to remove the checkmark, this sends the checkbox line of text back to the list of unchecked items. Its text will no longer be crossed out.
Checking off completed items moves them to the bottom of the note.
Howard Wen / Foundry
You can delete a checkbox item (rather than marking it complete) by hovering the mouse pointer over it and clicking the X that appears over its right end.
To uncheck or delete all items you’ve checked, or to hide the checkboxes: Click the three-dot icon in the toolbar at the bottom of the note and select Uncheck all items, Delete checked items, or Hide checkboxes.
Extract text from imagesIf an image attached to your note depicts text, Keep can try to extract it. Click the three-dot icon, then select Grab image text to insert that text into your note.
Keep can detect text in images and insert it into a note.
Howard Wen / Foundry
Send your note to Google DocsWhen a note starts to turn into a missive, you can send it to Google Docs for more advanced editing options. Click the three-dot icon and select Copy to Google Docs. A copy of the note will be sent to your Google Drive, where you can further work on it in Docs as a normal document.
Finish your noteWhen you’re done tweaking your note, click Close. This shrinks down the note and sends it to the main board of your Keep home page. You can reopen a note by clicking it, make further changes to it, and click Close again.
Click Close to save your note and send it to the main board.
Howard Wen / Foundry
Manage your notesThe main board of your Keep home page is where your notes appear. Imagine it as a big cork board that your notes are pinned to as cards.
Once you’ve created several notes, it can be difficult to find the one you want. But never fear: Keep has a number of ways to make them easier to find.
Arrange your notesNotes that you’ve pinned (by clicking the pushpin icon to the right of a note’s title line) are set toward the top of the main board. More recently pinned notes appear first. Unpinned notes are pushed down toward the bottom.
Pinned notes appear at the top of your main board.
Howard Wen / Foundry
To rearrange your notes, just drag and drop one note to another spot on the main board. The other notes will rearrange themselves to accommodate the note in its new spot.
If you want to see a certain note at the top of your main board, pin it and then, after newer pinned notes displace it, drag and drop it at the top. Or open the note, unpin it, and immediately re-pin it. This will set the note as the first one at the upper left of the board.
Search for notesAlong the top of your Keep home page is a search box you can use to search for text in your notes. Notes that contain your search query will appear on the main board.
Find notes quickly by using the search box up top.
Howard Wen / Foundry
You can also narrow down the search to certain types of notes (for example, those that contain drawings or voice memos), notes that have certain labels, or notes that you’ve shared with certain contacts. Keep provides handy shortcuts below the search box that you can click to look for notes containing these and other criteria.
Keep has some search tricks up its sleeve, too: Remember how it transcribes voice memos to text? That text is searchable. What’s more, if text appears in an image in a note, Keep can search that text as well.
Choose List view or Grid viewTo the right of the search box are three icons:
- Refresh (a circular arrow — click this to reload your Keep home page)
- List view/Grid view (two horizontal bars or four small squares)
- Settings (a gear)
By default, your Keep home page is set to Grid view, which arranges your notes in a grid layout.
Clicking the horizontal bars icon puts your main board into List view, which makes your notes wider and shows them in one long, single column. This can be better for scrolling through them on a phone screen, or if you’d rather see more information on individual notes at a glance.
When you’re in List view, the icon changes to four small squares. Click it to return to Grid view.
Click the List view icon to see more of each note at once. If you prefer the default compact view, click the Grid view icon.
Howard Wen / Foundry
Navigate the left sidebarKeep’s left sidebar helps you filter which notes are shown on the main board.
- Click Reminders to see only notes that you set with reminder notifications.
- Click one of the labels to see only notes that you’ve tagged with that label.
The left sidebar lets you filter notes by label.
Howard Wen / Foundry
- Click Edit labels to create a new label, change the name of a label, or delete a label.
- Click Archive to see only notes that you’ve archived.
- Click Trash to see notes that you’ve recently deleted. From here you can restore a note to the main board. Otherwise, a deleted note stays in Trash for 7 days before it’s removed forever from your Keep account.
Select a note in Trash, then click the Restore icon on the toolbar along the bottom of the note to restore it to the main board.
Howard Wen / Foundry
- Click the triple-bar icon at the upper-left corner to narrow or widen the left sidebar. When narrowed, the sidebar shows only the icons of these note labels. This may enable another column of notes to be shown on the main board, but it depends on your screen resolution, the size of your browser window, and your browser’s zoom level. You can try zooming your browser view in or out by pressing Ctrl + – (minus key) or Ctrl + + (plus key) to see how that affects the notes shown in the main window.
Click the three-line icon at the upper left to narrow the left sidebar and allow for another column of notes to be shown on the main board.
Howard Wen / Foundry
Adjust settingsTo the right of the List view/Grid view icon, click the gear icon and select Settings from the pop-up menu. A panel opens where you can disable note sharing, turn off thumbnail previews for links in your notes, and more.
Settings lets you tweak some of Keep’s default behaviors.
Howard Wen / Foundry
Use keyboard shortcutsYou can save time in Google Keep by using keyboard shortcuts to trigger some actions. Below are some of the most useful shortcuts. To see more, click the gear icon at the upper right of the Keep home page and select Keyboard shortcuts, or just type ? when you’re on the Keep home page.
Handy Google Keep keyboard shortcuts ActionWindows shortcutmacOS shortcutON THE KEEP HOME PAGEStart a new noteccStart a new checklist notellSearch notes//Move highlight to next notejjMove highlight to previous notekkSelect highlighted notexxArchive selected note(s)eeMove selected note(s) to Trash##Pin or unpin selected note(s)ffToggle between List view and Grid viewCtrl-g⌘-gIN A NOTECopyCtrl-c⌘-cCutCtrl-x⌘-xPasteCtrl-v⌘-vUndoCtrl-z⌘-zRedoCtrl-y⌘-yFinish editing noteEscEscThis article was originally published in January 2019 and most recently updated in April 2026.
Related reading:
Kategorie: Hacking & Security
Toto je 11 položek v nastavení iPhonu, které byste měli nechat vypnuté
Omezte sledování polohy, analýzu dat a personalizaci reklam • Deaktivujte nepotřebné funkce jako probuzení zvednutím či oznámení • Vypněte zbytečné služby, sdílení obsahu a sledování kondice
Kategorie: IT News
Zajímavé přednášky z TechEdu: cloud, bezpečnost i věci pro Linux
Největší česko-slovenská konference o IT TechEd se blíží, proběhne od 19. do 21. května. I v letošním roce je v hybridním formátu. Můžete se zúčastnit online nebo dorazit do Premiere Cinemas VIVO! Hostivař. Seznamte se s programem, který tvoří padesát přednášek od expertů z praxe.
Kategorie: GNU/Linux & BSD
Konec píchání do prstu se blíží. V MIT pracují na hodinkách, které změří hladinu cukru v krvi světlem
Neinvazivní metoda zjišťuje hladinu krevního cukru světlem • Optická technologie analyzuje tři konkrétní pásma pomocí Ramanovy spektroskopie • Sledování glukózy bez bolestivých vpichů brzy nabídnou běžné chytré hodinky
Kategorie: IT News
Tropic Trooper Uses Trojanized SumatraPDF and GitHub to Deploy AdaptixC2
Chinese-speaking individuals are the target of a new campaign that uses a trojanized version of SumatraPDF reader to deploy the AdaptixC2 Beacon post-exploitation agent and ultimately facilitate the abuse of Microsoft Visual Studio Code (VS Code) tunnels for remote access.
Zscaler ThreatLabz, which discovered the campaign last month, has attributed it with high confidence to Tropic Trooper (aka Ravie Lakshmananhttp://www.blogger.com/profile/[email protected]
Kategorie: Hacking & Security
Greece relaxes Euro biometric border entry rules amid airport chaos
Greece is taking a flexible approach to introducing the European Union's biometric Entry/Exit System (EES), after some British passport holders missed flights home following the system's implementation on 10 April. On 20 April, the Hellenic Police said it had started to fully deploy EES and Greece will use all necessary measures to manage traffic at border crossings in accordance with the regulations. The UK government updated its travel advice on the same day: "Greek authorities have indicated that they will not collect biometric data (fingerprints and photos) for UK travellers as part of EES" although passengers should "follow the advice of authorities on the ground". The Independent's travel correspondent Simon Calder said EES regulations allow flexibility to suspend biometric data collection at specific places for limited periods of time, yet the European Commission does not expect blanket exemptions for citizens of specific countries for extended periods. EES went live in October last year, causing launch-day queues at Prague's international airport. Many countries phased it in, but its use became compulsory on 10 April. Since then some Brits have missed flights due to border control delays caused by the system, including around 100 passengers due to take an Easyjet flight from Milan Linate to Manchester on 12 April and a smaller number trying to travel with Ryanair from Milan Bergamo to Manchester on 16 April. "The issues some passengers have experienced are unacceptable and so we continue to urge border authorities to ensure they make full and effective use of the permitted flexibilities for as long as needed, so our customers' travel plans are not impacted," Easyjet said in a statement. The airline will transfer passengers delayed by EES to other flights it provides for free, something it offered to a Register staffer and his family when they were delayed trying to fly from Paris to London Gatwick on 10 April. As replacement flights were not available until 15 days later, our vulture decided to catch a Eurostar instead. Airport operator group ACI Europe and Airlines for Europe, which includes Easyjet, Ryanair and British Airways parent company International Airlines Group, said some passengers have waited two to three hours due to the system. "Border control authorities must be allowed to fully suspend the EES when waiting times become excessive," said the heads of the two organizations. "This is essential not only in the coming weeks, but throughout the peak summer travel season." As of 10 April, the European Commission said that EES had registered more than 52 million entries and exits, refused entry to more than 27,000 individuals (about 0.1 percent of those trying to enter) and identified more than 700 as security risks. The EU has built a Travel to Europe app allowing those required to use EES to undertake some of the process in advance. However, so far only Sweden and Portugal are accepting its use. ®
Kategorie: Viry a Červi
Greece relaxes Euro biometric border entry rules amid airport chaos
Missed flights and more means something has got to give at the border
Greece is taking a flexible approach to introducing the European Union's biometric Entry/Exit System (EES), after some British passport holders missed flights home following the system's implementation on 10 April.…
Kategorie: Viry a Červi
Výborný batoh za 719 Kč. Voděodolný Kingsons s objemem 30 litrů pojme notebook i oblečení na dlouhý výlet
Kingsons Laptop Backpack 30L zlevnil o 20 % na 719 Kč. • Na dovolenou do něj dáte notebook, příslušenství i oblečení. • Je kvalitně vyrobený, může na palubu letadla, jen pozor na netradiční boční plnění.
Kategorie: IT News
UK gov pays public £550 to discuss Digital ID – then bans journalists from the room
Nothing says 'We want honest opinions' like a 36,000-letter mailshot with no awkward questions allowed
Members of the UK government’s People’s Panel on Digital ID will spend two weekends in Birmingham and three evenings on Zoom discussing how Britain should build a national digital identity system, earning £550 plus expenses for their trouble.…
Kategorie: Viry a Červi
PhantomRPC: A new privilege escalation technique in Windows RPC
Intro
Windows Interprocess Communication (IPC) is one of the most complex technologies within the Windows operating system. At the core of this ecosystem is the Remote Procedure Call (RPC) mechanism, which can function as a standalone communication channel or as the underlying transport layer for more advanced interprocess communication technologies. Because of its complexity and widespread use, RPC has historically been a rich source of security issues. Over the years, researchers have identified numerous vulnerabilities in services that rely on RPC, ranging from local privilege escalation to full remote code execution.
In this research, I present a new vulnerability in the RPC architecture that enables a novel local privilege escalation technique likely in all Windows versions. This technique enables processes with impersonation privileges to elevate their permissions to SYSTEM level. Although this vulnerability differs fundamentally from the “Potato” exploit family, Microsoft has not issued a patch despite proper disclosure.
I will demonstrate five different exploitation paths that show how privileges can be escalated from various local or network service contexts to SYSTEM or high-privileged users. Some techniques rely on coercion, some require user interaction and some take advantage of background services. As this issue stems from an architectural weakness, the number of potential attack vectors is effectively unlimited; any new process or service that depends on RPC could introduce another possible escalation path. For this reason, I also outline a methodology for identifying such opportunities.
Finally, I examine possible detection strategies, as well as defensive approaches that can help mitigate such attacks.
Microsoft RPC (Remote Procedure Call) is a Windows technology that enables communication between two processes. It enables one process to invoke functions that are implemented in another process, even though they are running in different execution contexts.
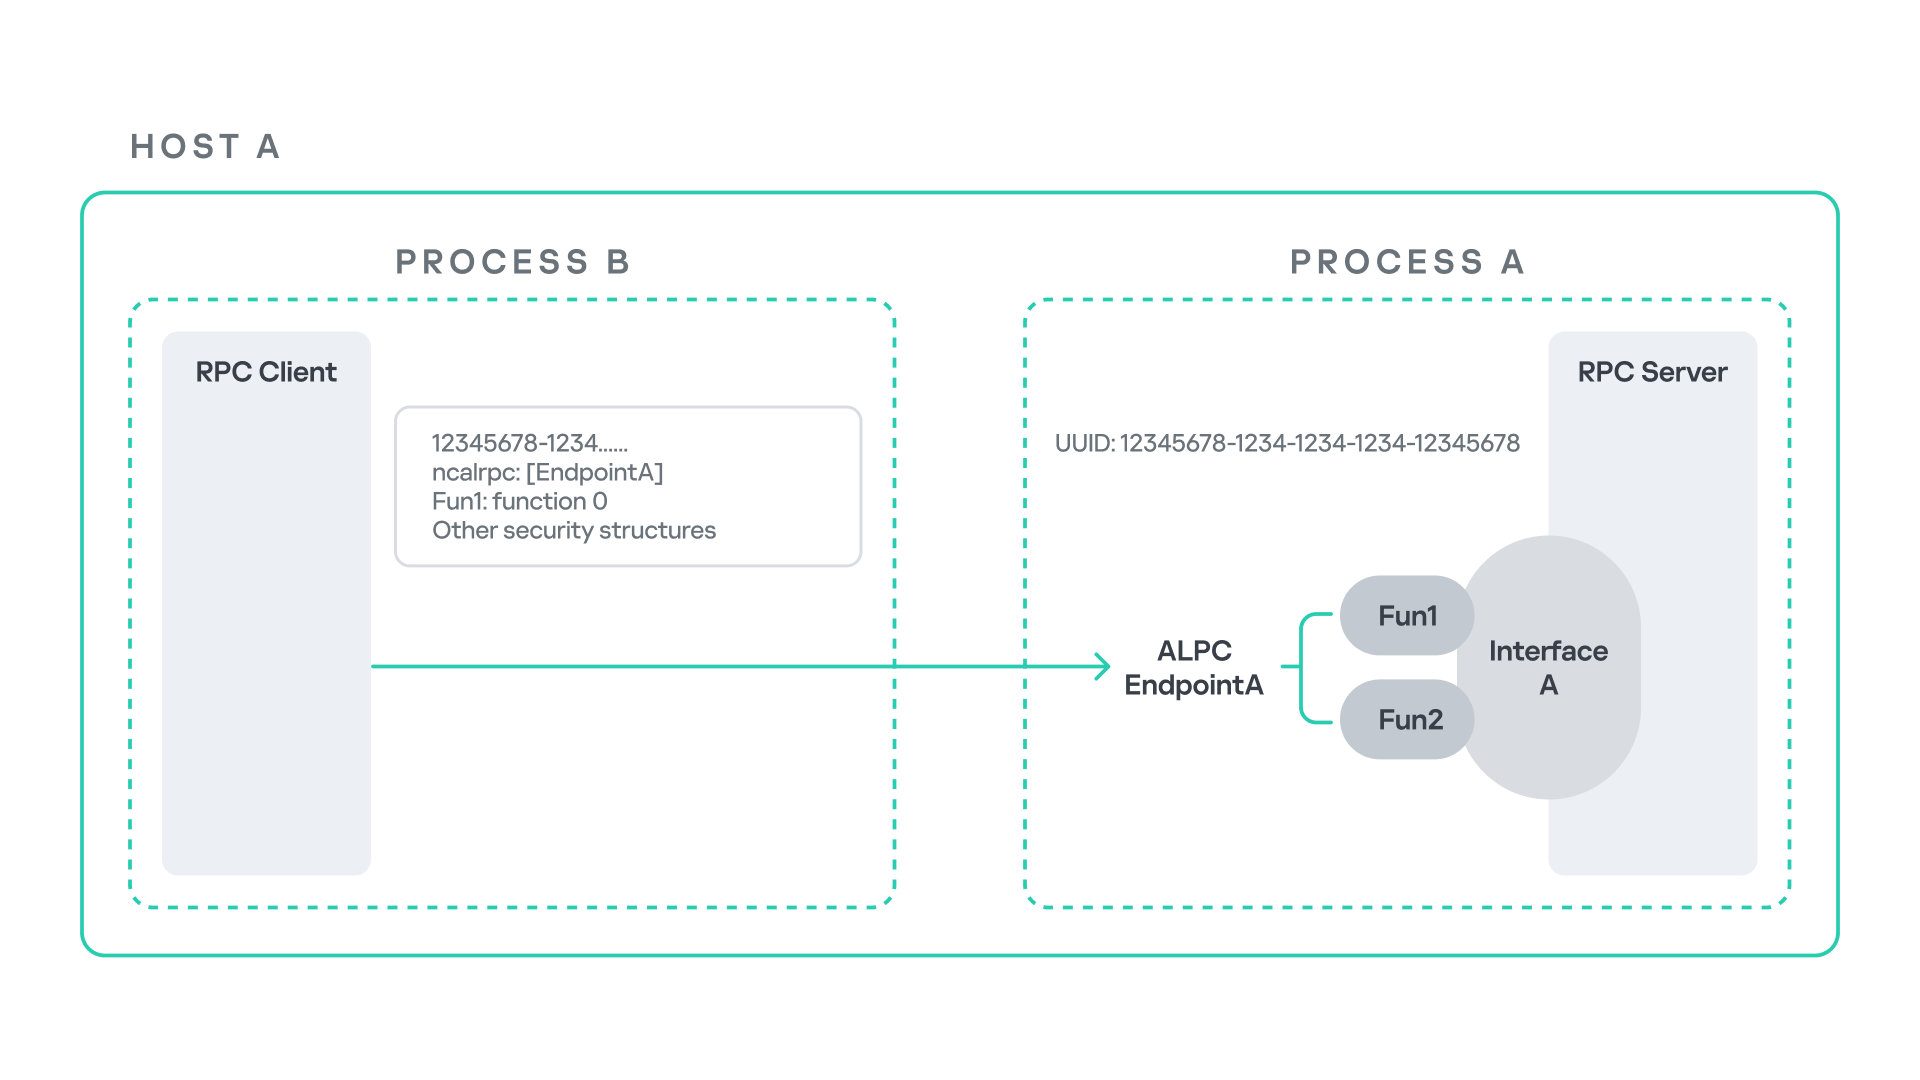
The figure below illustrates this mechanism.
Let us assume that Host A is running two processes: Process A and Process B. Process B needs to execute a function that resides inside Process A. To enable this type of interaction, Windows provides the Remote Procedure Call (RPC) architecture, which follows a client–server model. In this model, Process A acts as the RPC server, exposing its functionality through an interface, in our example, Interface A. Each RPC interface is uniquely identified by a Universally Unique Identifier (UUID), which is represented as a 128-bit value. This identifier enables the operating system to distinguish one interface from another.
The interface defines a set of functions that can be invoked remotely by the RPC client implemented in Process B. In our example, the interface exposes two functions: Fun1 and Fun2.
To communicate with the server, the RPC client must establish a connection through a communication endpoint. An endpoint represents the access point that enables transport between the client and the server. Because RPC supports multiple transport mechanisms, different endpoint types may exist, depending on the underlying transport.
For example:
- When TCP is used as the transport layer, the endpoint is a TCP port.
- When SMB is used, communication occurs through a named pipe.
- When ALPC is used, the endpoint is an ALPC port.
Each transport mechanism is associated with a specific RPC protocol sequence. For instance:
- ncacn_ip_tcp is used for RPC over TCP.
- ncacn_np is used for RPC over named pipes.
- ncalrpc is used for RPC over ALPC.
In this research, I focus specifically on Advanced Local Procedure Call (ALPC) as the RPC transport mechanism. ALPC is a Windows interprocess communication mechanism that predates MSRPC. Today, RPC can leverage ALPC as an efficient transport layer for communication between processes located on the same machine.
For simplicity, an ALPC port can be thought of as a communication channel similar to a file, where processes can send messages by writing to it, and receive messages by reading from it.
When the client wants to invoke a remote function, for example, Fun1, it must construct an RPC request. This request includes several important pieces of information, such as the interface UUID, the protocol sequence, the endpoint, and the function identifier. In RPC, functions are not referenced by name, but by a numerical identifier called the operation number (OPNUM). Depending on the requirements of the call, the request may also contain additional structures, such as security-related information.
Impersonation in WindowsIn Windows, impersonation enables a service to temporarily operate using another user’s security context. For example, a service may need to open a file that belongs to a user while performing a specific operation. By impersonating the calling user, the system allows the service to access that file, even if the service itself would not normally have permission to do so. You can read more about impersonation in James Forshaw’s book Windows Security Internals.
This research focuses specifically on RPC impersonation. Instead of describing the interaction as a service and a user, I refer to the participants as a client and a server. In this model, the RPC server may temporarily adopt the identity of the client that initiated the request.
To perform this operation, the RPC server can call the RpcImpersonateClient API, which causes the server thread to execute under the client’s security context.
However, in some situations, a client may not want the server to be able to impersonate its identity. To control this behavior, Windows introduces the concept of an impersonation level. This defines how much authority the client grants the server to act on its behalf.
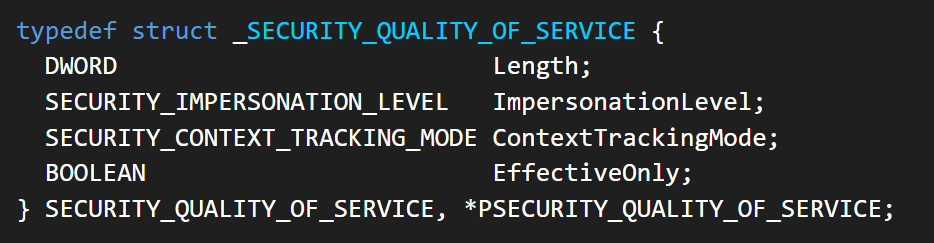
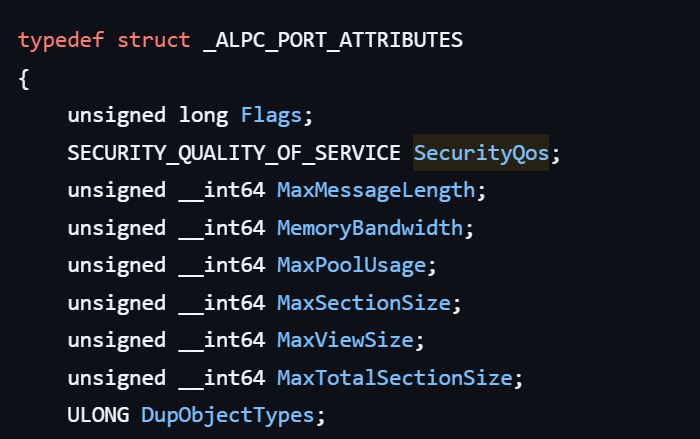
These settings are defined as part of the Security Quality of Service (SQOS) parameters, specified using the SECURITY_QUALITY_OF_SERVICE structure.
As you can see, this structure contains the impersonation level field, which determines the extent to which the server can assume the client’s identity.
Impersonation levels range from Anonymous, where the server cannot impersonate the client at all, to Impersonate and Delegate, which allow the server to act fully on behalf of the client.
At the same time, not every server process is allowed to impersonate a client. If any process could perform impersonation freely, it would pose a serious security risk. To prevent this, Windows requires the server process to possess a specific privilege called SeImpersonatePrivilege. Only processes with this privilege can successfully impersonate a client.
This privilege is granted by default to certain service accounts, such as Local Service and Network Service.
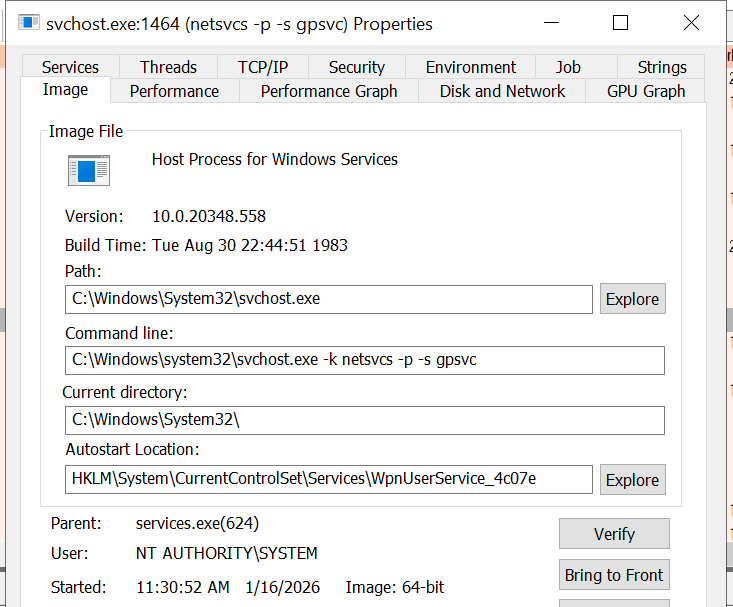
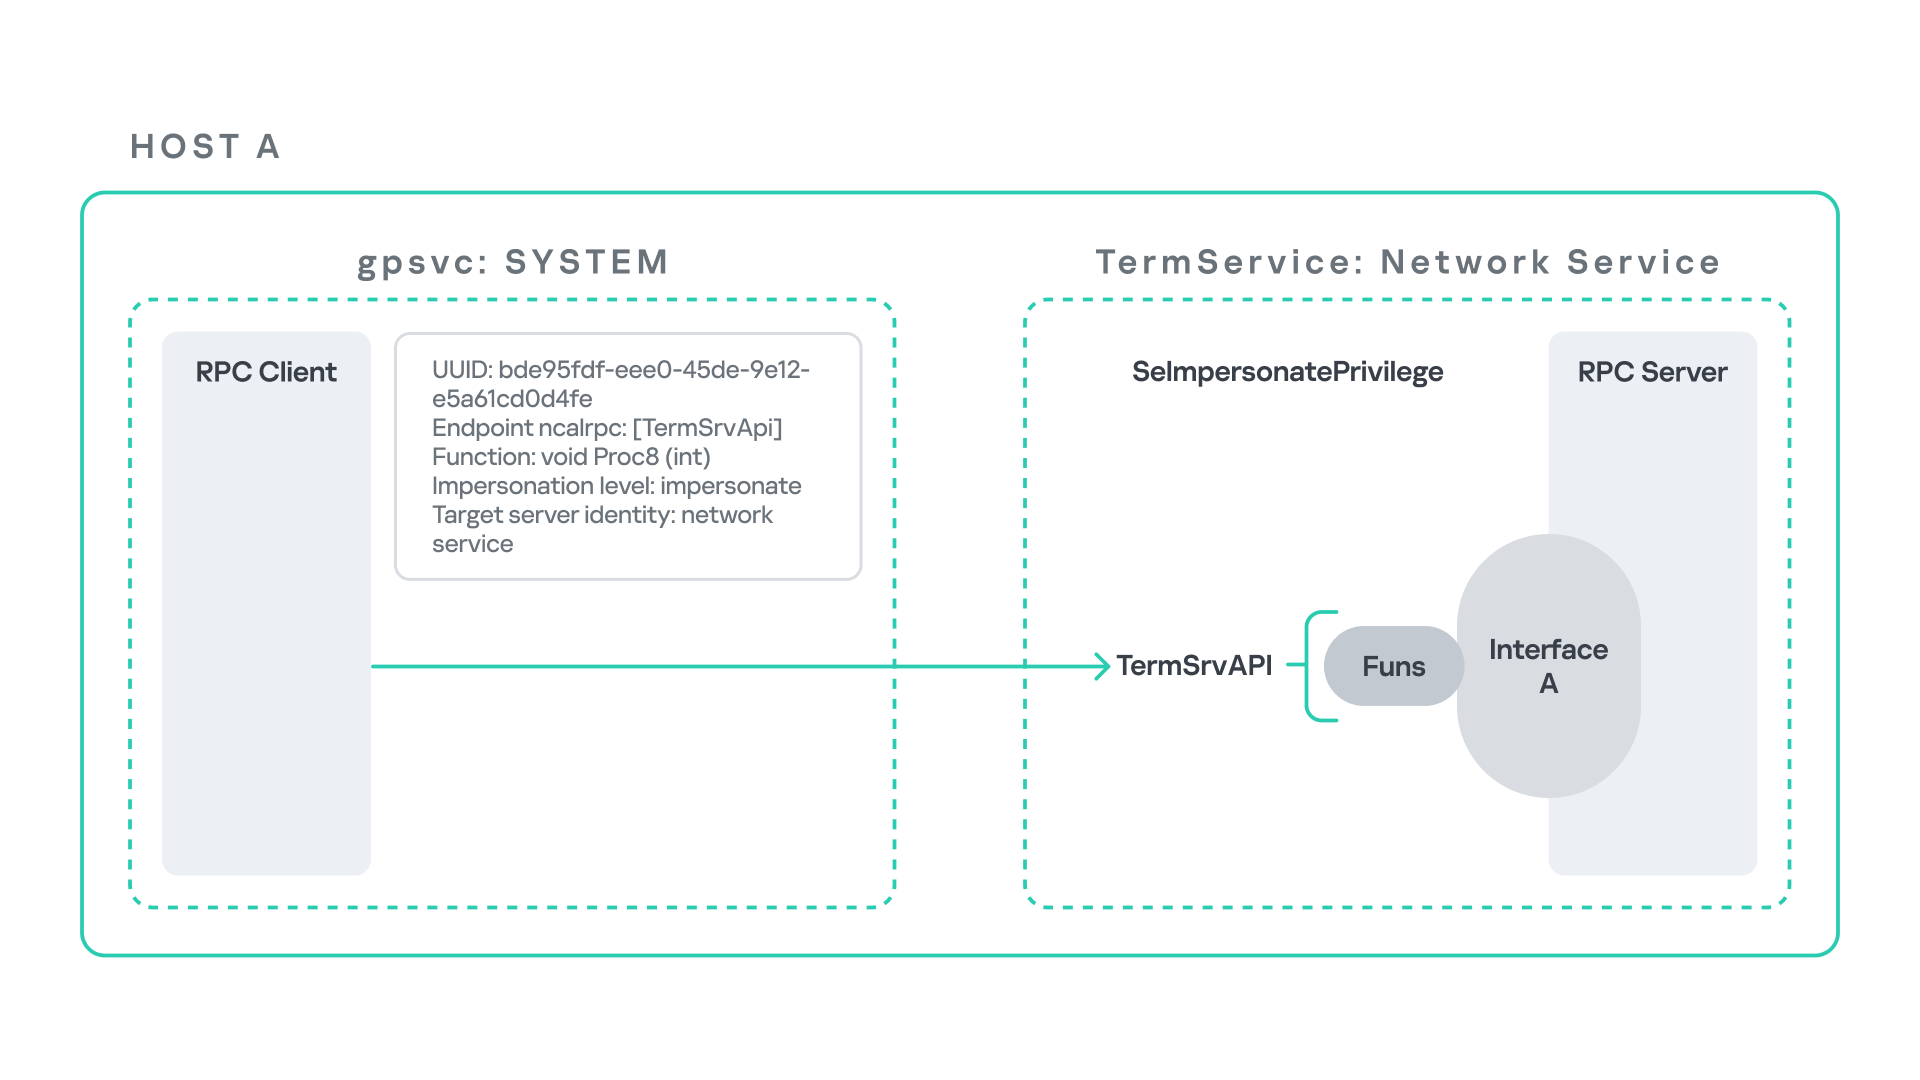
Interaction between Group Policy service and TermServiceThe Group Policy Client service (gpsvc) is a core Windows service responsible for applying and enforcing group policy settings on a system. It runs under the SYSTEM account inside svchost.exe.
When a group policy update is triggered, Windows uses an executable called gpupdate.exe. This tool can be executed with the /force flag to force an immediate refresh of all group policy settings. Internally, this executable communicates with the Group Policy service, which coordinates the update process.
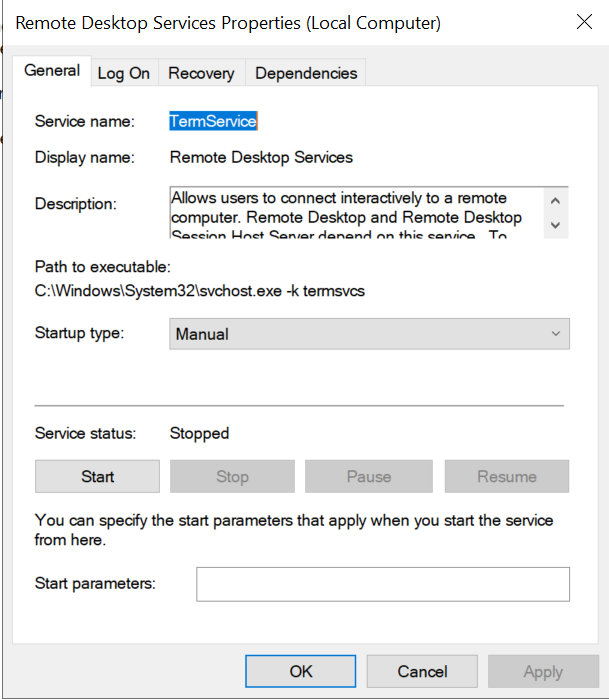
At a certain stage during this operation, the Group Policy service attempts to communicate with TermService (Terminal Service, the Remote Desktop Services service) using RPC.
TermService is responsible for providing remote desktop functionality. This service is not running by default and can be enabled manually by the administrator via activation of Remote Desktop access. When this happens, the service exposes an RPC server with multiple interfaces and endpoints. TermService runs under the NT AUTHORITY\Network Service account.
When the command gpupdate /force is executed, the Group Policy service performs an RPC call to the TermService using the following parameters:
- UUID: bde95fdf-eee0-45de-9e12-e5a61cd0d4fe.
- Endpoint: ncalrpc:[TermSrvApi].
- Function: void Proc8(int).
However, because TermService is disabled by default, the RPC call fails and an exception occurs in rpcrt4.dll (the RPC runtime). The returned error is:
- 0x800706BA (RPC_S_SERVER_UNAVAILABLE, 1722).
This error indicates that the RPC client could not reach the target server.
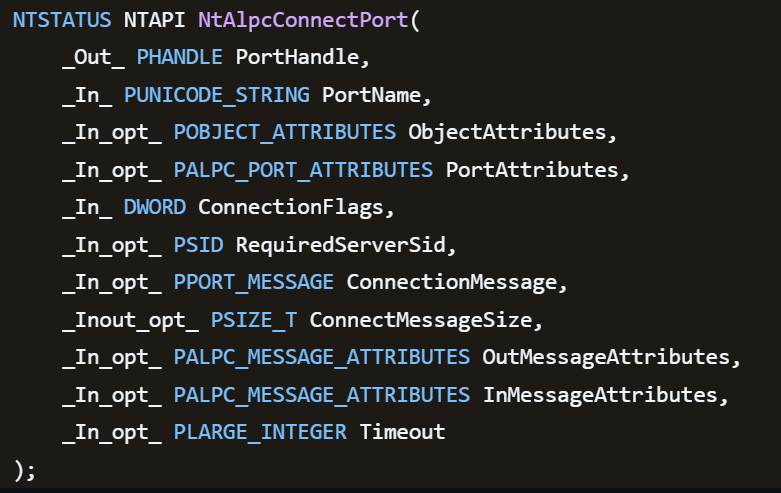
Tracing the failure path further reveals that the root cause originates from a call to NtAlpcConnectPort, which is used by RPC to establish an ALPC connection between processes.
The NtAlpcConnectPort function is responsible for connecting to a specific ALPC port and returning a handle that the client can use for further communication. This function accepts multiple parameters.
The first two parameters include:
- A pointer to the returned port handle.
- The ALPC port name, represented as an ASCII string.
Another important argument is PortAttributes, which is an ALPC_PORT_ATTRIBUTES structure. Inside this structure is the SECURITY_QUALITY_OF_SERVICE structure, which, as mentioned above, defines the impersonation level used for the connection.
The final parameter of interest is RequiredServerSid, which specifies the expected identity of the target server process. This identity is represented using a Security Identifier (SID) structure.
Inspecting this call reveals that the Group Policy service attempts to connect to the RPC server using an impersonation level of Impersonate, expecting the remote server to run under the Network Service account. This behavior makes sense because TermService normally runs under Network Service.
Based on all the information above, the following scheme can be created to illustrate the interaction between TermService and gpsvc.
Up to this point, nothing unusual has occurred. An RPC client attempts to connect to an RPC server that is unavailable, resulting in an exception handled by the RPC runtime.
However, an interesting question arises: What if an attacker compromises a service that runs under the Network Service identity and mimics the exact RPC server exposed by TermService?
Could the attacker deploy a fake RPC server with the same endpoint?
If so, would the RPC runtime allow the client to connect to this illegitimate server?
And if the connection is successful, how could an attacker leverage this behavior?
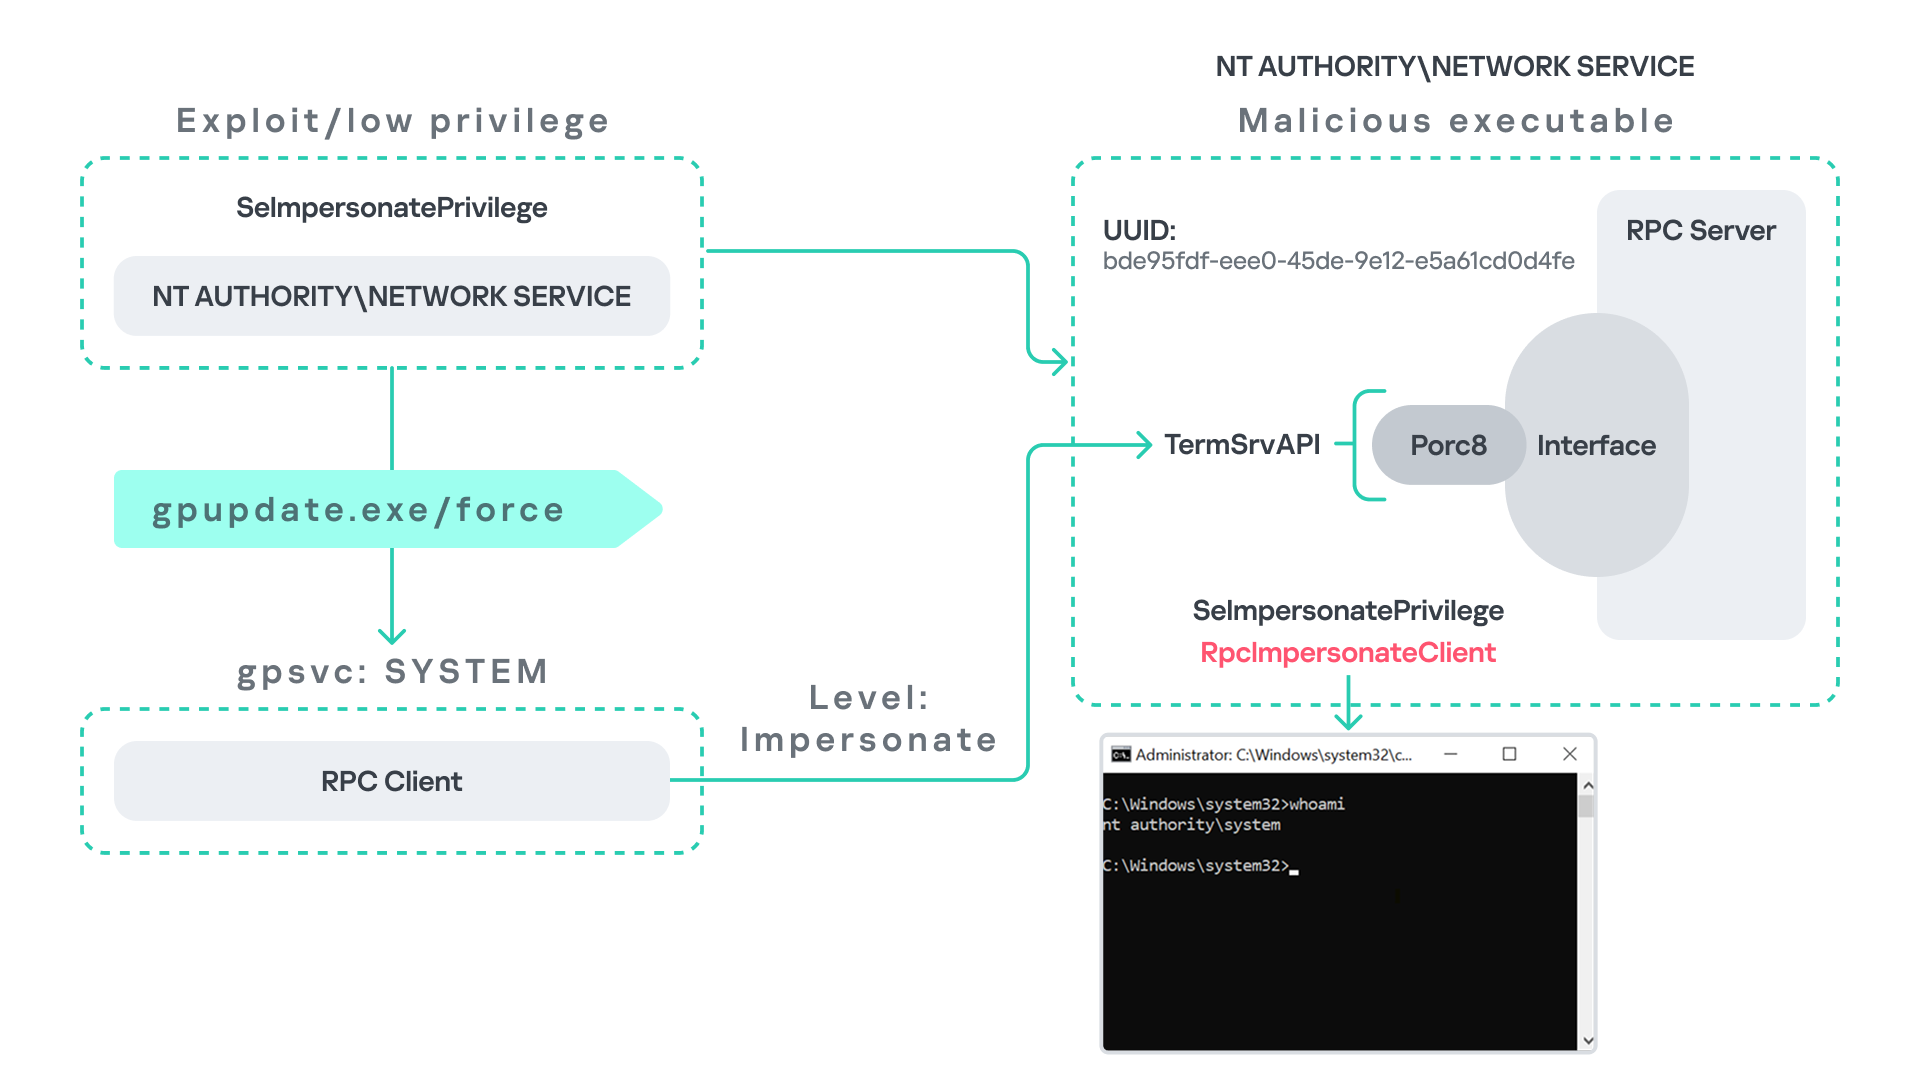
Coercing the Group Policy serviceTo better understand the implications of the previously described behavior, let us consider the following attack scenario.
Imagine an attacker has compromised a service running on the system under the Network Service account, for example, an IIS server operating under the Network Service account. With this level of access, the attacker can deploy a malicious RPC server.
The attacker’s RPC server is designed to mimic the RPC interface exposed by the Remote Desktop service (TermService). Specifically, it implements the same RPC interface UUID and exposes the same endpoint name: TermSrvApi. Once deployed, the malicious server listens for RPC requests that would normally be directed to the legitimate RDP service.
Next, the attacker coerces the Group Policy service by triggering a policy update using gpupdate.exe /force. This causes the Group Policy Client service, which runs under the SYSTEM account, to perform the previously described RPC call. As observed earlier, this RPC call uses a high impersonation level (Impersonate).
When the attacker’s fake RPC server receives the request, it calls RpcImpersonateClient. This enables the server thread to impersonate the security context of the calling client, which, in this case, is SYSTEM.
As a result, the attacker can elevate privileges from Network Service to SYSTEM. In our proof-of-concept implementation, the exploit demonstrates privilege escalation by spawning a SYSTEM-level command prompt.
When this attack scenario was first discussed, it was purely theoretical. However, after implementing the malicious RPC server, the experiment confirmed that Windows allowed the server to be deployed and started successfully, and that the RPC runtime permitted the client to connect to the malicious endpoint. This made it possible to reliably escalate privileges from Network Service to SYSTEM using this technique. For this attack to succeed, though, at least one group policy must be applied on the system.
RPC architecture flowFurther investigation revealed that many Windows services attempt to communicate with TermService using RPC. These RPC calls often originate from winsta.dll, which acts as the RPC client component.
Windows processes invoke APIs exposed by winsta.dll; these APIs rely internally on RPC communication with TermService. This pattern is common in Windows; many system DLLs use RPC behind the scenes when their exported APIs are called.
However, it appears that the RPC runtime (rpcrt4.dll) does not provide a mechanism to verify the legitimacy of RPC servers. Moreover, Windows allows another process to deploy an RPC server that exposes the same endpoint as a legitimate service.
As a result, this architectural design introduces a large attack surface because RPC is heavily used across numerous system DLLs. Applications that invoke seemingly benign APIs may unintentionally trigger privileged RPC interactions. Under certain conditions, these interactions could be abused to achieve local privilege escalation without the user’s knowledge.
Identifying RPC calls to unavailable serversAs the issue appears to stem from an architectural weakness, a systematic approach is needed to identify RPC clients attempting to communicate with servers that are unavailable. First, I need a platform capable of monitoring RPC activity and extracting relevant information from each RPC request.
Specifically, I need to capture key RPC metadata, including:
- Interface UUID, endpoint, and OPNUM.
- Impersonation level and RPC status code.
- Client process privilege level, process name, and module path.
This information is critical because it enables me to reconstruct the RPC interaction, mimic the expected RPC server, and determine how the call is triggered.
The platform that provides this capability is Event Tracing for Windows (ETW). ETW is a built-in Windows logging framework that captures both kernel-mode and user-mode events in real time.
Windows provides a tool called logman to collect ETW data. It enables us to create trace sessions, select event providers, and configure the verbosity level of the tracing process. The collected tracing data is stored in an .etl file, which can later be analyzed using tools such as Event Viewer or other ETW analysis utilities.
ETW provides deep visibility into RPC activity without requiring modifications to applications. Through ETW, it is possible to capture detailed RPC information, such as:
- RPC bindings
- Endpoints
- Interface UUIDs
- Authentication details
- Call flow and timing
- RPC status codes
However, I’m not interested in every RPC event. My focus is on RPC call failures, specifically those that return the status RPC_S_SERVER_UNAVAILABLE.
For an event to be relevant to this research, the exception must meet two conditions:
- It must originate from a high-privileged process because impersonating such a process may allow an attacker to escalate privileges to a more powerful security context.
- The RPC call must use a high impersonation level, enabling the server to fully impersonate the client once the connection is established.
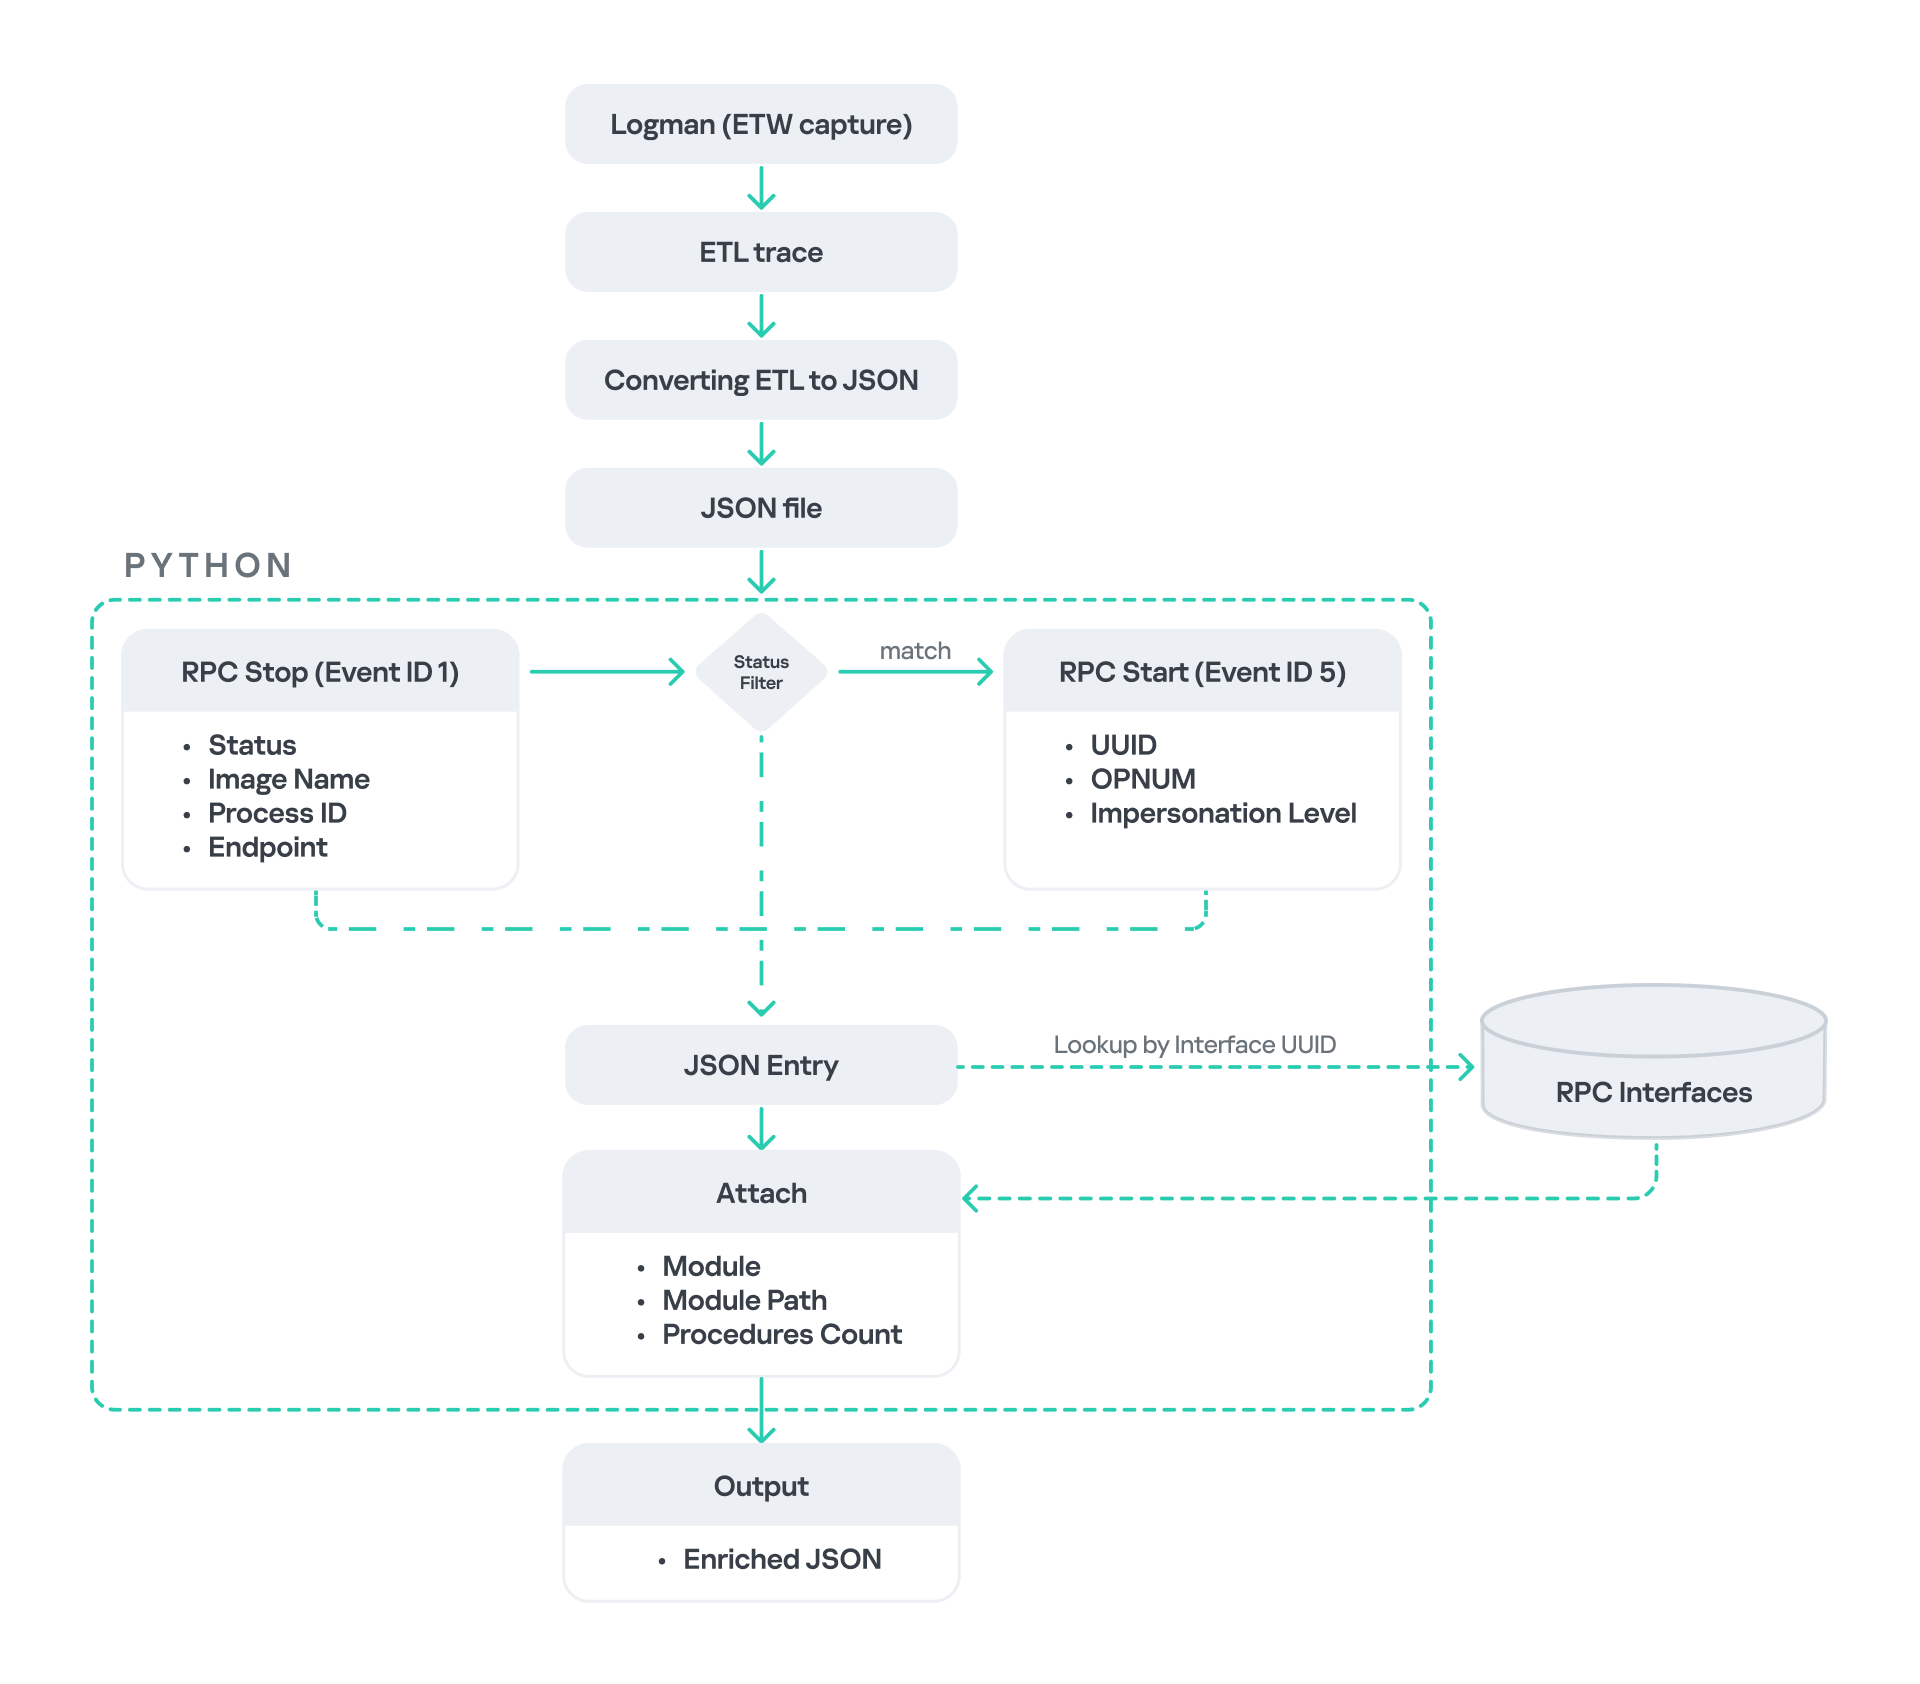
I cannot rely solely on the raw ETW output to implement this framework because it contains thousands of events, making manual filtering with standard tools inefficient. Therefore, I need to automate this process. The workflow shown below enables me to efficiently filter and extract only those events that are relevant to this analysis.
After generating the logs as an .etl file, I convert them to JSON format using tools such as etw2json. JSON is a much easier format to process programmatically. In this case, I use a Python script to filter and extract the relevant information.
The filtering process begins with a search for Event ID 1, which corresponds to an RPC stop event. This event indicates that the RPC client has completed the call and the result is available. From this event, I can extract useful information, such as:
- Status code
- Client process name
- Client process ID
- Endpoint
After extracting the status code, I filter for the specific value RPC_S_SERVER_UNAVAILABLE, which indicates that the target server was unreachable during an RPC call. These events represent the scenarios that are of interest.
However, Event ID 1 does not contain all of the required RPC metadata. To obtain the missing information, it is correlated with Event ID 5, which represents the RPC start event. This event is generated when the client initiates the RPC call.
By matching the metadata between Event ID 1 and Event ID 5, I can recover the missing details, including:
- Interface UUID
- OPNUM
- Impersonation level
After correlating and filtering these events, a JSON entry is obtained that is almost ready for analysis. At this stage, the data can be enriched further by adding context that will be helpful when reversing or analyzing the RPC server implementation. For example, the following can be identified:
- The DLL where the RPC interface is implemented
- The location of that DLL
- The number of procedures exposed by the interface
To retrieve this information, I match the UUID with an external RPC interface database. In this case, I used the RPC database, which contains a comprehensive list of RPC interfaces and their corresponding DLL implementations.
At the end of this process, a complete JSON dataset is obtained that can be used for further analysis.
One important observation is that the RPC calls I am looking for may only occur when specific system actions are triggered. Additionally, the resulting exceptions may vary from one system to another depending on which services are enabled or disabled. Therefore, I need a reliable way to generate these RPC exceptions.
In this research, I used several approaches to trigger such events:
- Monitoring RPC activity during system startup
I observed RPC activity while the system booted. During startup, many services initialize and perform various RPC calls, which increases the chances of capturing calls to unavailable servers. - Triggering administrative operations
I developed PowerShell scripts that perform common administrative tasks, such as updating Group Policy, changing network settings, or creating new users. These operations often trigger RPC communication and may generate exceptions. - Disabling services intentionally
After observing that Remote Desktop was disabled by default, I extended this idea by disabling additional services one by one and repeating the previous steps. This approach can reveal RPC clients that attempt to connect to services that are no longer available.
After running the logging and monitoring framework described earlier, I identified four additional scenarios that can lead to privilege escalation. The following sections introduce each case and explain how escalation can be achieved.
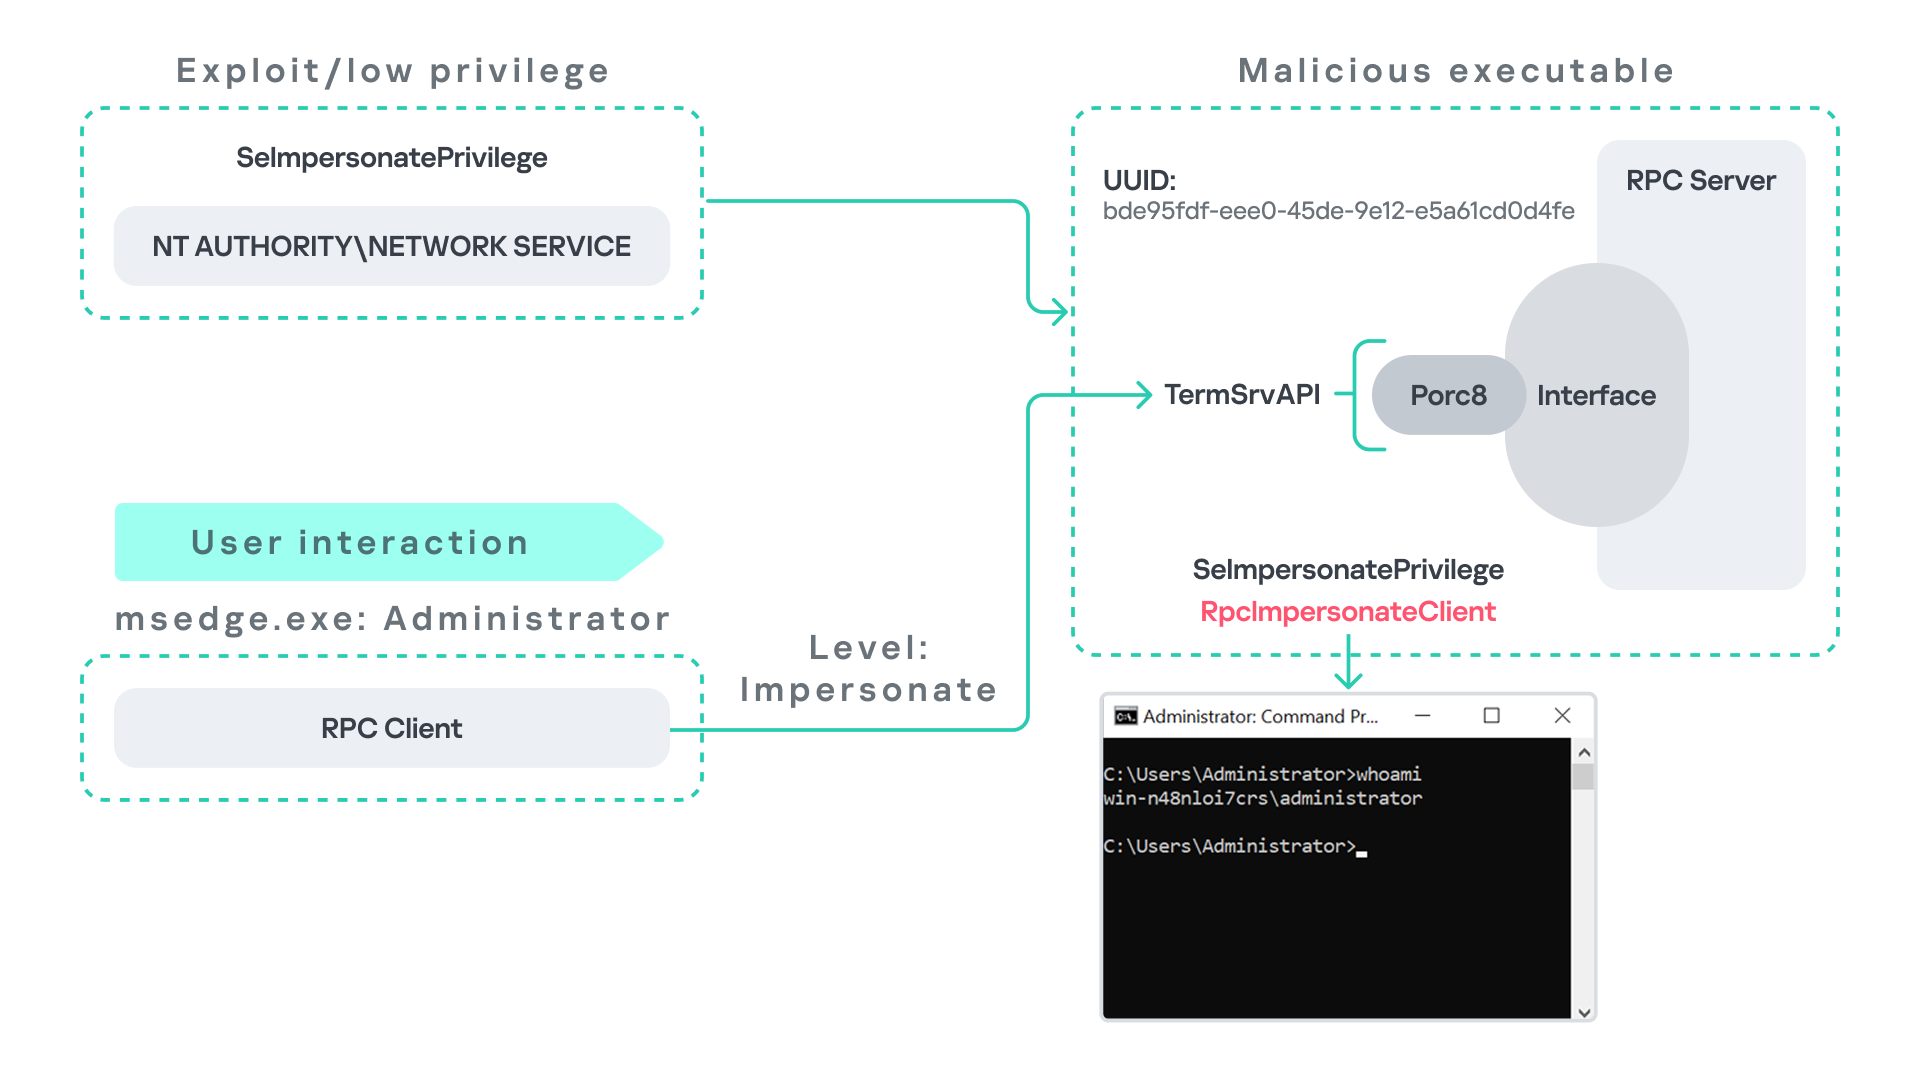
User interaction: From Edge to RDPMicrosoft Edge (msedge.exe) comes preinstalled on Windows systems. During startup, Edge triggers an RPC call to TermService. This RPC call is performed with a high impersonation level.
As previously discussed, Terminal Service is disabled by default. Because of this, the expected RPC server is unavailable, creating an opportunity for the attack scenario illustrated below.
The attack follows the same initial assumption as before: the attacker has already compromised a process running under the Network Service account. From there, they deploy the same malicious RPC server that mimics the legitimate TermService RPC interface.
However, unlike the previous scenario where the attacker coerced the Group Policy service, no coercion is required this time. Instead, the attacker simply waits for a high-privileged user, such as an administrator, to launch msedge.exe.
When Edge starts, it triggers the RPC client to attempt communication with the expected TermService RPC interface. Because the legitimate server is not running, the request is received by the attacker’s fake RPC server. Since the RPC call is made with a high impersonation level, the malicious server can call RpcImpersonateClient to impersonate the client process.
As a result, the attacker is able to impersonate the administrator-level client and escalate privileges from Network Service to Administrator.
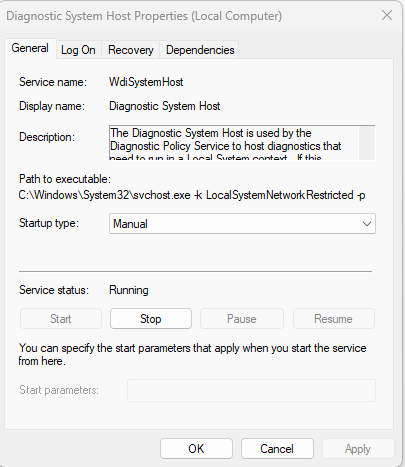
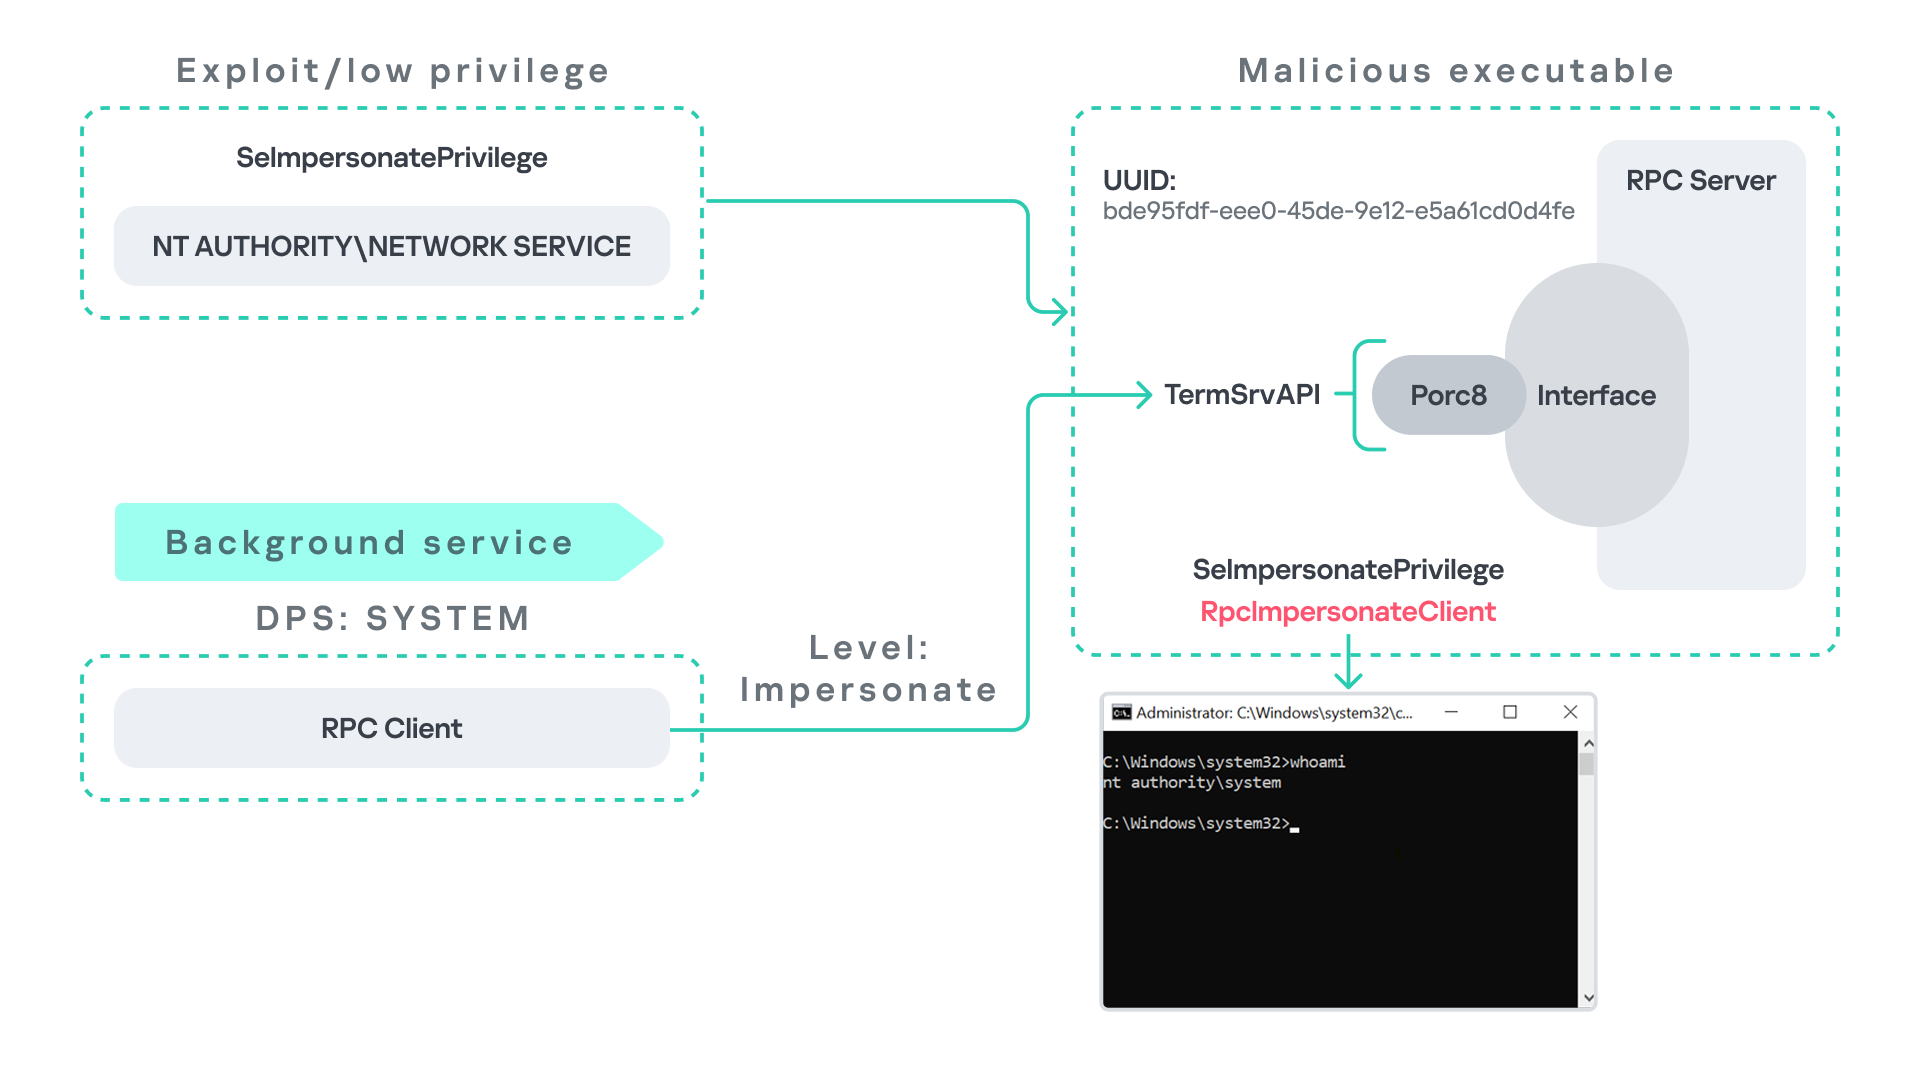
Background services: From WDI to RDPSome background Windows services periodically attempt to make RPC calls to the RDP service without user interaction. One such service is the WdiSystemHost service. The Diagnostic System Host Service (WDI) is a built-in Windows service that runs system diagnostics and performs troubleshooting tasks. This service runs under the SYSTEM account.
During normal operation, WDI periodically performs background RPC calls to the Remote Desktop service (TermService) using a high impersonation level. These RPC interactions occur automatically every 5–15 minutes and do not require any user input.
This behavior can be abused in a similar manner to the previous attack scenarios, as illustrated in the figure below.
In this case, however, no user interaction or coercion is required. After deploying a malicious RPC server that mimics the expected TermService RPC interface, the attacker only needs to wait for the WDI service to perform its periodic RPC call. Because the request is made with a high impersonation level, the malicious server can invoke RpcImpersonateClient and impersonate the calling process. This enables the attacker to escalate privileges to SYSTEM.
Abusing the Local Service account: From ipconfig to DHCPAnother scenario involves the DHCP Client service, which manages DHCP client operations on Windows systems. This service runs under the Local Service account and is enabled by default.
The DHCP Client service exposes an RPC server with multiple interfaces and endpoints. These interfaces are frequently invoked by various system DLLs, often using a high impersonation level.
In this scenario, instead of compromising a process running under Network Service, it is assumed the attacker has compromised a process running under the Local Service account. I also assume that the DHCP Client service is disabled, meaning the legitimate RPC server is unavailable.
As the figure below illustrates, the attacker can leverage this situation to escalate privileges.
After gaining control of a Local Service process, the attacker deploys a malicious RPC server that mimics the legitimate RPC server normally exposed by the DHCP Client service. Once the malicious server is running, the attacker waits for a high-privileged user, such as an administrator, to execute ipconfig.exe.
When ipconfig is run, it internally triggers an RPC request to the DHCP Client service. Since the legitimate RPC server is not running, the request is received by the attacker’s fake RPC server. Because the RPC call is performed with a high impersonation level, the malicious server can call RpcImpersonateClient to impersonate the client.
As a result, the attacker can escalate privileges from the Local Service account to the Administrator account.
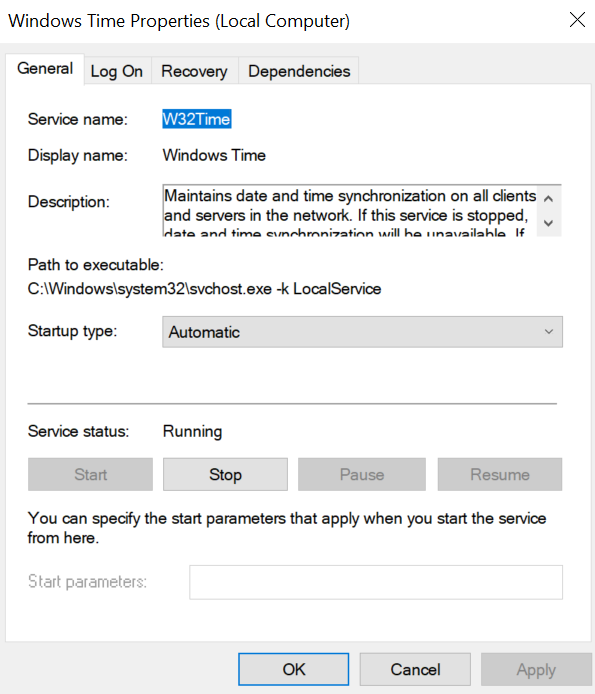
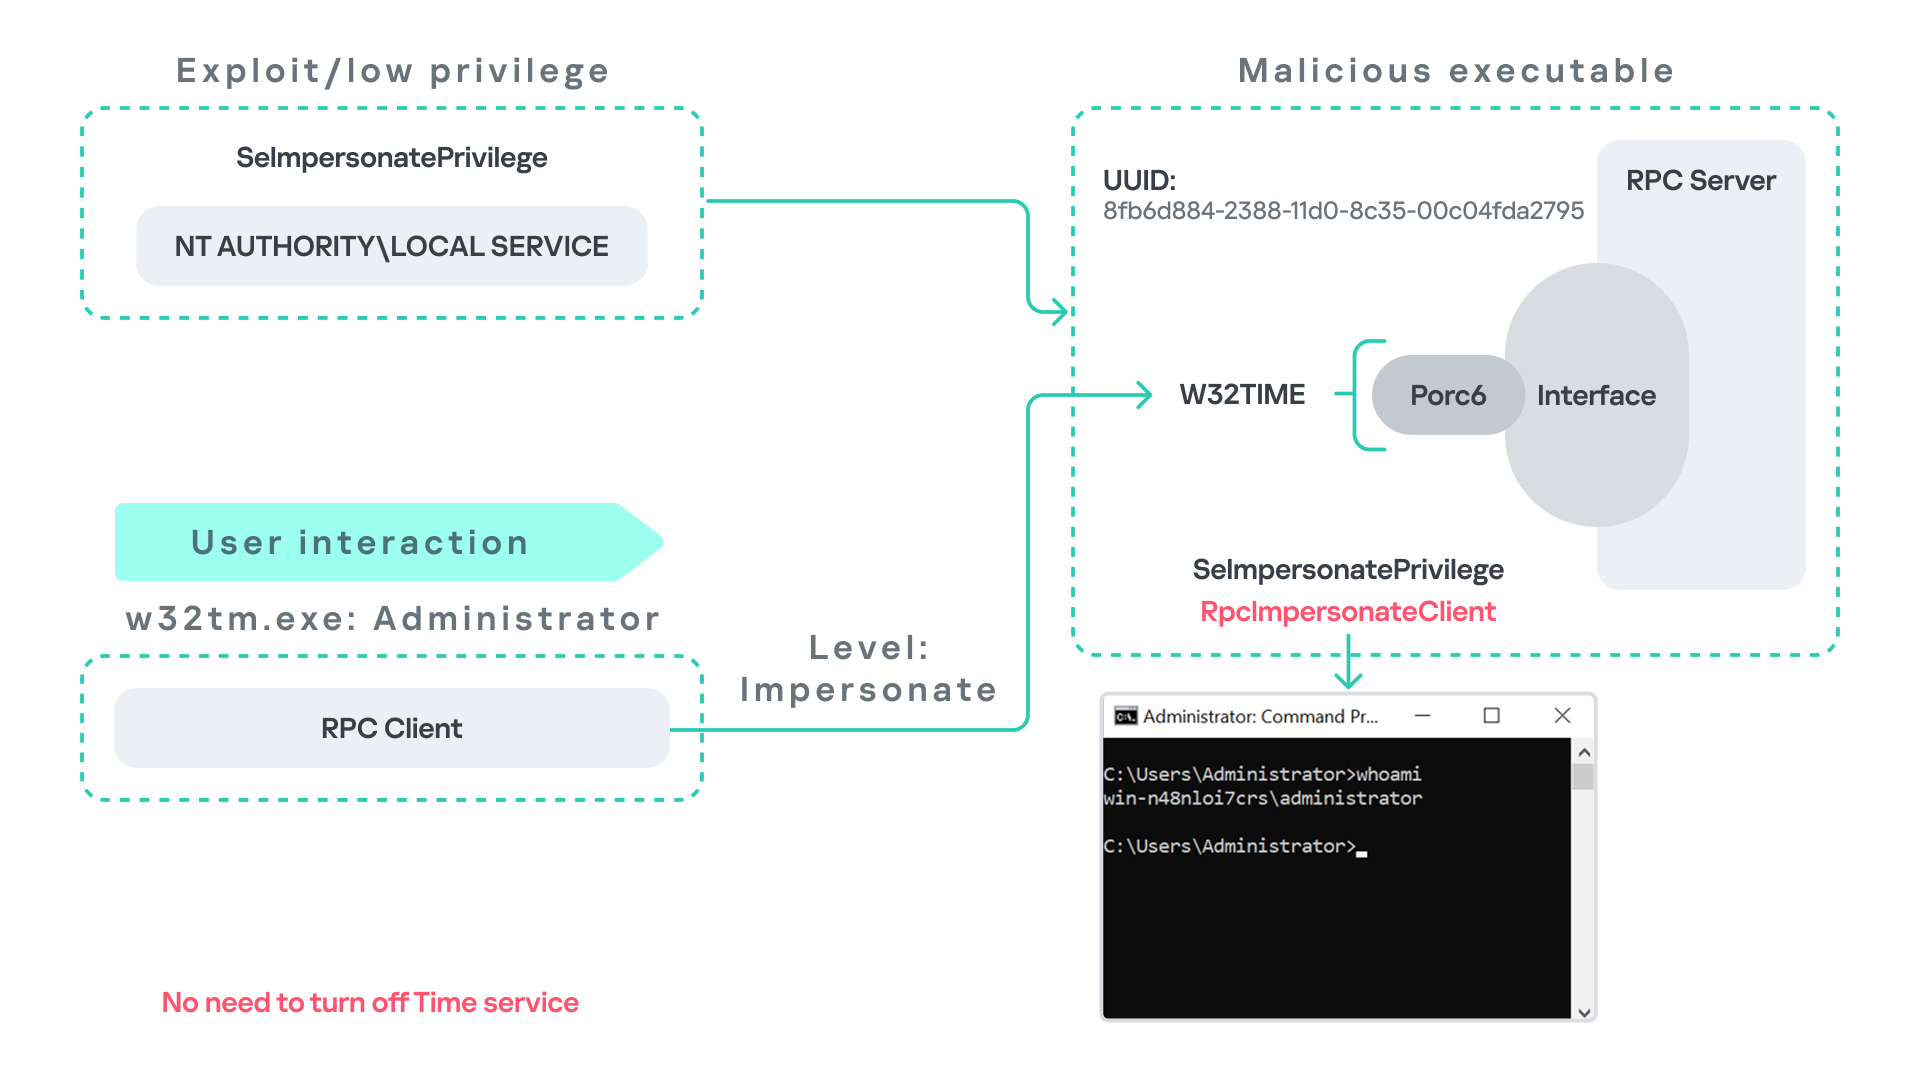
Abusing TimeThe Windows Time service (W32Time) is responsible for maintaining date and time synchronization across systems in a Windows environment. This service is enabled by default and runs under the Local Service account.
The service exposes an RPC server with two endpoints:
- \PIPE\W32TIME_ALT
- \RPC Control\W32TIME_ALT
The executable C:\Windows\System32\w32tm.exe interacts with the Windows Time service through RPC. However, before connecting to the valid RPC endpoints exposed by the service, the executable first attempts to access the nonexistent named pipe: \PIPE\W32TIME. This named pipe is not exposed by the legitimate W32Time service. However, if this endpoint were available, w32tm.exe would attempt to connect to it.
An attacker can abuse this behavior by deploying a malicious RPC server that mimics the legitimate RPC interface of the Windows Time service. Rather than exposing the legitimate endpoints, the attacker’s server exposes the nonexistent endpoint \PIPE\W32TIME, as shown in the figure below.
As in the previous scenarios, it is assumed the attacker has already compromised a process running under the Local Service account. The attacker then deploys a fake RPC server that implements the same RPC interface as the Windows Time service, but which exposes the alternative endpoint used by w32tm.exe.
Once the malicious server is running, the attacker simply waits for a high-privileged user, such as an administrator, to execute w32tm.exe. When the executable runs, it attempts to connect to the endpoint \PIPE\W32TIME. Because the attacker’s fake server exposes this endpoint, the RPC request is directed to the malicious server.
Since the RPC call is performed with a high impersonation level, the malicious server can impersonate the calling client. As a result, the attacker can escalate privileges from the Local Service account to the Administrator account.
In this scenario, it is important to note that the legitimate Windows Time service does not need to be disabled. Because the executable attempts to connect to a nonexistent endpoint, it is sufficient for the attacker to expose that endpoint through the malicious RPC server.
Vulnerability disclosureAfter discovering the vulnerability, Kaspersky Security Services prepared a 10-page technical report describing the issue and the various aforementioned exploitation scenarios. The report was submitted to the Microsoft Security Response Center (MSRC) to report the vulnerability and request a fix.
Twenty days later, Microsoft responded, indicating that they did not classify the vulnerability as high severity. According to their assessment, the issue was classified as moderate severity and would therefore not be patched immediately. No CVE would be assigned, and the case would be closed without further tracking.
Microsoft explained that the moderate severity classification was due to the requirement that the originating process had to already possess the SeImpersonatePrivilege privilege. Since this privilege was typically required for the attack to succeed, Microsoft determined that the issue did not require immediate remediation.
Kaspersky Security Services respect Microsoft’s assessment and only published the research after the embargo period ends. In line with the coordinated vulnerability disclosure policy, Kaspersky Security Services will refrain from publishing detailed instructions that could enable or accelerate mass exploitation.
The disclosure timeline is shown below:
- 2025-09-19: Vulnerability reported to Microsoft Security Response Center (Case 101749).
- 2025-10-10: MSRC response – the case was assessed as moderate severity, not eligible for a bounty, no CVE was issued, and the case was closed without further tracking.
- 2026-04-24: expected whitepaper publication date.
As discussed above, this vulnerability is related to an architectural design behavior. Fully preventing it would require Microsoft to release a patch that addresses the underlying issue.
Nevertheless, organizations can still take steps to detect and mitigate potential abuse. ETW-based monitoring within the framework described above enables defenders to identify RPC exceptions in their environment, especially when RPC clients attempt to connect to unavailable servers.
I have provide the tools used in the previously described framework so that organizations can check their environment for such behavior. You can find all of them in the research repository.
By monitoring these events, administrators can identify situations where legitimate RPC servers are expected but not running. In some cases, the attack surface may be reduced by enabling the corresponding services, ensuring that the legitimate RPC server is available. This can hinder attackers from deploying malicious RPC servers that imitate legitimate endpoints.
It is also good practice to reduce the use of the SeImpersonatePrivilege privilege in processes where it is not required. Some system processes need this privilege for normal operations. However, granting it to custom processes is generally not considered good security practice.
ConclusionAll the exploits described in this research were tested on Windows Server 2022 and Windows Server 2025 with the latest available updates prior to the submission date. The proof-of-concept implementations can be found in the research repository. However, it is highly likely that this issue may also be exploitable on other Windows versions.
Because the vulnerability stems from an architectural design issue, there may be additional attack scenarios beyond those presented in this research. The exact exploitation paths may vary from one system to another depending on factors such as installed software, the DLLs involved in RPC communication, and the availability of corresponding RPC servers.
Kategorie: Hacking & Security, Viry a Červi
- « první
- ‹ předchozí
- …
- 50
- 51
- 52
- 53
- 54
- 55
- 56
- 57
- 58
- …
- následující ›
- poslední »
