


Kategorie
Apple: People in more than 92 nations are being surveilled
Far from shrinking, the scale of mercenary surveillance companies paid by governments to spy on journalists, human rights campaigners, and other members of the civil state is growing.
Today Apple warned iPhone users in an astonishing 92 nations that attacks against them have taken place. (The company sends out these notifications several times each year.) Without opposition, governments and other entities will not quit this unconstrained descent into becoming a surveillance society.
You are a surveillance targetAccording to TechCrunch, Apple wrote users: “Apple detected that you are being targeted by a mercenary spyware attack that is trying to remotely compromise the iPhone associated with your Apple ID. This attack is likely targeting you specifically because of who you are or what you do. Although it’s never possible to achieve absolute certainty when detecting such attacks, Apple has high confidence in this warning — please take it seriously.”
The latest rash of warnings means Apple has now identified 150 nations in which such attacks have taken place. There are 196 nations on the planet.
“Since 2021, we have sent Apple threat notifications multiple times a year as we have detected these attacks, and to date we have notified users in over 150 countries in total,” Apple said.
Though it may not be aware of every attack, its security teams work around the clock to protect customers against what it has until recently described as “state sponsored mercenary surveillance.” Many of the firms engaged in selling snooping software are, like NSO Group, Israel-based.
What to do if you receive a warningIf you have received a threat notification, you should act immediately. Amnesty International’s Security Lab tells us that an Apple threat notification should be seen as a very strong indication that you are being attacked.
Amnesty’s own forensic tests with individual devices that have received such notifications confirm they should be taken seriously, and if you have received one, you should take immediate steps to remediate and secure your digital existence.
Apple advises that you secure expert help, such as the rapid-response emergency security assistance provided by the Digital Security Helpline at the non-profit Access Now. Amnesty International and other Security Lab civil society partners are also equipped to provide support to individuals who received the Apple notifications.
Are these attacks proliferating?Reuters also notes that Apple has changed how it describes the attacks. The company now tells people that they may have been victims of “mercenary spyware attack,” rather than framing the assault as being “state-sponsored” as it did before.
While this is described as a reaction to government reluctance to be linked with such attacks, it is also plausible to believe that it reflects continued growth in the surveillance business. As I’ve warned before, today’s expensive state-sponsored attacks become tomorrow’s $100 bargain deal on the dark web. These offensive technologies are utterly insidious and rot the center of democracy.
Apple also updated its Apple Support article concerning mercenary spyware and the threat notifications it has shared. “Mercenary spyware attacks cost millions of dollars and often have a short shelf life, making them much harder to detect and prevent,” the company said. “The vast majority of users will never be targeted by such attacks.”
Ivan Krstić, head of Apple security engineering and architecture, has previously promised to keep fighting back: “Apple runs one of the most sophisticated security engineering operations in the world, and we will continue to work tirelessly to protect our users from abusive state-sponsored actors like NSO Group.”
That said, a report today from Interpres Security seems to confirm the growing magnitude of these threats.
Security adviceIn an increasingly challenging security environment, everyone online should protect themselves:
- Update devices with latest software.
- Use complex passcodes.
- Use two-factor authentication.
- Protect their Apple ID with a strong password.
- Install apps only from trusted sources, such as the App Store.
- Use strong and unique passwords.
- Never click on links or attachments from people you do not know.
Finally, if you think you may be a target, use Lockdown Mode.
Apple developed this mode in response to a wave of sophisticated attacks (Pegasus, Devils Tongue and Hermit). Lockdown Mode provides a great deal of protection at the cost of some utility; Apple is expected to continue to invest in securing its platforms, even against the designed in weaknesses it is being forced to adopt in reaction to some regulations, particularly in Europe and the UK.
Please follow me on Mastodon, or join me in the AppleHolic’s bar & grill and Apple Discussions groups on MeWe.
Apple, iOS Security, Mobile Security
Kategorie: Hacking & Security
Python's PyPI Reveals Its Secrets
GitGuardian is famous for its annual State of Secrets Sprawl report. In their 2023 report, they found over 10 million exposed passwords, API keys, and other credentials exposed in public GitHub commits. The takeaways in their 2024 report did not just highlight 12.8 million new exposed secrets in GitHub, but a number in the popular Python package repository PyPI.
PyPI,
Kategorie: Hacking & Security
TA547 Phishing Attack Hits German Firms with Rhadamanthys Stealer
A threat actor tracked as TA547 has targeted dozens of German organizations with an information stealer called Rhadamanthys as part of an invoice-themed phishing campaign.
"This is the first time researchers observed TA547 use Rhadamanthys, an information stealer that is used by multiple cybercriminal threat actors," Proofpoint said. "Additionally, the actor appeared to
Kategorie: Hacking & Security
Python's PyPI Reveals Its Secrets
GitGuardian is famous for its annual State of Secrets Sprawl report. In their 2023 report, they found over 10 million exposed passwords, API keys, and other credentials exposed in public GitHub commits. The takeaways in their 2024 report did not just highlight 12.8 million new exposed secrets in GitHub, but a number in the popular Python package repository PyPI.
PyPI, The Hacker Newshttp://www.blogger.com/profile/[email protected]
Kategorie: Hacking & Security
TA547 Phishing Attack Hits German Firms with Rhadamanthys Stealer
A threat actor tracked as TA547 has targeted dozens of German organizations with an information stealer called Rhadamanthys as part of an invoice-themed phishing campaign.
"This is the first time researchers observed TA547 use Rhadamanthys, an information stealer that is used by multiple cybercriminal threat actors," Proofpoint said. "Additionally, the actor appeared to Newsroomhttp://www.blogger.com/profile/[email protected]
Kategorie: Hacking & Security
Microsoft v dubnu opravil skoro 150 děr a současně vydal balík vylepšení pro Windows 11 a 10
**Microsoft ve Windows 11 všem zapíná druhou část Momentu 5
**Do Windows 10 míří Spotlight, který automaticky mění tapety
**Dubnové povinné aktualizace opravují 149 zranitelných míst
Kategorie: Hacking & Security
How to use PivotTables and PivotCharts in Excel
Spreadsheets can be vast, often containing thousands of rows of repetitive data that makes them impossible to parse at a glance. Fortunately, Excel offers two powerful features — PivotTables and PivotCharts — for summarizing data sets and presenting them visually.
What is a PivotTable?A PivotTable allows you to take an extensive data set with multiple columns and rows and summarize that data in a compact, easy-to-read table. You can create multiple PivotTables from the same data set, each highlighting different aspects of the data. And PivotTables are interactive — you can easily manipulate them to filter or rearrange the data shown in one.
What is a PivotChart?A PivotChart is a chart visualization based on the summarized information in a PivotTable. You can choose from a wide variety of chart types to best display a PivotTable’s data. The combinations you can create using these tools are countless.
In this tutorial, we will give you step-by-step instructions on how to get started with PivotTables and PivotCharts, and you can apply these steps to any data set you work with in Excel. We’ll demonstrate in Excel for Windows under a Microsoft 365 subscription; if you’re using a different version of Excel, your interface might look a little different and the steps might vary slightly, but things work more or less the same way.
How to create a PivotTable in ExcelWe will use the data set shown below as our starting point:
The starting data set for our PivotTable examples.
Shimon Brathwaite / IDG
To get started, select any cell in the data set, then go to the Ribbon toolbar at the top of the spreadsheet and select Insert. At the far left of the toolbar, select the PivotTable button.
A pop-up appears that lets you select the range of data you want to analyze and where to place the PivotTable. Make sure the whole data set is selected and that the PivotTable will be placed in a new worksheet, then click OK.
Starting a PivotTable in Excel.
Shimon Brathwaite / IDG
Now we are brought to the starting page for creating a PivotTable. From here, we can begin constructing our first data summary.
Your blank canvas for PivotTable creation.
Shimon Brathwaite / IDG
First, we will look at the total quantity of each ordered product. To do this, let’s check the checkbox next to Quantity in the PivotTable Fields sidebar on the right. This will move Quantity into the Values area at the bottom right of the sidebar. Next, drag Product_# into the Rows area to sort by Product_#. The screenshot below shows the result.
This PivotTable shows the quantity of each product type sold.
Shimon Brathwaite / IDG
Here we see a summary of the quantity of products sold by product number and the total quantity of all products sold. You can do this sort of simple analysis with any two variables, but you can also do more fine-grained summaries.
Next, we will add another layer to our analysis by displaying quantity of products by product number and categorizing them by order category. To do this, drag Order_Category into the Rows section of the sidebar and make sure that Order_Category is on top. (You can reorder the items in any area of the sidebar by dragging and dropping them.)
In this version of the PivotTable, another element is shown: Order_Category.
Shimon Brathwaite / IDG
It’s important to understand that you can manipulate how information is shown in the table by the order in which you place the items in any section of the PivotTable. Since we put Order_Category on top of the Rows area, the PivotTable is summarized by that first and then by Product_# inside. To show the opposite sorting, move Product_# to the top in the Rows section and see the result.
Reversing how Product_# and Order_Category are displayed in the PivotTable.
Shimon Brathwaite / IDG
So far, we have only used the Rows section of the PivotTable builder, but we can show even more information using the Rows and Columns sections together. To demonstrate, we will display the total quantity of products sold at different unit prices. To do this, uncheck the Order_Category checkbox at the top of the sidebar, keep Product_# in the Rows section, and then drag Unit_Price into the Columns section.
The PivotTable now has columns for different unit prices.
Shimon Brathwaite / IDG
We have created a summary showing the amount of each product sold at a particular unit price. Now, let’s say we don’t want to view all of the products at the same time. We can limit the products shown using the filtering tools built into PivotTables.
First, let’s filter our results by Products 1, 2, and 3. Click the downward triangle icon next to Row Labels. In the filtering pop-up that appears, select Products 1, 2, and 3. The PivotTable will change to show only those three products.
Filtering the PivotTable to show only Products 1, 2, and 3.
Shimon Brathwaite / IDG
Once you are done, select the Clear Filter button in the pop-up, and the full PivotTable reappears.
Next, let’s filter by unit price using the Column Labels filter option. Select that filter and select the $4.00, $5.00, & $7.00 options to change your PivotTable.
Filtering the PivotTable to show only items that cost $4.00, $5.00, and $7.00.
Shimon Brathwaite / IDG
You can also use the pop-up to sort the items in the PivotTable by various fields, and to filter using conditions such as “Greater Than” or “Contains.” It’s worth spending a little time playing with the options to see what happens; just remember to click Clear Filter when you’re done.
Before we move on to PivotCharts, let’s discuss the Filters area of the sidebar. This can be used to filter out specific items from the PivotTable, but you may find it simpler to remove the field altogether or use the filtering and sorting options that we discussed earlier for more granular control. However, you can see how this box functions by moving the “Product_#” field to the Filters area.
Another way to filter PivotTable data is by using the Filters area in the PivotTable Fields sidebar.
Shimon Brathwaite / IDG
How to create a PivotChart in ExcelNow, let’s move on to how to create data visualizations using PivotCharts. To add a PivotChart to the main data set, go back to the worksheet that contains the main data set, place your cursor in a cell that contains data, and select Insert> PivotChart in the Ribbon.
Starting a PivotChart in Excel.
Shimon Brathwaite / IDG
Hit OK on the dialog box that pops up, and the familiar PivotTable builder interface appears, with an additional placeholder for a PivotChart.
Your blank canvas for PivotChart creation.
Shimon Brathwaite / IDG
We will summarize the quantity of items sold by order category and unit price. In the sidebar, check Quantity to add it to the Values area, then drag Order_Category and Unit_Price to the Axis (Categories) area, with Order_Category on top. This will create a PivotTable and a column chart displaying the information we have selected.
The PivotChart graphically displays the information from the PivotTable at left.
Shimon Brathwaite / IDG
But you’re not limited to column charts; there are multiple types of charts to choose from. Right-click the column chart, select Change Chart Type, and select Pie > 3-D Pie to see a different chart example.
Choosing a different chart type for the PivotChart.
Shimon Brathwaite / IDG
The result will look like the screenshot below.
The PivotChart in 3-D pie chart form.
Shimon Brathwaite / IDG
You can filter or sort the data in the PivotTable that a PivotChart is based on, and those changes will be reflected in the PivotChart. To see what this looks like, click the minus sign to the left of Large Order in the PivotTable to the left of the chart. The Large Order section of the PivotTable collapses and shows only the large order total, without breaking it down by unit price. The same thing happens in the PivotChart to the right.
The PivotChart with Large Orders collapsed into a single slice of pie.
Shimon Brathwaite / IDG
Now you see how using PivotTables and PivotCharts lets you create data summaries and visualizations to display specific data quickly and easily. These options can be used on data sets of almost any size and easily customized to show only very specific information. The combinations that you can create using PivotTables and PivotCharts are almost endless, and we encourage you to test them out on any data sets that you work with in Excel.
Microsoft 365, Microsoft Excel, Microsoft Office, Office Suites, Productivity Software
Kategorie: Hacking & Security
Apple Updates Spyware Alert System to Warn Victims of Mercenary Attacks
Apple on Wednesday revised its documentation pertaining to its mercenary spyware threat notification system to mention that it alerts users when they may have been individually targeted by such attacks.
It also specifically called out companies like NSO Group for developing commercial surveillance tools such as Pegasus that are used by state actors to pull off "individually targeted
Kategorie: Hacking & Security
Apple Updates Spyware Alert System to Warn Victims of Mercenary Attacks
Apple on Wednesday revised its documentation pertaining to its mercenary spyware threat notification system to mention that it alerts users when they may have been individually targeted by such attacks.
It also specifically called out companies like NSO Group for developing commercial surveillance tools such as Pegasus that are used by state actors to pull off "individually targeted Newsroomhttp://www.blogger.com/profile/[email protected]
Kategorie: Hacking & Security
Fortinet Rolls Out Critical Security Patches for FortiClientLinux Vulnerability
Fortinet has released patches to address a critical security flaw impacting FortiClientLinux that could be exploited to achieve arbitrary code execution.
Tracked as CVE-2023-45590, the vulnerability carries a CVSS score of 9.4 out of a maximum of 10.
"An Improper Control of Generation of Code ('Code Injection') vulnerability [CWE-94] in FortiClientLinux may allow an unauthenticated attacker to
Kategorie: Hacking & Security
Fortinet Rolls Out Critical Security Patches for FortiClientLinux Vulnerability
Fortinet has released patches to address a critical security flaw impacting FortiClientLinux that could be exploited to achieve arbitrary code execution.
Tracked as CVE-2023-45590, the vulnerability carries a CVSS score of 9.4 out of a maximum of 10.
"An Improper Control of Generation of Code ('Code Injection') vulnerability [CWE-94] in FortiClientLinux may allow an unauthenticated attacker to Newsroomhttp://www.blogger.com/profile/[email protected]
Kategorie: Hacking & Security
Strategies for Improving Linux Security Through Cross-Browser Compatibility Testing
In the dynamic landscape of web development , ensuring that applications perform uniformly across various web browsers is a vital aspect of user experience. This becomes increasingly important for Linux systems, where the default browsers and configurations range presents unique challenges. Cross-browser compatibility testing on Linux helps to identify and resolve these discrepancies, thereby enhancing the accessibility and functionality of web applications for all users.
Kategorie: Hacking & Security
18 ways to speed up Windows 10
The one thing that seems about as certain as death and taxes is that, over time, your Windows 10 PC seems to slow down. There are a variety of reasons this can happen, from accumulated apps and background processes that run amok to registry problems and outdated drivers.
How to speed up your computerWant your Windows 10 PC to run faster? We’re here to help. By tweaking some of the operating settings, your machine will be zippier and less prone to performance and system issues.
And if you’re already running Windows 11, we’ve got you covered there. Check out our top ways to keep Windows 11 devices chugging along smoothly.
Here’s our list of tips for Windows 10.
The top ways to speed up Windows 10- Change your power settings
- Disable programs that run on startup
- Go to a previous restore point
- Use ReadyBoost to speed up disk caching
- Shut off Windows tips and tricks
- Stop OneDrive from syncing
- Use OneDrive files on-Demand
- Turn off search indexing
- Clean out your hard disk
- Clean out your Registry
- Disable shadows, animations and visual effects
- Disable transparency
- Update your device drivers
- Turn on automated Windows maintenance
- Kill bloatware
- Defrag your hard disk
- Disable Game Mode
- Shut down and restart Windows
You may notice that that last tip is the most tried-and-true way of (hopefully) smoothing out any problems in Windows 10. There’s a reason it’s effectively an internet meme.
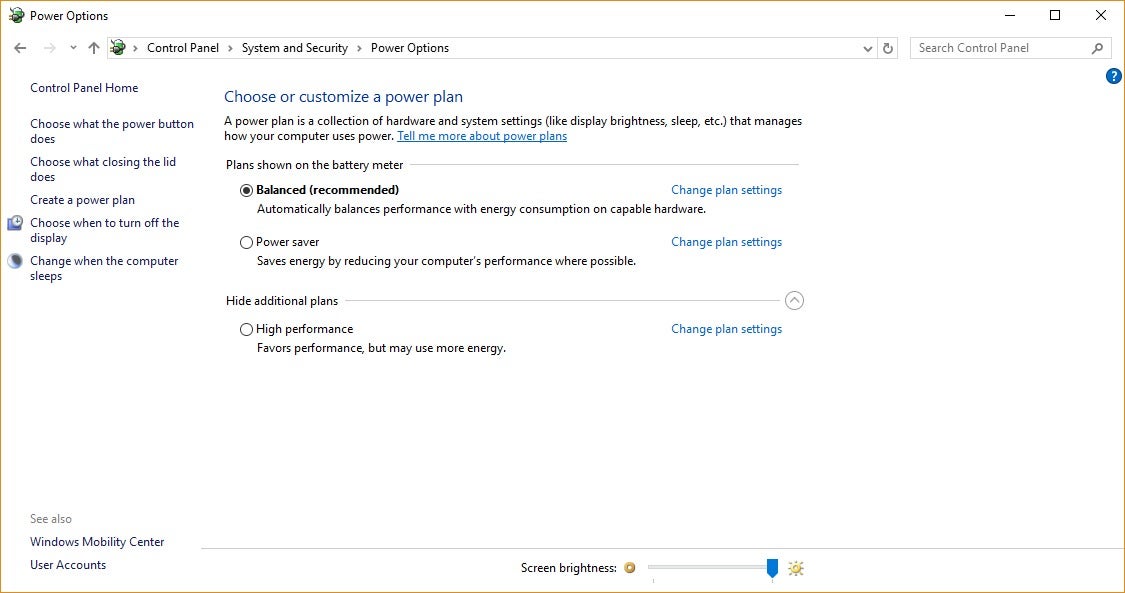
1. Change your power settingsIf you’re using Windows 10’s “Power saver” plan, you’re slowing down your PC. That plan reduces your PC’s performance in order to save energy. (Even desktop PCs typically have a “Power saver” plan.) Changing your power plan from “Power saver” to “High performance” or “Balanced” will give you an instant performance boost.
To do it, launch the Control Panel app, then select Hardware and Sound > Power Options. You’ll typically see two options: Balanced (recommended) and Power saver. (Depending on your make and model, you might see other plans here as well, including some branded by the manufacturer.) To see the High performance setting, click the down arrow by Show additional plans.
Change your power settings in Control Panel to give your PC a performance boost. (Click image to enlarge it.)
To change your power setting, simply choose the one you want, then exit Control Panel. “High performance” gives you the most oomph, but uses the most power; “Balanced” finds a happy medium between power use and better performance; and “Power saver” does everything it can to give you as much battery life as possible. Desktop users have no reason to choose “Power saver,” and even laptop users should consider the “Balanced” option when unplugged — and “High performance” when connected to a power source.
2. Disable programs that run on startupOne reason your Windows 10 PC may feel sluggish is that you’ve got too many programs running in the background — programs that you rarely or never use. Stop them from running, and your PC will run more smoothly.
Start by launching the Task Manager: Press Ctrl-Shift-Esc, right-click the lower-right corner of your screen and select Task Manager, or type task manager into the Windows 10 search box and press Enter. If the Task Manager launches as a compact app with no tabs, click More details at the bottom of your screen. The Task Manager will then appear in its full-tabbed glory. There’s plenty you can do with it, but we’re going to focus only on killing unnecessary programs that run at startup.
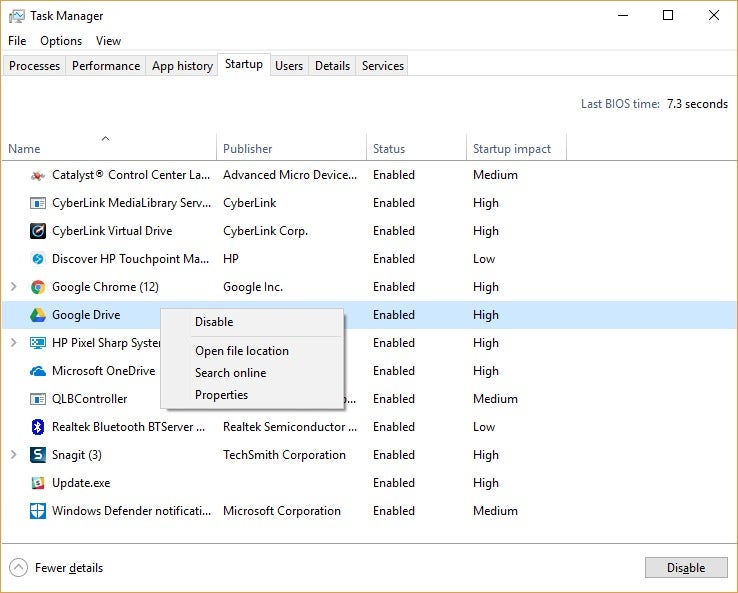
Click the Startup tab. You’ll see a list of the programs and services that launch when you start Windows. Included on the list is each program’s name as well as its publisher, whether it’s enabled to run on startup, and its “Startup impact,” which is how much it slows down Windows 10 when the system starts up.
To stop a program or service from launching at startup, right-click it and select Disable. This doesn’t disable the program entirely; it only prevents it from launching at startup — you can always run the application after launch. Also, if you later decide you want it to launch at startup, you can just return to this area of the Task Manager, right-click the application and select Enable.
You can use the Task Manager to help get information about programs that launch at startup and disable any you don’t need. (Click image to enlarge it.)
Many of the programs and services that run on startup may be familiar to you, like OneDrive or Evernote Clipper. But you may not recognize many of them. (Anyone who immediately knows what “bzbui.exe” is, please raise your hand. No fair Googling it first.)
The Task Manager helps you get information about unfamiliar programs. Right-click an item and select Properties for more information about it, including its location on your hard disk, whether it has a digital signature, and other information such as the version number, the file size and the last time it was modified.
You can also right-click the item and select Open file location. That opens File Explorer and takes it to the folder where the file is located, which may give you another clue about the program’s purpose.
Finally, and most helpfully, you can select Search online after you right-click. Bing will then launch with links to sites with information about the program or service.
If you’re really nervous about one of the listed applications, you can go to a site run by Reason Software called Should I Block It? and search for the file name. You’ll usually find very solid information about the program or service.
Now that you’ve selected all the programs that you want to disable at startup, the next time you restart your computer, the system will be a lot less concerned with unnecessary programs.
3. Go to a previous restore pointAs you use Windows 10, it automatically creates restore points that are essentially snapshots of your system at specific moments in time, including installed software, drivers, and updates. Restore points are a kind of safety net so if something goes wrong, you can always restore your PC to a previous state.
They can also be used to speed up your PC if you notice — for no reason you can fathom — it’s started to slow down. Recently installed problematic drivers, software, or updates could be to blame, so going back to a previous restore point could speed things up again because the system will be returned to the state it was in before the problems started. Keep in mind, though, that you’ll only be able to restore your system to the state it was in during the last seven to 10 days. (Restore points don’t affect your files, so you won’t lose any files by going to a restore point.)
To go to a previous restore point:
- Save any open files and close all your programs.
- In the search box type advanced system and then click View advanced system settings. You’ll be sent to the Advanced tab of System Properties in the Control Panel.
- Click the System Protection tab.
- In the System Restore area, click System Restore.
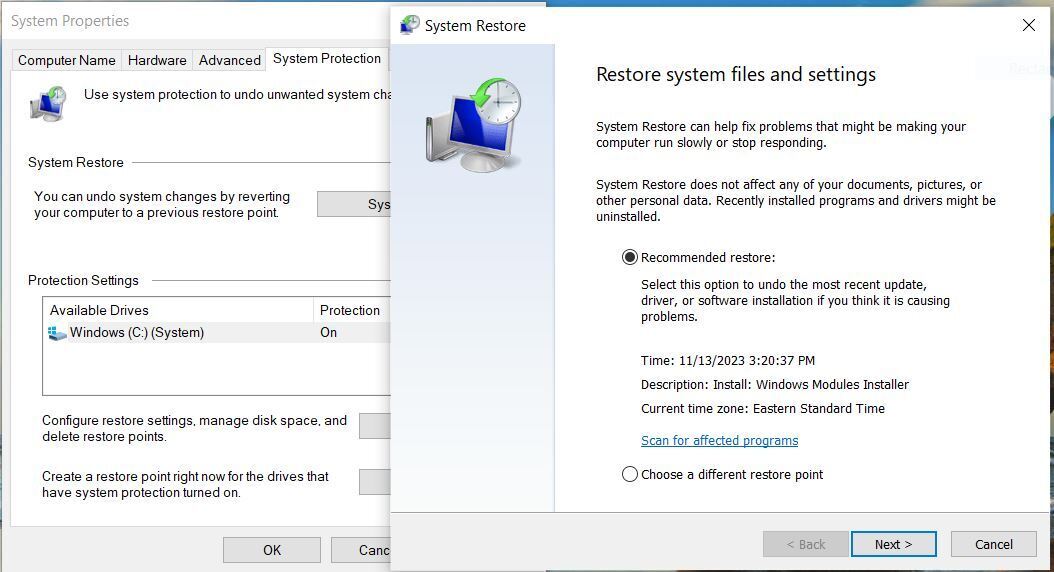
- On the screen that pops up, the “Recommended restore” option will be chosen for you. Click Next if you want to go that restore point. To see others, click Choose a different restore point. Highlight the one you want to use and click Next.
- Click Finish from the screen that appears.
- Your system will restore to the restore point you chose and shut down. Restart your PC.
Going to a restore point can help speed up your PC if you’ve recently installed drivers, software, or updates that have slowed down your system. (Click image to enlarge it.)
Note: there’s a chance System Restore isn’t turned on, meaning you won’t be able to use this tip. If that’s the case, you should turn it on to solve any future problems. To do so:
- In the search box, type create a restore point, then click Create a restore point.
- On the System Protection tab, select Configure.
- Select Turn on system protection. Leave the other settings on the page as they are.
- Click OK. From now on, your PC will automatically create restore points.
Windows 10 regularly stores cached data on your hard disk, and then when it needs the data, fetches it from there. The time it takes to fetch cached data depends on the speed of your hard disk. If you have a traditional hard disk instead of an SSD, there’s a trick that can help speed up your cache: use Windows’ ReadyBoost feature. It tells Windows to cache data to a USB flash drive, which is faster than a hard disk. Fetching data from that speedier cache should speed up Windows.
First, plug a USB flash drive into one of your PC’s USB ports. The flash drive needs to support at least USB 2.0, and preferably USB 3 or faster. The faster your flash drive, the more of a speed boost you should see. Also, look for a flash drive that is at least double the size of your PC’s RAM for maximum performance.
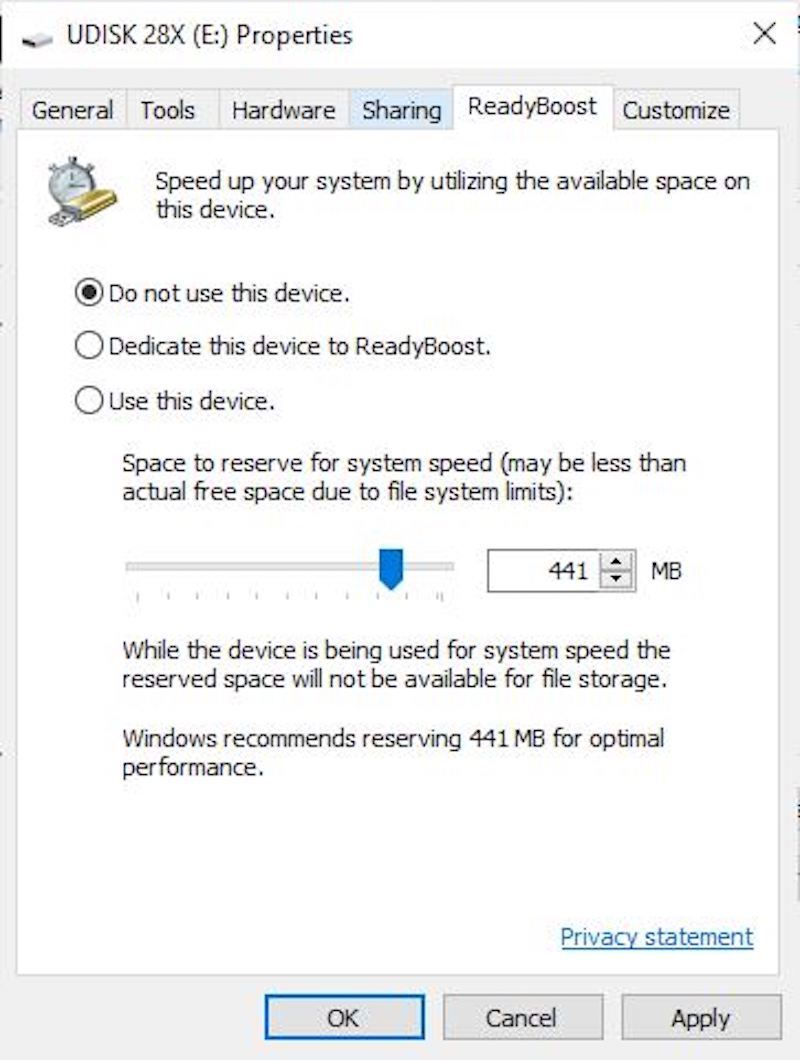
After you plug in in the drive, open File Explorer and click This PC. Look for the flash drive. It may have an odd name, like UDISK 28X, or something even less obvious. Right-click it, choose Properties, and click the ReadyBoost tab.
Turn on ReadyBoost from this screen to speed up your PC. (Click image to enlarge it.)
You’ll come to a screen that asks whether you want to use the flash drive as a cache and recommends a cache size. Leave the cache size as is or change it if you like. Then select Dedicate this device to ReadyBoost and click Apply and then OK.
(Note that if you see the message, “This device cannot be used for ReadyBoost” when you click the ReadyBoost tab, it means your flash drive doesn’t meet ReadyBoost’s minimum performance standards, so you’ll have to insert a new one.)
As you use your computer, ReadyBoost will start filling the cache with files, so you may notice an increase in disk activity. Depending on how much you use your PC, it can take a few days for your cache to fill and offer maximum improved performance. If you don’t see an increase in performance, try a flash disk with more capacity.
Note: If you have an SSD, you won’t get any extra speed from ReadyBoost, and it might even hurt performance. So don’t use this on a system with an SSD.
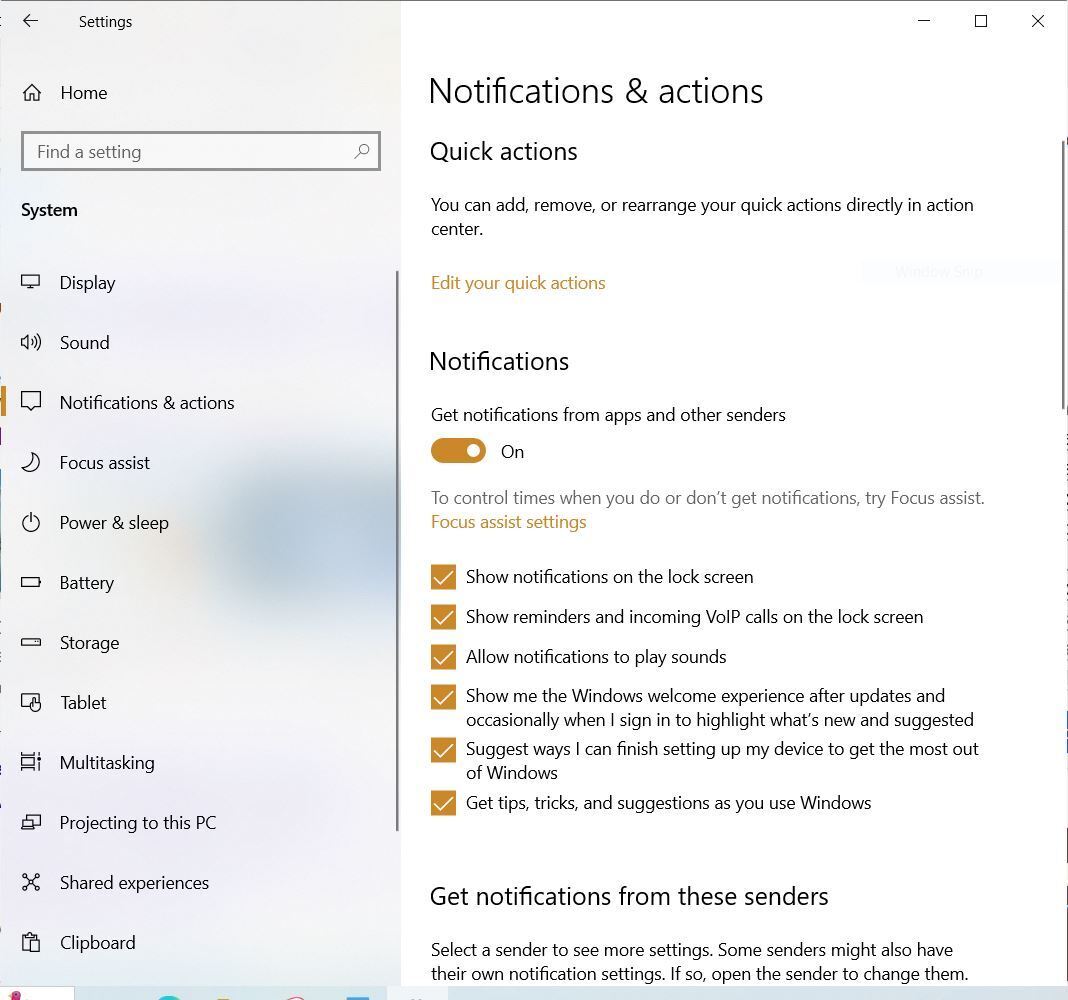
5. Shut off Windows tips and tricksAs you use your Windows 10 PC, Windows keeps an eye on what you’re doing and offers tips about things you might want to do with the operating system. In my experience, I’ve rarely if ever found these “tips” helpful. I also don’t like the privacy implications of Windows constantly taking a virtual look over my shoulder.
Windows watching what you’re doing and offering advice can also make your PC run more sluggishly. So if you want to speed things up, tell Windows to stop giving you advice. To do so, click the Start button, select the Settings icon and then go to System > Notifications & actions. Scroll down to the Notifications section and uncheck the box marked “Get tips, tricks, and suggestions as you use Windows.”
Turning off Windows’ suggestions for you should help things run more smoothly (and give you back a measure of privacy). (Click image to enlarge it.)
That’ll do the trick.
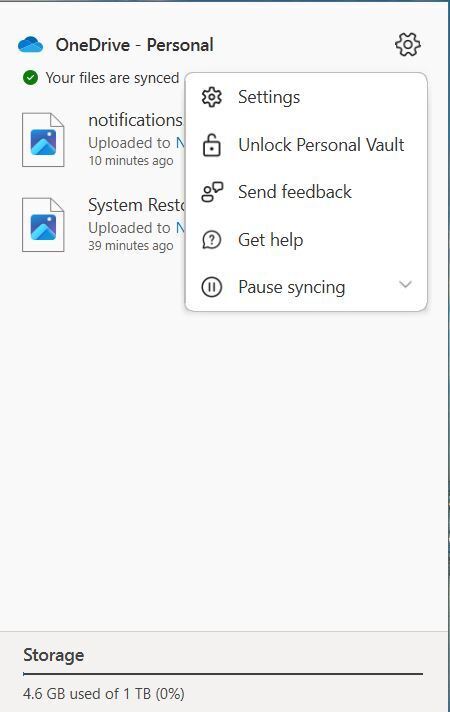
6. Stop OneDrive from syncingMicrosoft’s cloud-based OneDrive file storage, built into Windows 10, keeps files synced and up to date on all of your PCs. It’s also a useful backup tool so that if your PC or its hard disk dies, you still have all your files intact, waiting for you to restore them.
Here’s how to turn off OneDrive syncing temporarily, to see if that boosts system performance. (Click image to enlarge it.)
It does this by constantly syncing files between your PC and cloud storage — something that can also slow down your PC. That’s why one way to speed up your PC is to stop the syncing. Before you turn it off permanently, though, you’ll want to check whether it is actually slowing down your PC.
To do so, right-click the OneDrive icon (it looks like a cloud) in the notification area on the right side of the taskbar. (Note: In order to see the OneDrive icon, you may need to click an upward facing arrow.) From the pop-up screen that appears, click Pause syncing and select either 2 hours, 8 hours, or 24 hours, depending upon how long you want it paused. During that time, gauge whether you’re seeing a noticeable speed boost.
If so, and you decide you do indeed want to turn off syncing, right-click the OneDrive icon, and from the pop-up, select Settings > Account. Click Unlink this PC, and then from the screen that appears, click Unlink account. When you do that, you’ll still be able to save your files to your local OneDrive folder, but it won’t sync with the cloud.
If you find that OneDrive slows down your PC but prefer to keep using it, you can try to troubleshoot OneDrive problems. For info on how to do that, check out Microsoft’s “Fix OneDrive sync problems” page.
7. Use OneDrive Files On-DemandSome users may not want to stop OneDrive from syncing; doing so defeats its purpose of making sure you have the latest files on whatever device you use. And it would also mean you won’t be able to use OneDrive as a way to safely back up files.
But there’s a way to get the best of both worlds: You can keep syncing to an absolute minimum and only do it when absolutely necessary. You’ll speed up performance, and still get the best of what OneDrive has to offer.
To do this, you use Windows’ OneDrive Files On-Demand feature. With it, you can choose to keep only certain files on your PC, but still have access to all your other OneDrive files in the cloud. When you want to use one of those online files, you open it directly from the cloud. With fewer files on your PC syncing, you should see a performance boost.
Right-click the OneDrive icon on the right side of the Taskbar and select Settings. Click Advanced settings and scroll down to the Files On-Demand section. Click Free up disk space and select Continue. When you do that, all the files on your PC will be set to online-only, which means they’re only available from OneDrive in the cloud not on your PC. From now on, the first time you want to open one of your files, you’ll have to be online – that is, unless you use the following instructions to make some files available on your PC as well as in the cloud, while you leave others available only in the cloud.
After you click the Continue button, you’ll see OneDrive in a File Explorer window. For every folder whose files you want kept on your PC, right-click the folder and select Always keep on this device. You can do the same thing for subfolders and individual files.
Later, if you want to have folders, subfolders, or files stored only in OneDrive in the cloud, right-click it in File Explorer, and uncheck the box next to Always keep on this device. You can change the status of folders, subfolders, and files like this whenever you like.
Use this dialog box to turn on OneDrive Files on-Demand
If you change your mind and want all your files stored locally and kept in sync via OneDrive, go back to the “Advanced settings” section of OneDrive settings page, scroll down to the Files On-Demand section and click Download all files.
Note that OneDrive Files On-Demand is available only on Windows 10 version 1709 and higher.
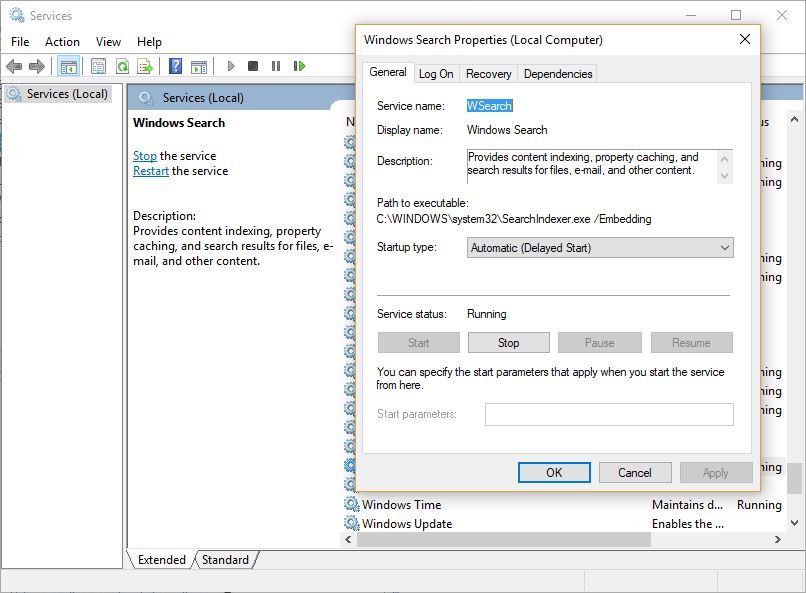
8. Turn off search indexingWindows 10 indexes your hard disk in the background, allowing you — in theory — to search your PC more quickly than if no indexing were being done. But slower PCs that use indexing can see a performance hit, and you can give them a speed boost by turning off indexing. Even if you have an SSD disk, turning off indexing can improve your speed, because the constant writing to disk that indexing does can eventually slow down SSDs.
To get the maximum benefit in Windows 10, you need to turn indexing off completely. To do so, type services.msc in the Windows search box and press Enter. The Services app appears. Scroll down to either Indexing Service or Windows Search in the list of services. Double-click it, and from the screen that appears, click Stop. Then reboot your machine. Your searches may be slightly slower, although you may not notice the difference. But you should get an overall performance boost.
Here’s how to turn off Windows 10 indexing. (Click image to enlarge it.)
If you’d like, you can turn off indexing only for files in certain locations. To do this, type index in the Windows search box and click the Indexing Options result that appears. The Indexing Options page of the Control Panel appears. Click the Modify button, and you’ll see a list of locations that are being indexed, including Microsoft Outlook, Internet Explorer History, and your hard drive or drives. Uncheck the box next to any location, and it will no longer be indexed. If you’d like to customize what gets indexed and what doesn’t on individual drives, click the down arrow next to any drive and check the box next to what you want indexed and uncheck the box of what you don’t.
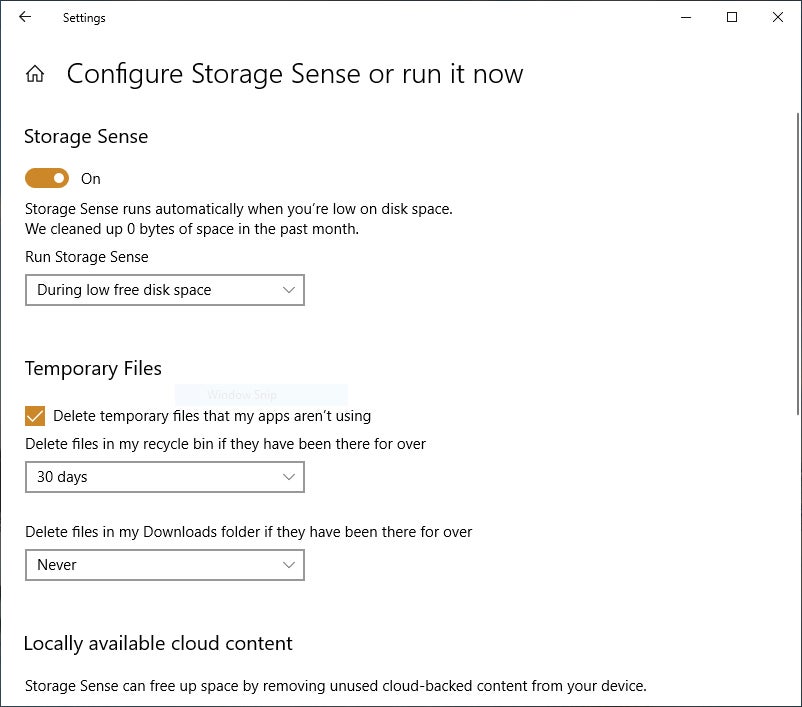
9. Clean out your hard diskIf you’ve got a bloated hard disk filled with files you don’t need, you could be slowing down your PC. Cleaning it out can give you a speed boost. Windows 10 has a surprisingly useful built-in tool for doing this called Storage Sense. Go to Settings > System > Storage and at the top of the screen, move the toggle from Off to On. When you do this, Windows constantly monitors your PC and deletes old junk files you no longer need — temporary files, files in the Downloads folder that haven’t been changed in a month, and old Recycle Bin files.
You can customize how Storage Sense works and also use it to free up even more space than it normally would. Underneath Storage Sense, click Configure Storage Sense or run it now. From the screen that appears, you can change how often Storage Sense deletes files (every day, every week, every month or when your storage space gets low).
You can also tell Storage Sense to delete files in your Download folder, depending on how long they’ve been there, and set how long to wait to delete files in the Recycle Bin automatically. You can also have Storage Sense move files from your PC to the cloud in Microsoft’s OneDrive cloud storage if they’re not opened for a certain amount of time (every day, or every 14 days, 30 days, or 60 days).
IDGHere’s how to customize the way Storage Sense works, and to tell it to delete old versions of Windows. (Click image to enlarge it.)
10. Clean out your RegistryUnder the Windows hood, the Registry tracks and controls just about everything about the way Windows works and looks. That includes information about where your programs are stored, which DLLs they use and share, what file types should be opened by which program, and just about everything else.
But the Registry is a very messy thing. When you uninstall a program, for example, that program’s settings don’t always get cleaned up in the Registry. So over time, it can get filled with countless outdated settings of all types. And that can lead to system slowdowns.
Don’t even think of trying to clean any of this out yourself. It’s impossible. To do it, you need a Registry Cleaner. There are plenty available, some free and some paid. But there’s really no need to outright buy one, because the free Auslogics Registry Cleaner does a solid job.
Before using Auslogics or any other Registry cleaner, you should back up your Registry so you can restore it if anything goes wrong. (Auslogics Registry Cleaner does this for you as well, but it can’t hurt to have it backed up twice.) To do your own Registry backup, type regedit.exe in the search box, then press Enter. That runs the Registry editor. From the File menu, select Export. From the screen that appears, make sure to choose the All option in the “Export range” section at the bottom of the screen. Then choose a file location and file name and click Save. To restore the Registry, open the Registry editor, select Import from the File menu, then open the file you saved.
Now download, install, and run Auslogics Registry Cleaner. On the left-hand side of the screen you can select the kinds of Registry issues you want to clean up — for example, File Associations, Internet, or Fonts. I generally select them all.
IDGAuslogics Registry Cleaner scans for and fixes problems in your Windows Registry. (Click image to enlarge it.)
Next, tell it to scan the Registry for problems. To do that, click Scan Now, and from the drop-down menu that appears, select Scan. That lets you first examine the Registry problems it finds. If you instead choose Scan and Resolve, it makes the fixes without you checking them.
It now scans your Registry for errors, then shows you what it found. Uncheck the boxes next to any you don’t want it to fix. Click Resolve when you’ve made your decision, and make sure that Back Up Changes is checked, so you can restore the Registry easily if something goes wrong. If you want to see details about what it’s done, click View detailed report at the bottom of the screen.
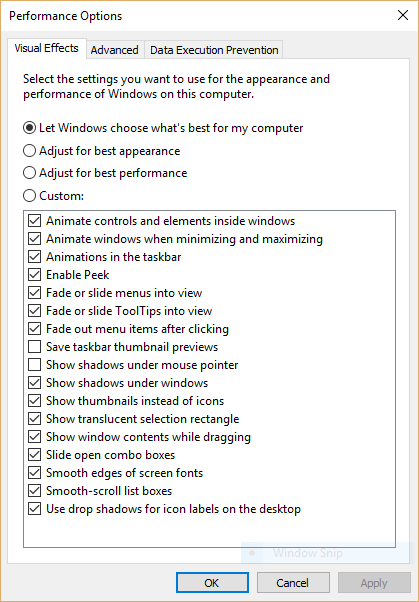
11. Disable shadows, animations, and visual effectsWindows 10 has some nice eye candy — shadows, animations, and visual effects. On fast, newer PCs, these don’t usually affect system performance. But on slower and older PCs, they can exact a performance hit.
It’s easy to turn them off. In the Windows 10 search box, type sysdm.cpl and press Enter. That launches the System Properties dialog box. Click the Advanced tab and click Settings in the Performance section. That brings you to the Performance Options dialog box. You’ll see a varied list of animations and special effects.
IDGThe Performance Options dialog box lets you turn off effects that might be slowing down Windows 10. (Click image to enlarge it.)
If you have time on your hands and love to tweak, you can turn individual options on and off. These are the animations and special effects you’ll probably want to turn off, because they have the greatest effect on system performance:
- Animate controls and elements inside windows
- Animate windows when minimizing and maximizing
- Animations in the taskbar
- Fade or slide menus into view
- Fade or slide ToolTips into view
- Fade out menu items after clicking
- Show shadows under windows
However, it’s probably a lot easier to just select Adjust for best performance at the top of the screen and then click OK. Windows 10 will then turn off the effects that slow down your system.
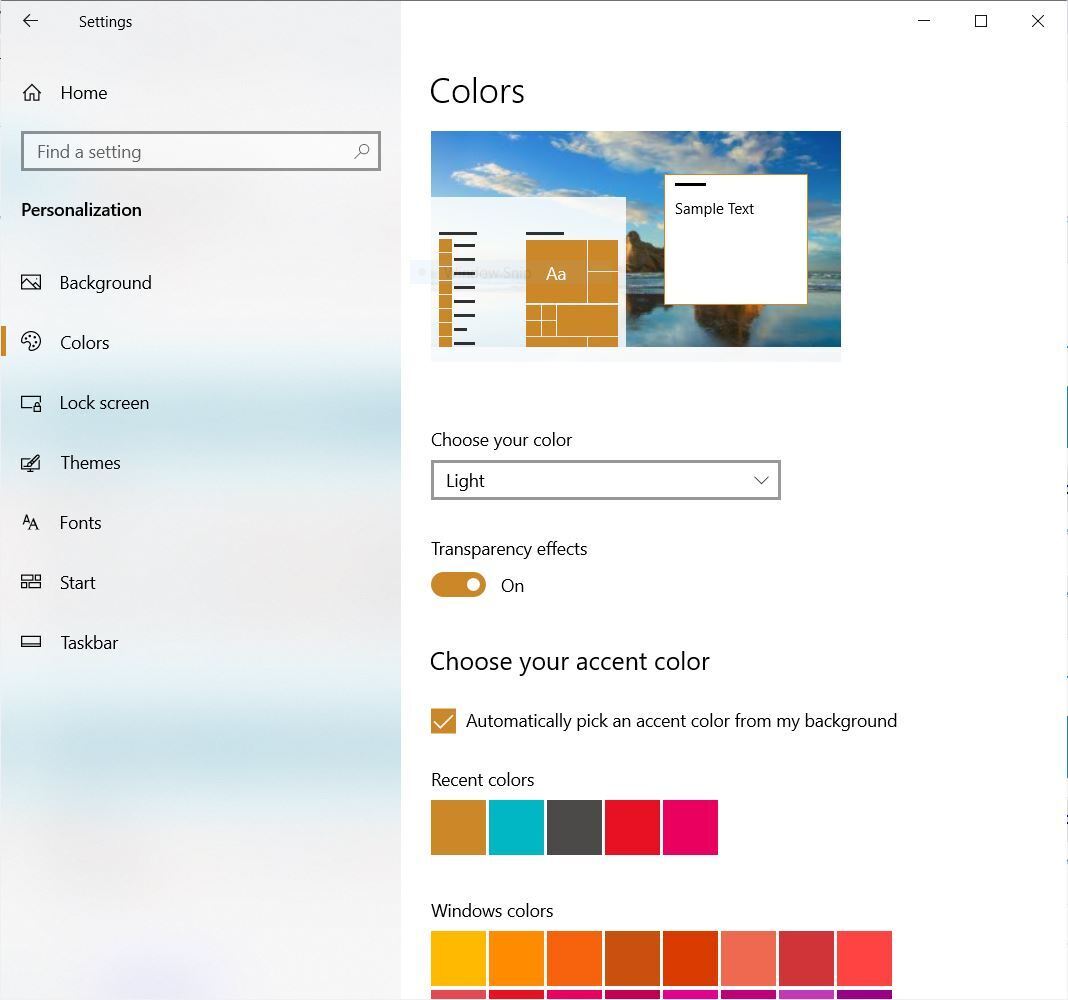
12. Disable transparencyIn addition to turning off shadows, animations, and visual effects, you should also disable the transparency effects that Windows 10 uses for the Start menu, the Taskbar, and the Action Center. It takes a surprising amount of work for Windows to create these transparency effects, and turning them off can make a difference in system performance.
To do it, from Settings, choose Personalization > Colors, scroll down to “Transparency effects” and move the slider to Off.
IDGTurning off Windows 10’s transparency effects can help speed up performance. (Click image to enlarge it.)
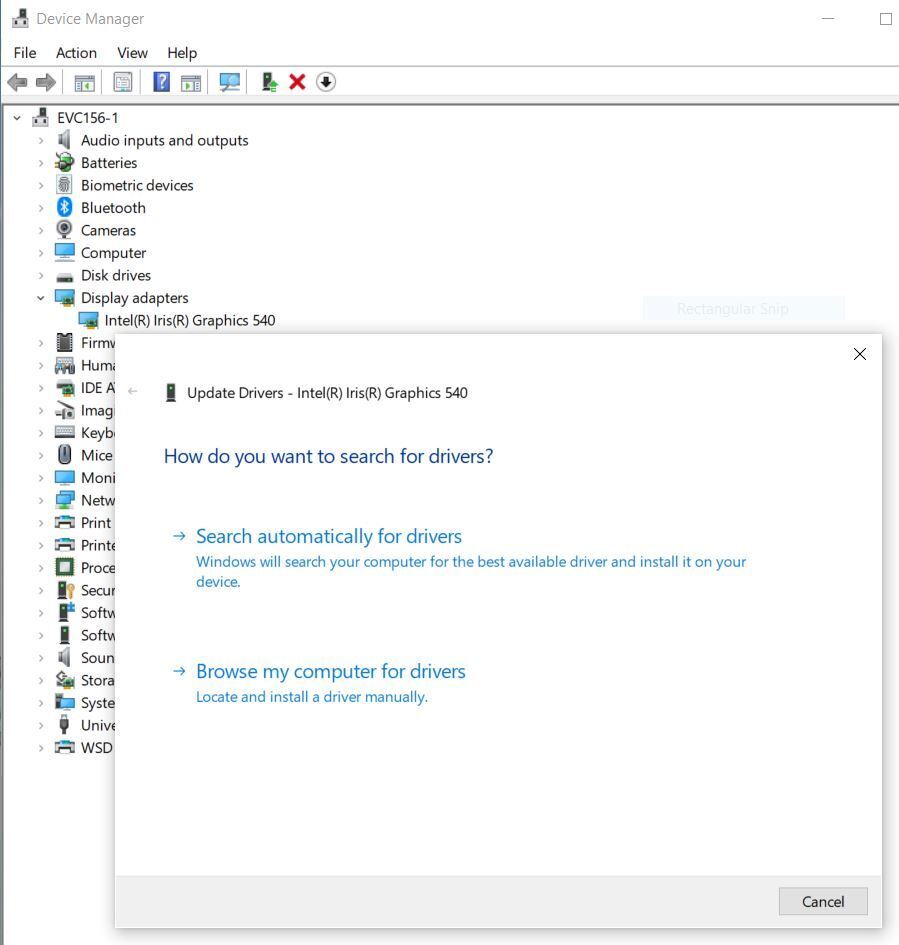
13. Update your device driversWindows 10 can take a big performance hit if it’s using outdated drivers. Installing the latest ones can go a long way towards speeding it up. Particularly problematic are graphics drivers, so those are the ones you should make sure to update. To do it:
- Type devmgmt.msc into the Search box and click the Device Manager icon that appears in the right pane.
- Scroll to the Display Adapters entry and click the side-facing arrow to expand it.
- Right-click the driver that appears.
- From the context menu that appears, select Update driver.
- You’ll be asked whether to have Windows search for an updated driver or if you want to find one and install it manually. Your best bet is to let Windows do the work. Follow the on-screen instructions to install the driver.
Updating your device drivers with the Device Manager can give Windows 10 a speed boost. (Click image to enlarge it.)
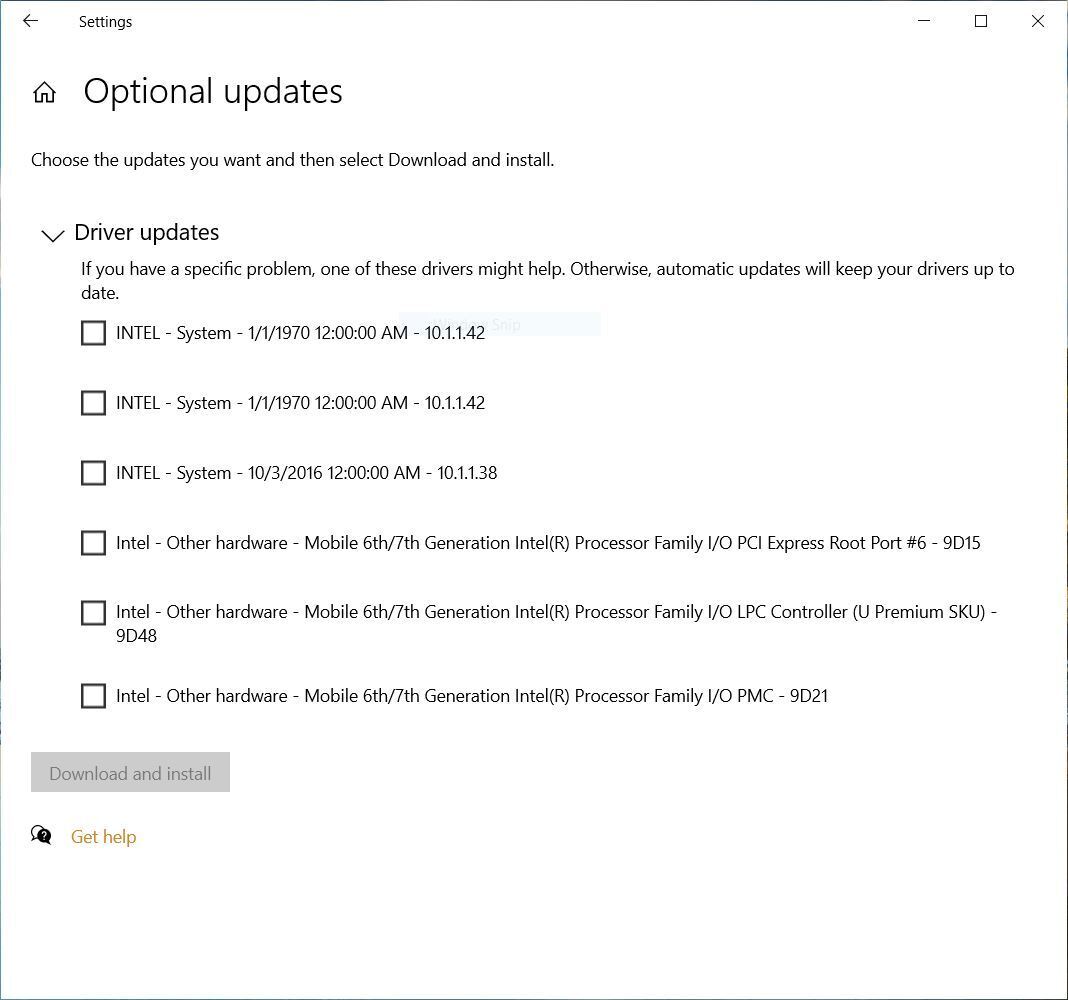
You can do this to update all your drivers, not just graphics-related ones. It can take a while to do that one by one using the Device Manager, so you might want to use Windows Update to do it for you instead.
- Launch the Settings app and select Update & Security > Windows Update.
- Select Advanced Options > View optional updates > Driver updates. A list of all driver updates that Windows has found but hasn’t installed appears.
- Select any of the drivers you want to install and click Download & Install.
Windows Update finds drivers you might want to update. (Click image to enlarge it.)
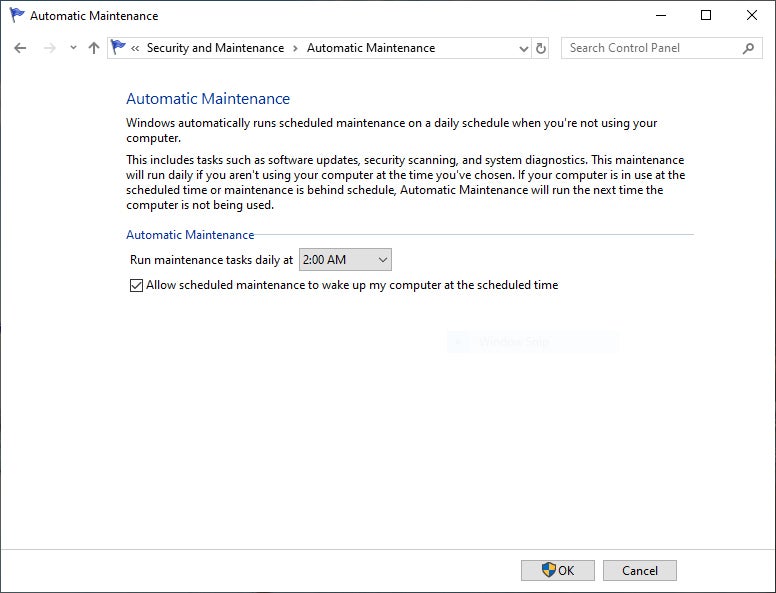
14. Turn on automated Windows maintenanceEvery day, behind the scenes, Windows 10 performs maintenance on your PC. It does things like security scanning and performing system diagnostics to make sure everything is up to snuff — and automatically fixes problems if it finds them. That makes sure your PC runs at peak performance. By default, this automatic maintenance runs every day at 2:00 a.m., as long as your device is plugged into a power source and is asleep.
There’s a chance, though, that the feature has been accidentally turned off or you haven’t had your PC plugged in for a while, so the maintenance hasn’t been done. You can make sure it’s turned on and runs every day, and run it manually if you’d like.
Run the Control Panel app and select System and Security > Security and Maintenance. In the Maintenance section, under Automatic Maintenance, click “Start maintenance” if you want it to run now. To make sure that it runs every day, click “Change maintenance settings,” and from the screen that appears, select the time you’d like maintenance to run, and check the box next to “Allow scheduled maintenance to wake up my computer at the scheduled time.” Then click OK.
IDGYou can designate a time each day for Windows to run its maintenance tasks. (Click image to enlarge it.)
15. Kill bloatwareSometimes the biggest factor slowing down your PC isn’t Windows 10 itself, but bloatware or adware that takes up CPU and system resources. Adware and bloatware are particularly insidious because they may have been installed by your computer’s manufacturer. You’d be amazed at how much more quickly your Windows 10 PC can run if you get rid of it.
First, run a system scan to find adware and malware. If you’ve already installed a security suite such as Norton Security or McAfee LiveSafe, you can use that. You can also use Windows 10’s built in anti-malware app — just type windows security in the search box, press Enter, and then select Virus & threat protection > Quick Scan. Windows Defender will look for malware and remove any it finds.
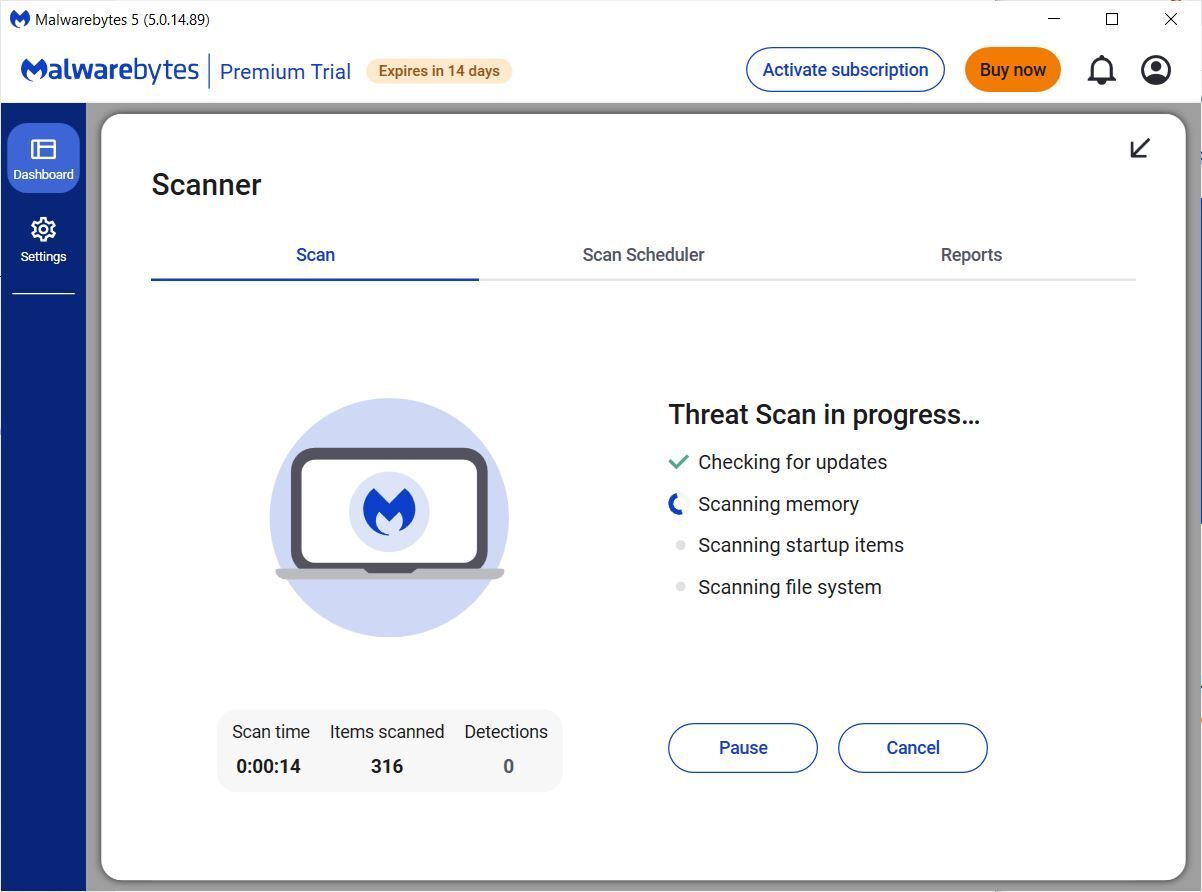
It’s a good idea to get a second opinion, though, so consider a free tool like Malwarebytes Anti-Malware. The free version scans for malware and removes what it finds; the paid version offers always-on protection to stop infections in the first place.
IDGMalwarebytes Anti-Malware is a useful application that will scan for and fix Windows 10 PC problems. (Click image to enlarge it.)
Now you can check for bloatware and get rid of it. A good program to do that is PC Decrapifier. And Should I Remove It? is a website that offers advice on what files may be malware or bloatware.
For more details about removing bloatware, check out Computerworld’s article “Bloatware: What it is and how to get rid of it.”
16. Defrag your hard diskThe more you use your hard disk, the more it can become fragmented, which can slow down your PC. When a disk gets fragmented, it stores files willy-nilly across it, and it takes a while for Windows to put them together before running them.
Windows 10, though, has a built-in defragmenter you can use to defragment your hard disk. You can even tell it to run automatically so it stays constantly defragmented.
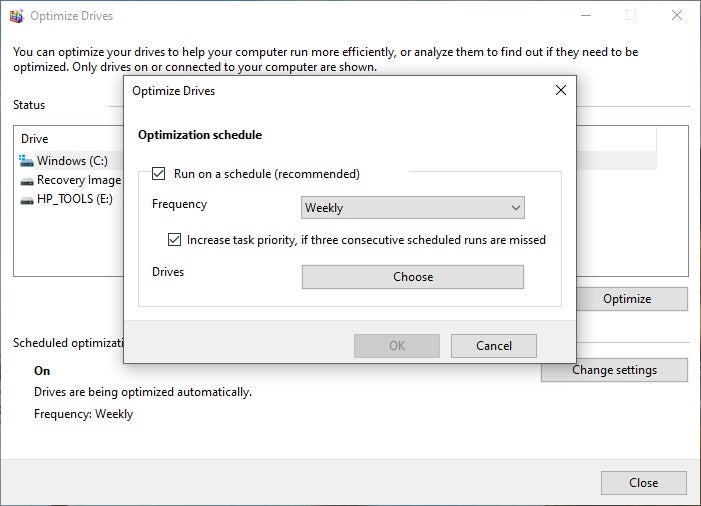
To do it, type defrag into the search box and press Enter. From the screen that appears, select the drive you want you want to defragment. Click the Optimize button to defragment it. Select multiple disks by holding down the Ctrl key and clicking each one you want to defragment.
If you want to have your disk or disks defragmented automatically, click the Change settings button, then check the box next to Run on a schedule. Now select the frequency at which you want the disk(s) defragmented by clicking the drop-down next to Frequency and selecting Daily, Weekly, or Monthly. (Weekly will be your best bet.) From this screen you can also choose multiple drives to defragment.
Note: If you have an SSD, defragging won’t offer any noticeable performance boost, and it could cause wear on the disk. So it’s not worth your while to defrag SSDs.
IDGYou can set Windows 10’s built-in disk defragmenter to run automatically on a schedule. (Click image to enlarge it.)
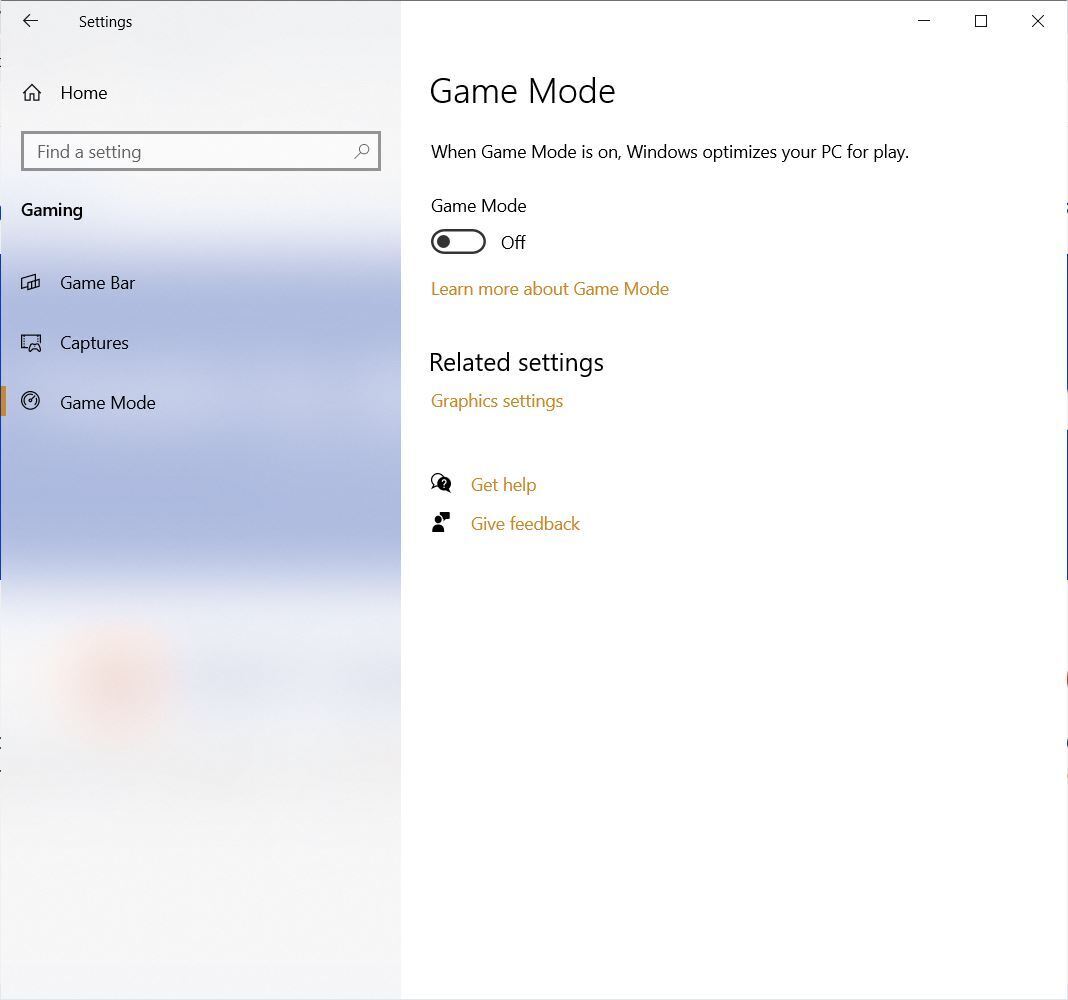
17. Disable Game ModeIf you’re a serious gamer, you probably know all about Game Mode, which optimizes your PC for playing games. That’s great for when you’re doing just that, but it can slow down your system when you’re not playing because it keeps some system resources in reserve in case you start playing a game and has occasionally been linked to stability issues. So turning off Game Mode can give your PC a quick boost. (You can always turn it back on again when you want to play a game.)
Game Mode is turned on by default, so even if you’ve never played a game on your PC, it’s probably enabled. To turn it off, go to Settings > Gaming > Game Mode and move the Game Mode slider to Off.
IDGTurning off Game Mode can give your PC an instant boost. (Click image to enlarge it.)
18. Shut down and restart WindowsHere’s one of IT’s not-quite-secret weapons for troubleshooting and speeding up a PC: Shut it down and restart it. Doing that clears out any excess use of RAM that otherwise can’t be cleared. It also kills processes that you might have set in motion and are no longer needed, but that continue running and slow your system. If your Windows 10 PC has turned sluggish over time for no apparent reason, you may be surprised at how much more quickly it will run when you do this.
Try just some of these tricks, and you’ll find that you’ve got a faster Windows 10 PC — and one that is less likely to have any reliability problems.
This article was originally published in February 2016 and most recently updated in December 2023.
Computers, Microsoft, Small and Medium Business, Windows, Windows 10
Kategorie: Hacking & Security
Google adds a premium option for Chrome Enterprise
Google has rolled out a premium tier for Chrome Enterprise, offering additional security features for the popular web browser.
Google launched Chrome Enterprise in 2017 as a business-focused edition of its Chrome browser with built-in management features for IT admins and security teams. On Tuesday, Google unveiled Chrome Enterprise Premium, promising enhanced security with features not available in the core version.
This includes malware deep scanning, data loss prevention, the ability to filter URLs based on website category, and “context-aware access controls” that help enforce zero-trust access to cloud applications. There are also additional controls that enable admins to enforce enterprise policies and manage software updates, Google said.
The growth in remote work has created new challenges around endpoint security, Parisa Tabriz, Google’s vice president for Chrome, said in a blog post, with businesses forced to contend with variety of employee devices outside of an organization’s managed fleet. “As these trends continue to accelerate and converge, it’s clear that the browser is a natural enforcement point for endpoint security in the modern enterprise,” she said.
Indeed, with many business apps running in the cloud, the browser is becoming the entire endpoint environment for many end users, said Phil Hochmuth, research vice president for endpoint management and enterprise mobility for IDC. The new features will allow IT and security teams to manage browsers “like a PC endpoint,” he said, “allowing for granular access control, data protection and usage polices to be applied to the Enterprise Chrome browser environment separately from the underlying hardware device.”
When managed-device-level security can be enforced at the browser level, he said, it’s possible to extend corporate apps and data access to more types of users, including remote or contract workers with BYOD endpoints. “It can help workers become more productive with a more flexible, but secure and managed, computing environment,” said Hochmuth.
Chrome Enterprise Premium is generally available now, with prices starting at $6 per user, per month.
Browser Security, Chrome, Enterprise Applications, Google, Vendors and Providers
Kategorie: Hacking & Security
Jamf brings powerful new compliance tools to Apple IT
As Apple becomes more deeply embedded in increasingly regulated enterprises, IT needs new tools for security compliance to keep their fleets in shape. Jamf introduced a batch of solutions to achieve this at a special event this week. I spoke again with Michael Covington, vice president of portfolio strategy at Jamf, to learn more about what the company has made available.
“We see organizations of all sizes struggle to establish good security hygiene for their Apple devices,” Covington said. “Our research shows 39% of organizations operate at least one device with known vulnerabilities, so improving basic endpoint configuration is low hanging fruit for security teams, and it can significantly improve their overall risk posture.”
What has Jamf introduced?Jamf announced the following:
- A Compliance Dashboard in Jamf Protect that lets admins monitor their fleet against CIS benchmarks.
- The new Compliance Editor in Jamf Pro that lets admins deploy configuration files to bring mobile device in line with CIS benchmarks. This makes it easy for admins to select a baseline security standard and push it to all users. The idea is that organizations can ensure their fleets are compliant with relevant security standards.
- Jamf Routines, a new Jamf Pro tool that offers new no-code automations and integrations, such as between Jamf and Slack or Teams. This helps keep those devices in compliance with security benchmarks.
- App Version Control within App Installers, which puts admins in charge of app deployments and upgrades. Typically, some admins might want to test new application software updated across small groups before approving installation across the company. This tool helps them do that.
The company also introduced a new Privilege Elevation tool in Jamf Connect for Macs. This lets IT assign admin privileges to users on a temporary basis. Covington explained what this is for: “There are many scenarios where a user could benefit from having ‘admin’ privileges, but granting permanent access presents a real security risk, both because of the damage that could be done accidentally and because of the risk of credential compromise with an active attacker.”
At the same time, a lack of admin access can be challenging. “System updates like adding a printer, installing a third-party app, or changing various settings are all fairly routine and benign, but may be unavailable when the organization enforces the principle of least privilege,” he said. “Privilege Elevation enables end users to receive elevated privileges on-demand, without requiring ad-hoc IT intervention. When scoped with this feature, users will be able to temporarily acquire local admin rights for a configurable amount of time. The feature includes safeguards and audit trails to reduce misuse and monitor for compliance.”
On Apple Watch and Vision Pro in businessFrom the thousands who took an interest in an earlier plea for device management support in Vision Pro and Apple’s subsequent introduction of such support, we know that plenty of businesses are now making use of iPhones, iPads, and Macs at work.
This extends to Apple Watch also, which is why Jamf now supports device management of that device. “We have seen some very clever solutions developed around the Apple Watch, with industries like aviation and medicine truly treating the device like a wearable computer instead of a timepiece,” Covington said. “Businesses that want to deploy the Apple Watch at scale will need management to do so. Jamf’s implementation is built on modern Declarative Device Management workflows and includes the ability for applications to utilize a secure enterprise VPN to access rich datasets.”
Covington confirmed his company is seeing its business clients begin to explore the potential of Vision Pro. He pointed to several industries — medical, education, field service and maintenance — already known to be using the device, saying:
“The key to extracting maximum value from a device like the Vision Pro is to develop a transformational application for the business, which typically requires secure access to critical enterprise data. As new applications are developed and tested, organizations are finding that they must manage and secure these new devices just like every sanctioned device in the business.”
Apple in the enterpriseIt’s always good to get a reality check from Jamf concerning Apple’s enterprise markets. On the back of its success in mobile products and growing support for employee choice schemes, the company has done a great job of building a bridgehead into the industry, supported by third parties such as Jamf.
“Apple has made some tremendous strides in the enterprise over the past several years,” said Covington. “Their strength was initially in mobility, with businesses choosing the iPhone to enable a mobile workforce. But that position has expanded to both line of business solutions (often build around iPad) and to primary compute (with the MacBook becoming a de facto device choice for many users).”
The result (as regular readers may already recognize) is that, “Apple’s devices are no longer for niche use cases or hyper-specific user groups. They are now used to empower work in all corners of the business. With the recent introduction of enterprise support on both Apple Watch and the Vision Pro, it will be interesting to see what new enterprise use cases emerge for Apple to tackle in the future.”
Covington also confirmed the introduction of Apple Silicon chips in Macs helped spur interest across the enterprise, saying Jamf has seen the move accelerate employee choice programs. “Apple continues to outpace rivals with the overall compute experience they are offering professionals, with amazing hardware that comes to life through tightly integrated software, applications, and services,” he said.
Please follow me on Mastodon, or join me in the AppleHolic’s bar & grill and Apple Discussions groups on MeWe.
Apple, Enterprise Applications, Enterprise Mobile Management, iOS, IT Management, IT Operations, Vendors and Providers
Kategorie: Hacking & Security
'eXotic Visit' Spyware Campaign Targets Android Users in India and Pakistan
An active Android malware campaign dubbed eXotic Visit has been primarily targeting users in South Asia, particularly those in India and Pakistan, with malware distributed via dedicated websites and Google Play Store.
Slovak cybersecurity firm said the activity, ongoing since November 2021, is not linked to any known threat actor or group. It's tracking the group behind the operation under the
Kategorie: Hacking & Security
'eXotic Visit' Spyware Campaign Targets Android Users in India and Pakistan
An active Android malware campaign dubbed eXotic Visit has been primarily targeting users in South Asia, particularly those in India and Pakistan, with malware distributed via dedicated websites and Google Play Store.
Slovak cybersecurity firm said the activity, ongoing since November 2021, is not linked to any known threat actor or group. It's tracking the group behind the operation under the Newsroomhttp://www.blogger.com/profile/[email protected]
Kategorie: Hacking & Security
Raspberry Robin Returns: New Malware Campaign Spreading Through WSF Files
Cybersecurity researchers have discovered a new Raspberry Robin campaign wave that has been propagating the malware through malicious Windows Script Files (WSFs) since March 2024.
"Historically, Raspberry Robin was known to spread through removable media like USB drives, but over time its distributors have experimented with other initial infection vectors," HP Wolf Security researcher Patrick
Kategorie: Hacking & Security
Raspberry Robin Returns: New Malware Campaign Spreading Through WSF Files
Cybersecurity researchers have discovered a new Raspberry Robin campaign wave that has been propagating the malware through malicious Windows Script Files (WSFs) since March 2024.
"Historically, Raspberry Robin was known to spread through removable media like USB drives, but over time its distributors have experimented with other initial infection vectors," HP Wolf Security researcher Patrick Newsroomhttp://www.blogger.com/profile/[email protected]
Kategorie: Hacking & Security
Canonical launches Ubuntu Pro for IoT Devices
Canonical has launched Ubuntu Pro for Devices , a comprehensive offering emphasizing security and compliance for IoT device deployments. This initiative aims to provide 10 years of security maintenance for Ubuntu and thousands of open-source packages, along with device management capabilities through Landscape , a systems management tool by Canonical. Ubuntu Pro also ensures that IoT devices receive reliable security patches from a trusted source.
Kategorie: Hacking & Security
- « první
- ‹ předchozí
- …
- 7
- 8
- 9
- 10
- 11
- 12
- 13
- 14
- 15
- …
- následující ›
- poslední »


